
Author:
Željko Jagušt
Publish Date:
November 6, 2023
Estimated Reading Time:
15 minutes
Unlock the full potential of your Debian Linux desktop with our in-depth GNOME customization guide. If you’re looking to tailor your user experience to your preferences, you’ve come to the right place.
Introduction
In this article, we’ll walk you through the art of Debian GNOME customization, offering expert tips, tweaks, and insights to make your desktop truly your own. Dive into the world of Linux desktop personalization and transform your Debian experience today.
Prerequisites
For this guide, an installation of the Debian operating system with GNOME Desktop Environment is required. You can download the installation media with the live installer on the Debian LIVE ISO download page (download the ISO with GNOME included). Once you boot from it, you will notice the “Install Debian” icon you should click on to start the installation. From there, a guided graphical installer will start, which will lead you through the operating system installation.
You can also follow our guides below for a more “finely-grained” installation of Debian Desktop—whatever suits you best.

Debian 11 Server – Minimal Installation Guide
Follow this guide for a Debian 11 Server minimal installation, providing a solid foundation for any server setup or project you want to build.

Debian 11 Server – Initial Customization Guide
Discover introductory steps to streamline performance, security, and administration in our Debian Server Initial Customization guide.

Install GNOME Desktop Environment on Debian – Easy Guide
Discover the GNOME Desktop Environment elegance and modern features. Follow our Debian installation guide for a seamless experience.
GNOME Customization Resources
A few software packages must be installed before starting with GNOME customization. We will also show you how to add all the resources required to fully customize your GNOME interface, including a GTK4 theme, GNOME Shell theme, icons pack, wallpaper, and user profile picture.
Required Software
If you followed our guides from the prerequisites section, you should already have installed most of the software required for this guide. You can also check our Debian Recommended Applications guide as an optional reading. Nevertheless, you can run the command below in the terminal to make sure everything required is really installed:
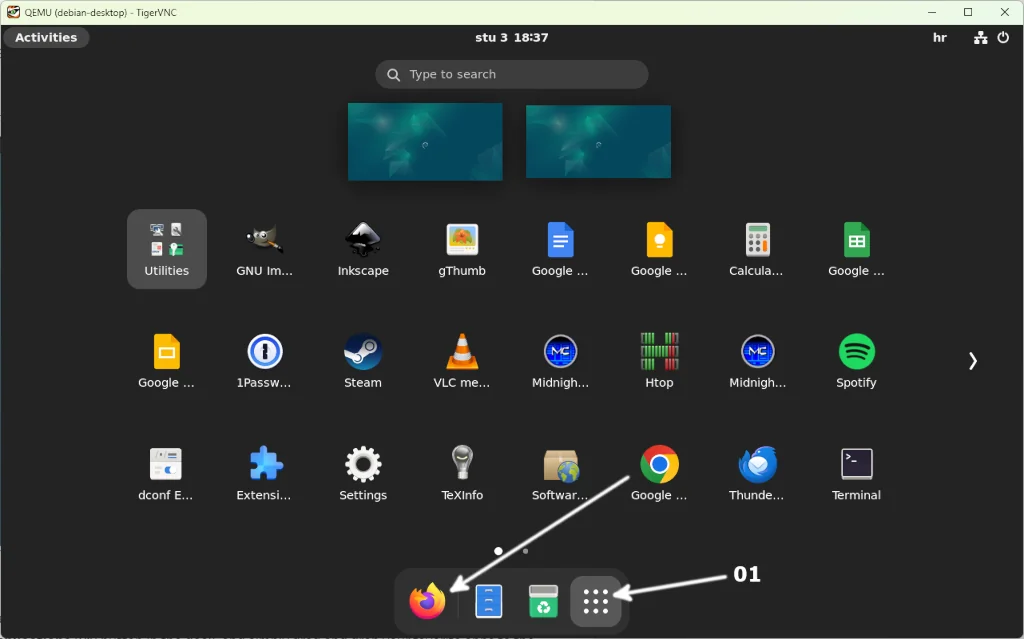
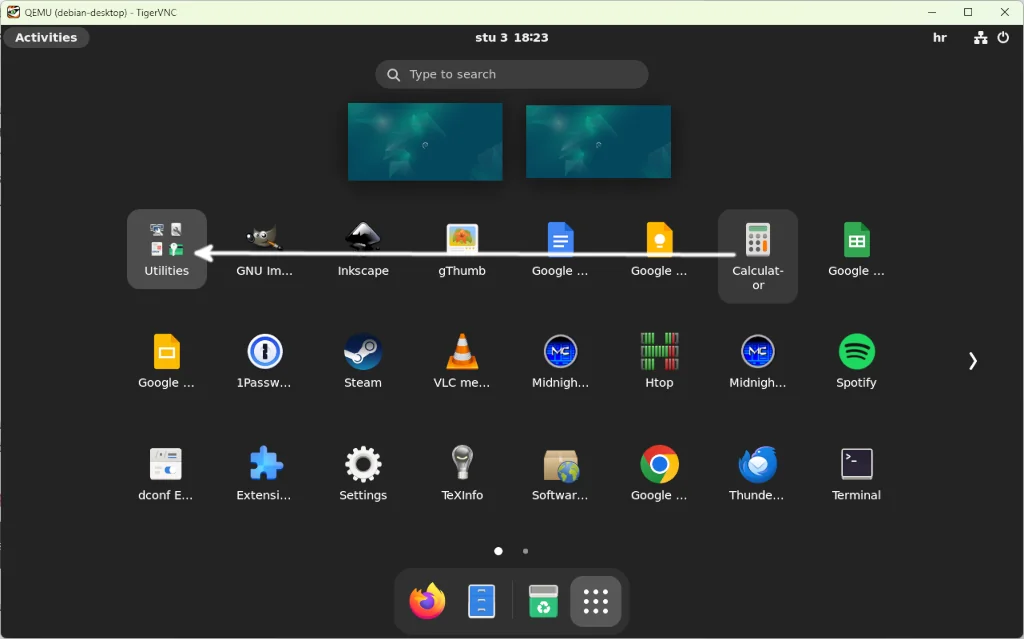
sudo apt install -y --no-install-recommends chrome-gnome-shell gnome-shell-extension-dashtodock gnome-shell-extension-manager gnome-shell-extensions gnome-shell-extensions-extra gnome-tweaks conky-all mpd lua5.4 jq imagemagickOptionally, you can also install the “Just Perfection” extension. It needs to be installed in Extension Manager, so if you opt for it, click on Show Applications (01) followed by Extension Manager (02):

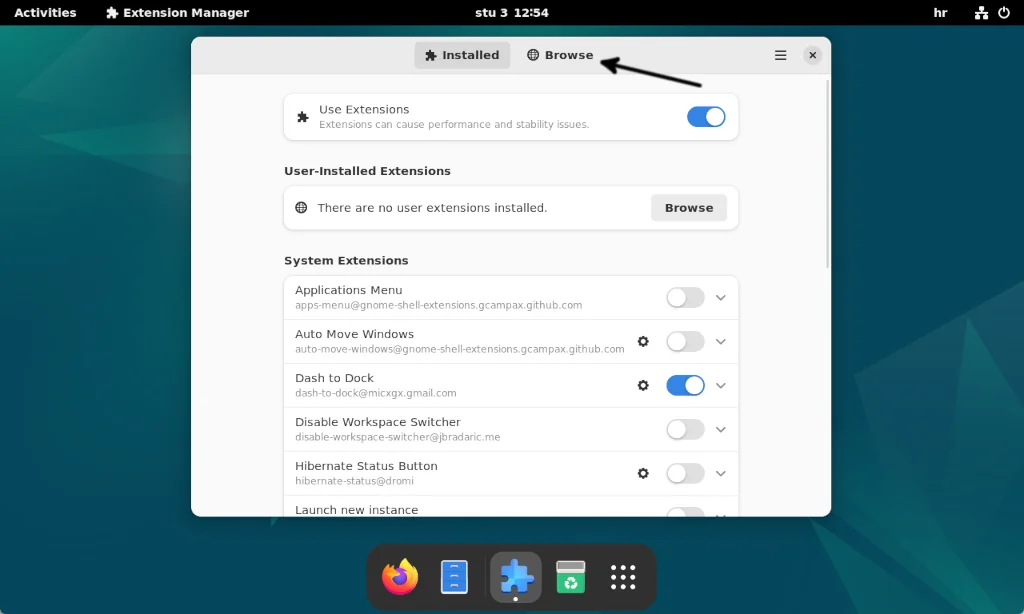
In Extension Manager, please click on the Browse button:
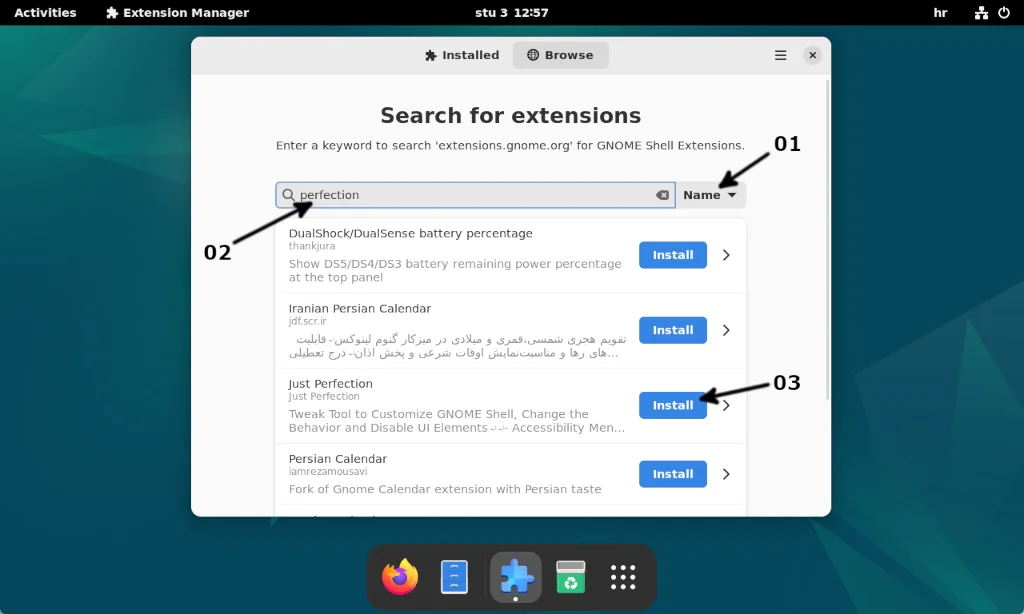
Click on the sort button, select Name (01), and type “perfection” in the search box (02). Once the results are listed, click on the Just Perfection extension Install button (03):
All the required directories for resources can be set here also, so please execute the following commands in the Terminal:
cd
mkdir .icons
mkdir .themes
mkdir .config/conky
Visual Resources
In this section, I will show you how to acquire all the resources required to “beautify” the GNOME interface. That includes a GTK4 theme, a GNOME Shell Theme, a Conky theme, a profile picture for your user, and some classy wallpaper.
You can use whatever you want for your profile picture or “avatar.” You can use the one you use for your social network profiles or similar. Regarding size, a square-shaped image of at least 250×250 pixels is required. The same rules apply to wallpaper: whatever you like. I have a huge 32″ wide-screen monitor, so I opted for a high-resolution (4K) wide-screen wallpaper. If you like the one I used in the featured image for this article (on top), you can find it here.
As for themes and icon sets, there is a huge selection available on the Pling website. I opted for the following:
- GTK4 Theme: Flat Remix GTK (Magenta variant)
- GNOME Shell Theme: Flat Remix GNOME/GDM (Magenta variant)
- Icons Theme: Flat Remix ICON Theme (Magenta variant)
- Conky Theme: Graffias Conky Theme (Dark variant)
You can save everything to your Downloads folder and then extract everything there by right-clicking on the package followed by Extract:

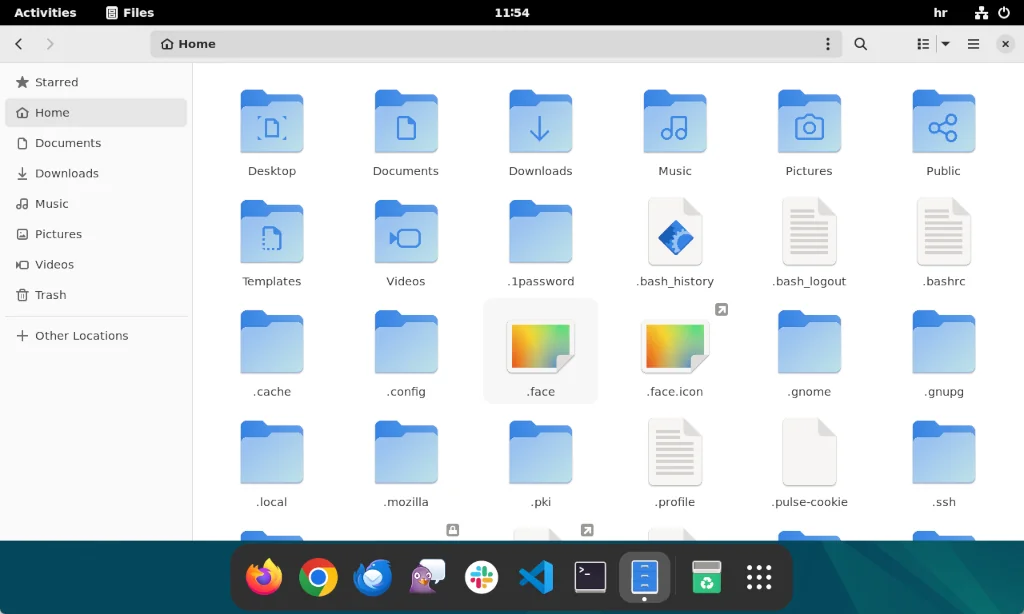
Once the packages are extracted, all the content must be moved to their “resource” directories (created in the Resources section above). To do so, please go to your home folder and enable hidden files to display there by clicking on Ctrl+H key combo:
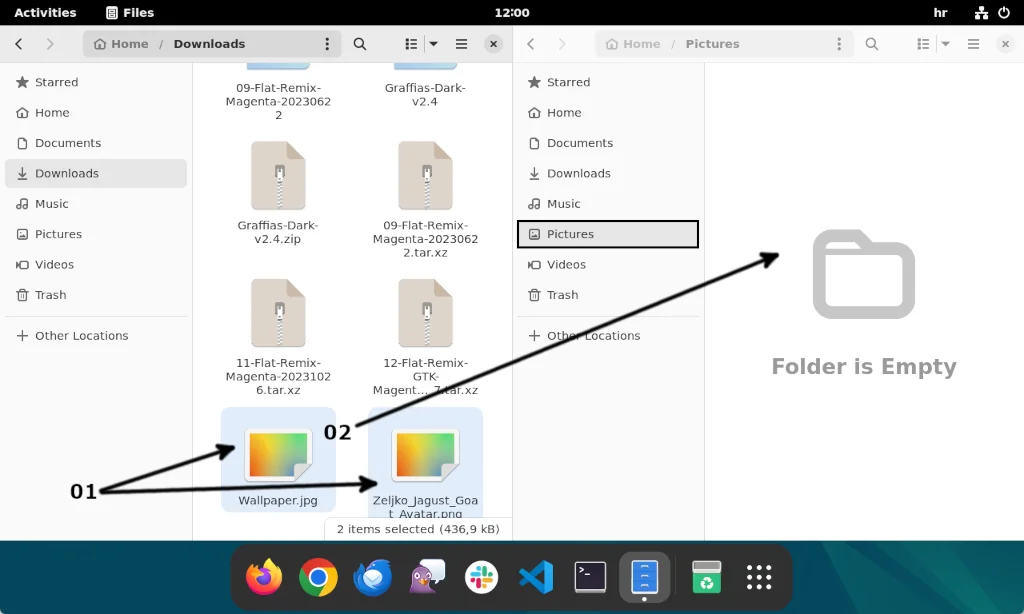
Move (drag and drop) the profile picture and wallpaper (01) into the Pictures folder (02):
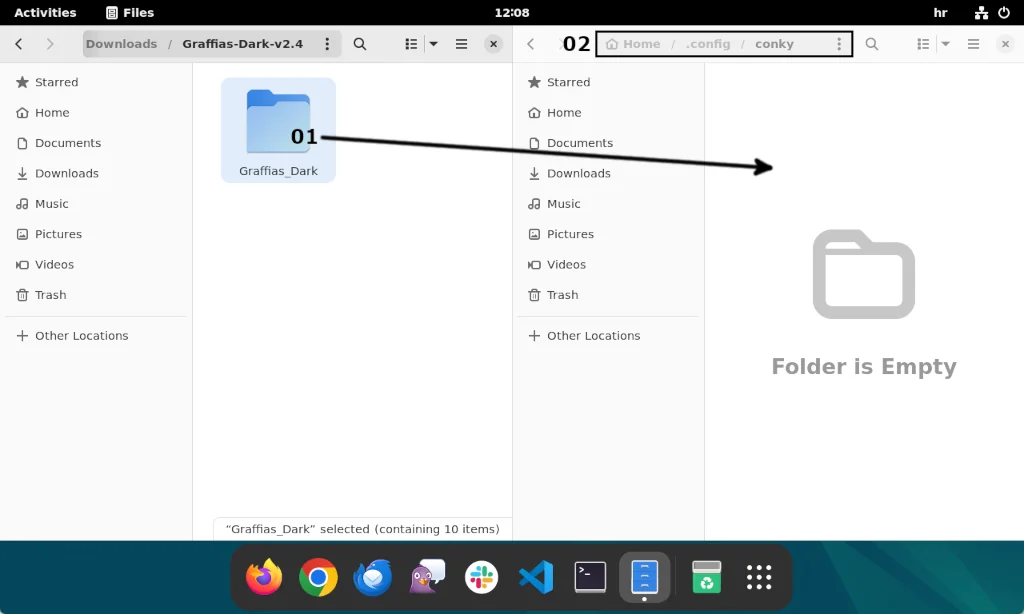
Go to a folder containing the Conky theme (01) and move it to the .config/conky directory (02):
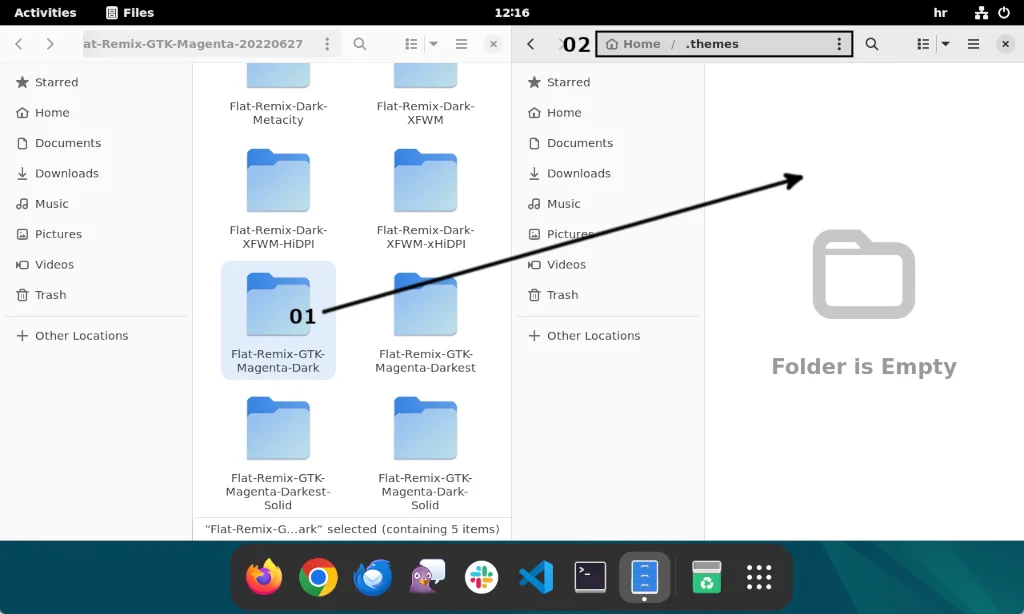
Do the same for the GTK, Gnome Shell, and Icons themes. Move the GTK theme folder (01) to the .themes folder (02):
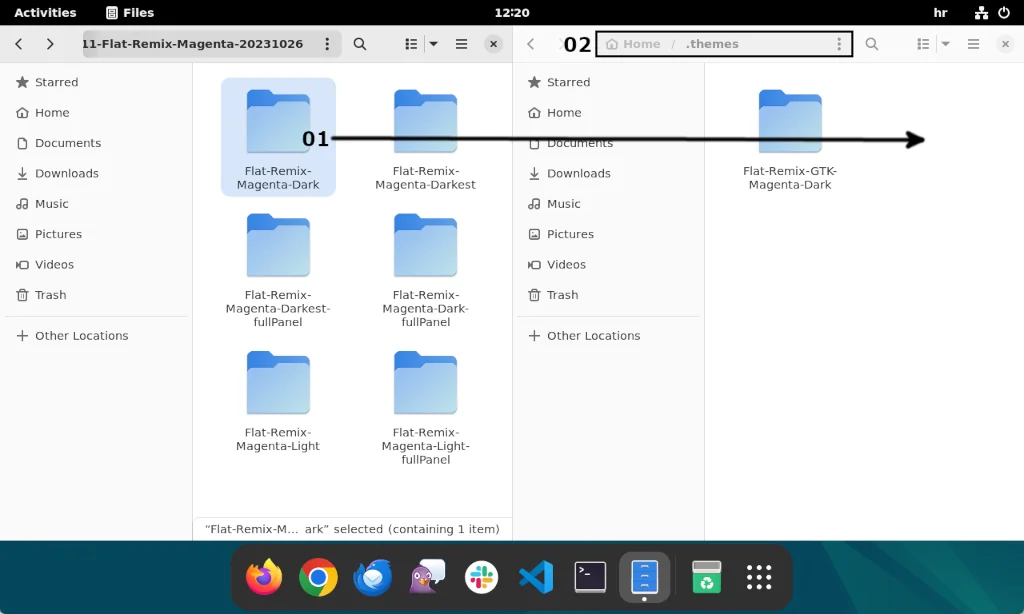
Gnome Shell theme folder (01) to the .themes folder (02):
Icons theme folder (01) to the .icons folder (02):
You can now delete everything that remains in the Downloads folder as it is not needed anymore.
GNOME Customization UI Settings
In this section, I will show you how to modify the basic user interface a bit and all the options present in the GNOME Settings and GNOME Tweaks applications.
Applications, Panel & Dock
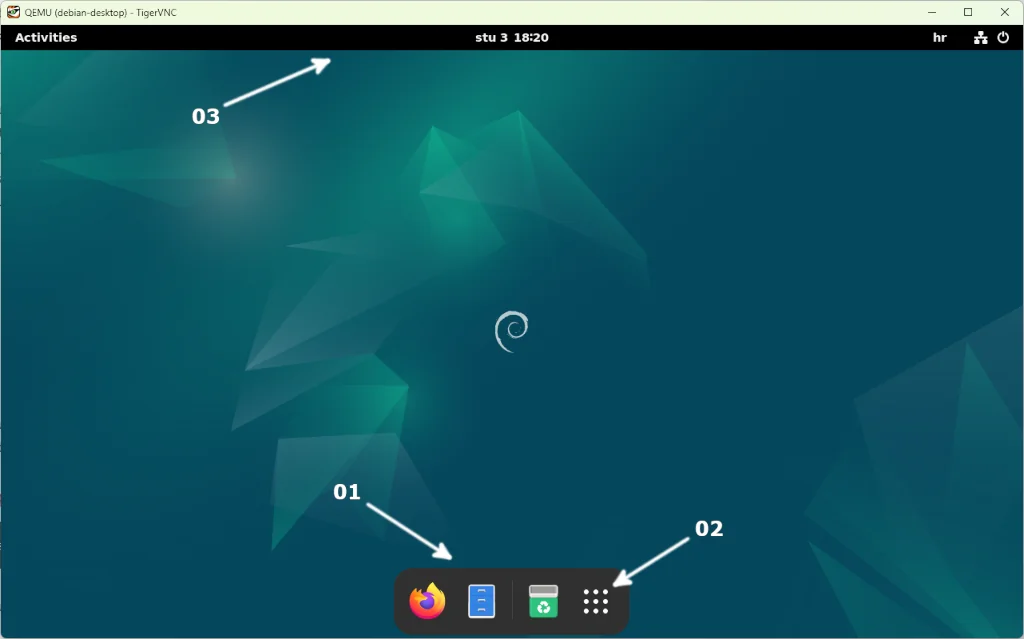
Basically, the GNOME desktop environment consists of 3 essential elements: Dock (01), Applications (02), and Panel (03):
The first thing you can do here is to add your favorite applications to the Dock, usually the ones you use the most. Click on the Applications (01) button in the dock, and simply drag and drop your favorite apps to the Dock:
Once you do that, you should have Dock populated with your favourite applications:

You can group rest of the applications by simply dragging and dropping them into logical groups:
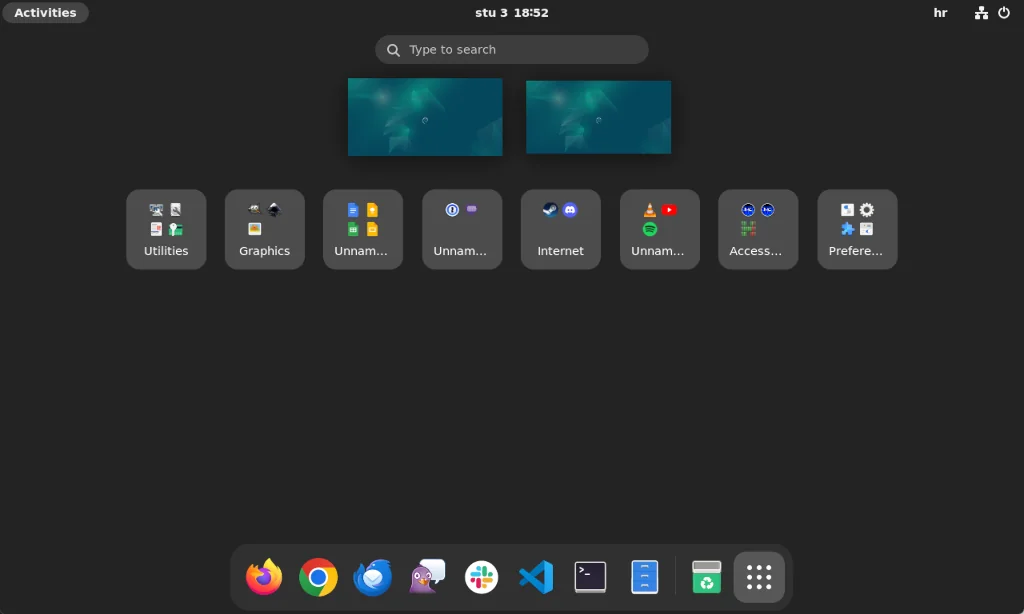
If you group all applications (something I like to do), you will have something similar shown in the picture below:
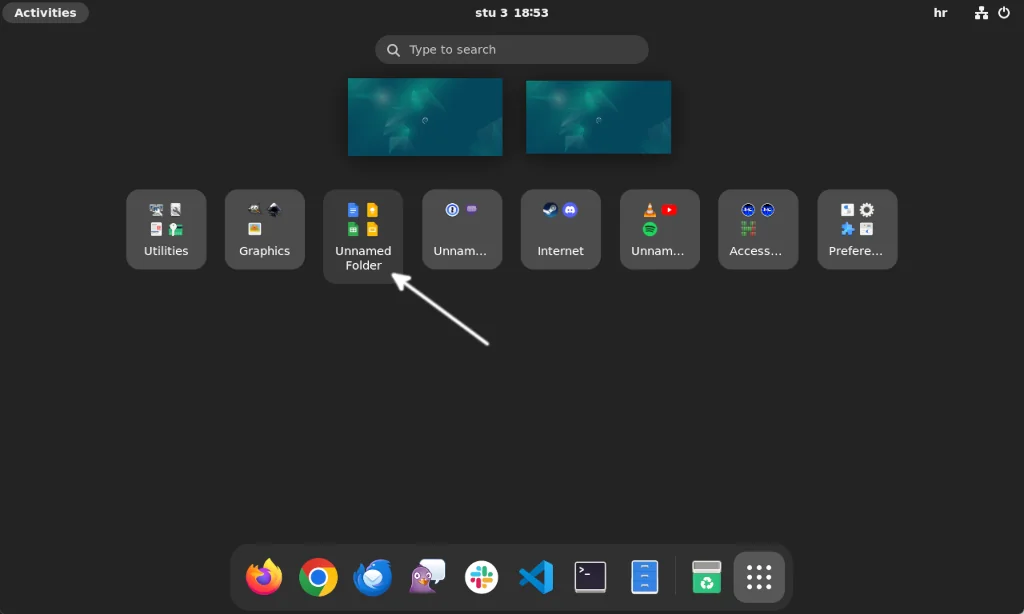
When grouping applications, several groups could end up without the name. You will notice an Unnamed Folder under the group without the name/title:
You can give that group a name by simply clicking on it, then click on the Edit button (01) and type in the desired name (02):
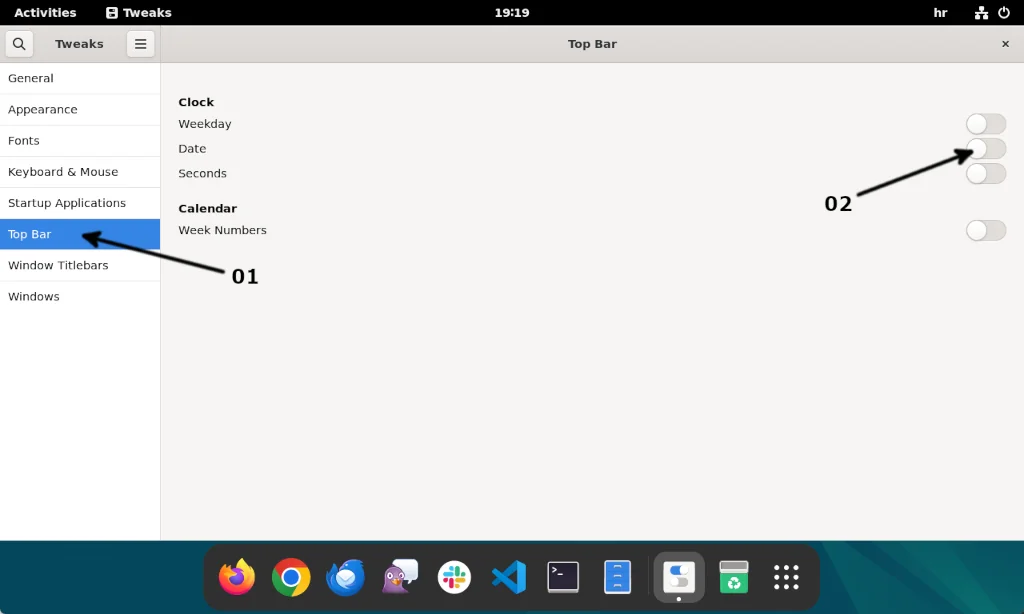
With the Dock and Applications sorted out, the only thing I like to do in the panel is to remove the date. To do so, open Gnome Tweaks, click on Top Bar (01), and turn off the date by clicking on the toggle button (02) next to it:
GNOME Settings
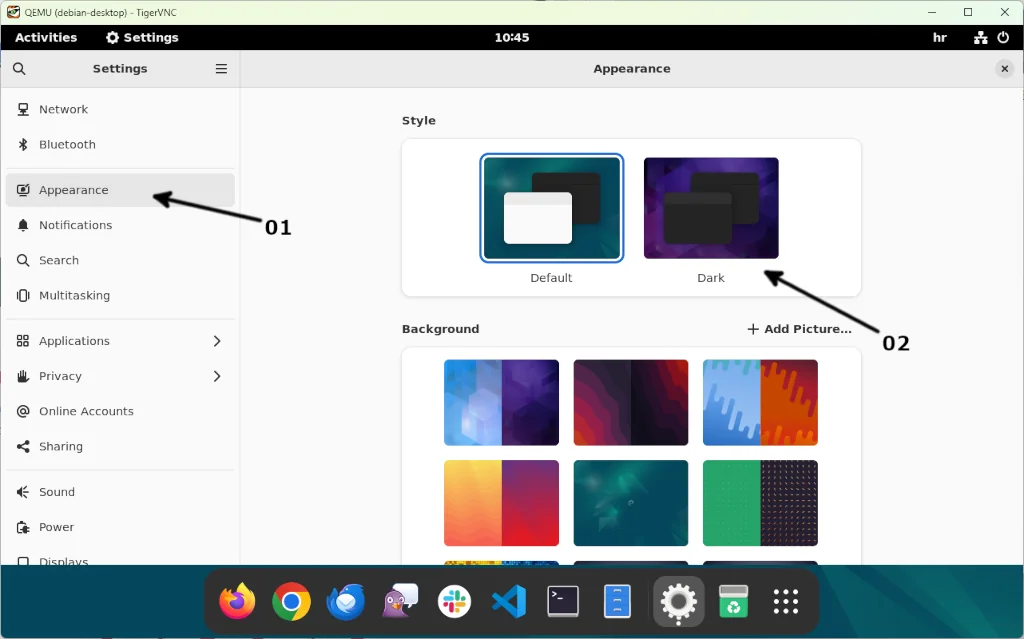
In this section, I am going to go through basic GNOME Settings. Settings can be accessed by clicking the Show Applications button in the Dock and then on Settings. The first thing I like to do there is change the style to dark. It is much more pleasant “for the eyes” when working long hours in the evening, and it will also save some battery time on laptops. You can do it by clicking on the Appearance (01) tab and then selecting Dark style (02):
The wallpaper can also be set here by clicking on the “+ Add Picture…” button and then browsing to the location where you have saved your wallpaper:

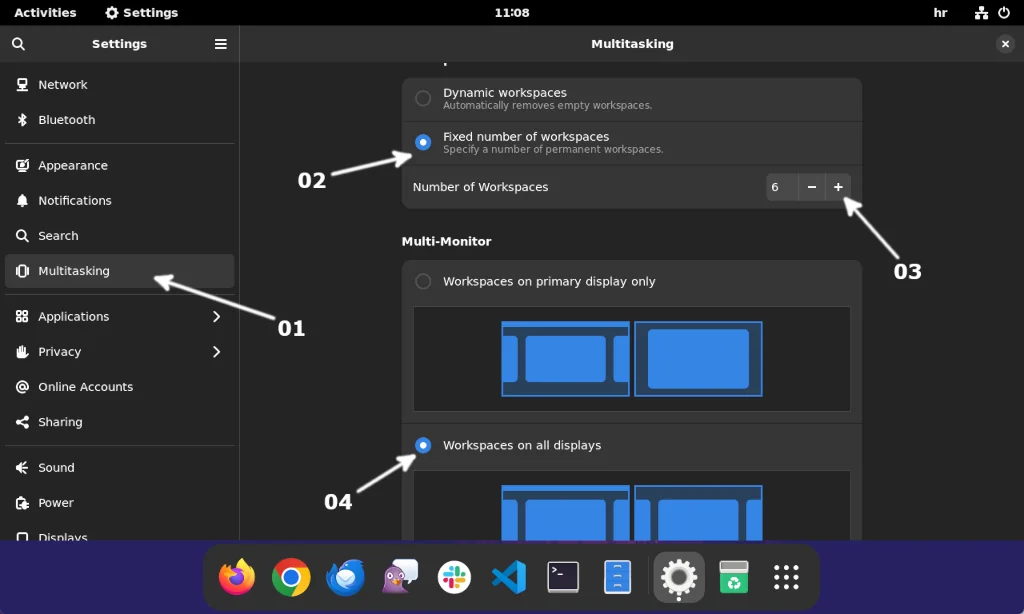
In the Multitasking tab(01), I prefer to reconfigure the workspaces a bit. Workspaces are a great feature that will allow you to have multiple “virtual monitors” where you can start different applications in each one. You can switch between them by hitting the “Ctrl+Alt+left/right arrow” key combo on your keyboard. I prefer to set a fixed number of workspaces(02), limit them to a maximum of 6(03), and make them visible on all monitors(04):
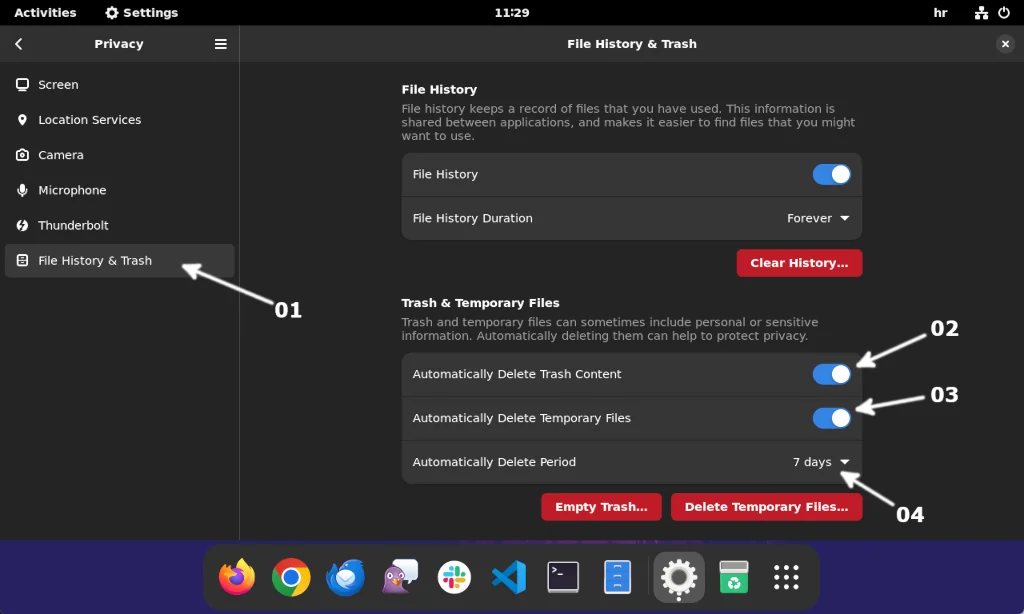
Regarding privacy (Privacy tab in GNOME Settings), I like to configure the automatic cleanup of Trash and temporary files. To do so, click on the File History & Trash tab(01), enable the automatic cleanup of Trash(02) and temporary files(03) and set the automatic cleanup schedule(04):
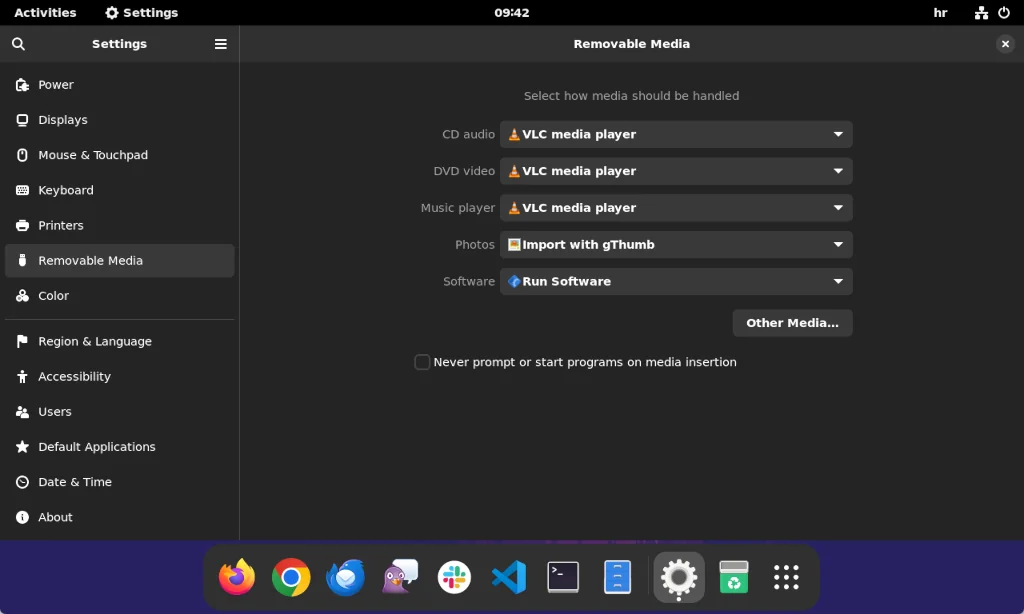
In Removable Media, you can specify how specific media will be handled. If you followed our guides from the prerequisites section, you can set everything up as in the picture below:
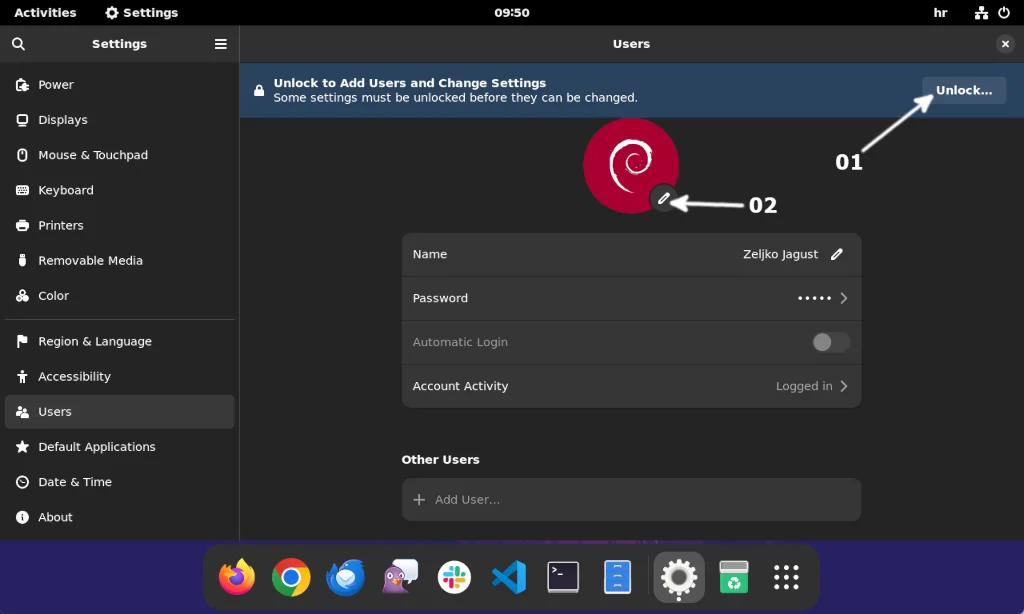
You can set your profile picture in the Users tab. You will first need to click on the Unlock button(01) and enter your login password. Then click on a pencil-like edit button(02) to set your profile picture:
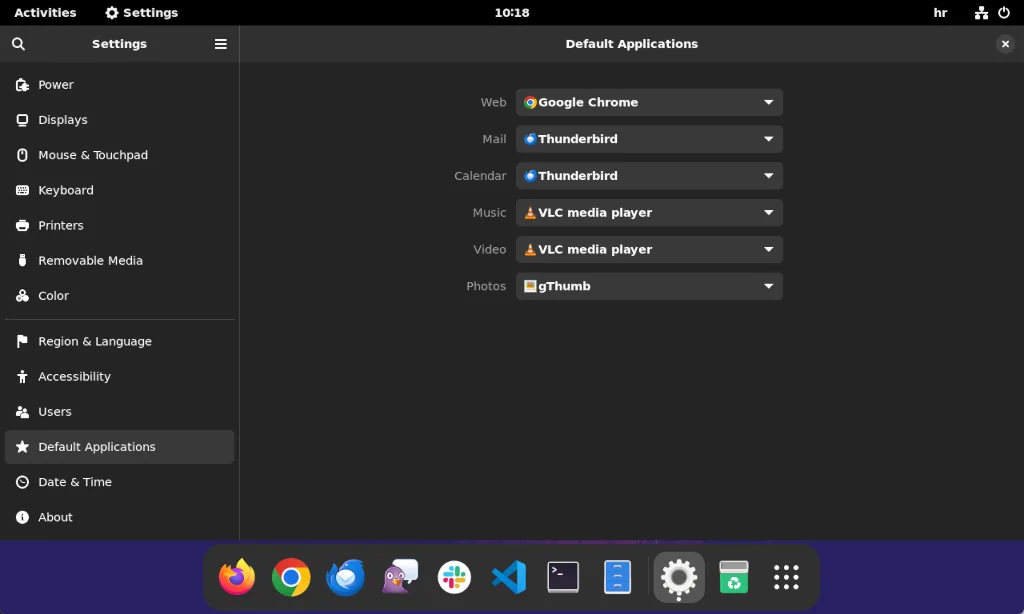
The last thing I like to do in Settings is to set default applications. This will depend much on what software you have installed on your Debian, but if you followed our prerequisite articles, the same options can be applied as in the picture below:
GNOME Extensions
In this section, I will show you how to extend GNOME features with the help of – extensions. With the use of the extensions, there are some excellent features you can enable in GNOME, and I highly recommend you give it a try.
If you followed our prerequisite articles, you should already have all the required extensions installed, so let’s get started. Click on the Show Applications button(01) in the Dock, and then search for Extension Manager(02):

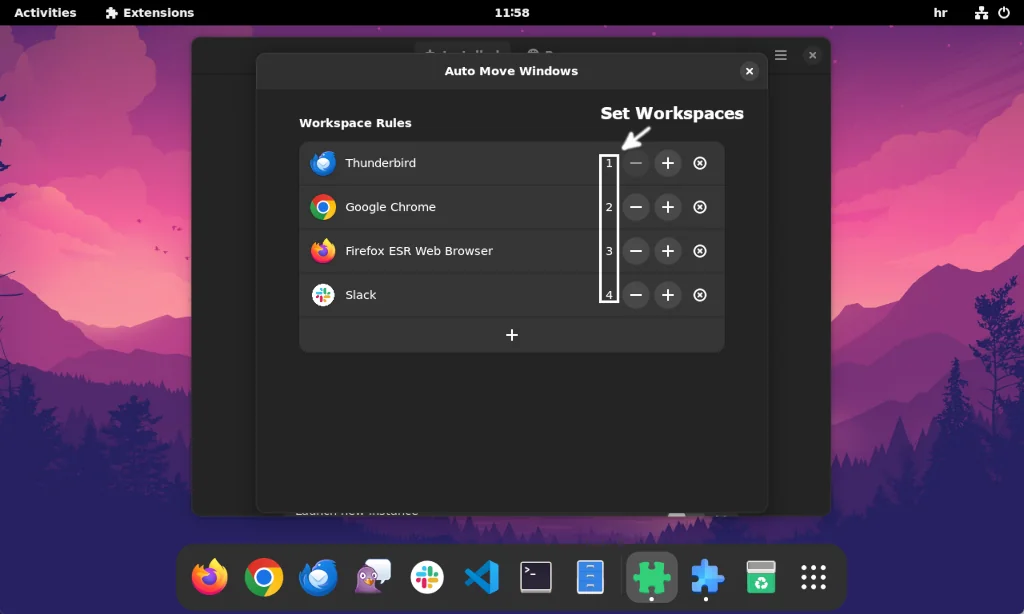
Auto Move Windows extension will allow you to start a specific application in a particular workspace. For instance, I use Thunderbird, Google Chrome, Firefox, and Slack regularly for my work. With the help of Auto Move Windows, I configured Thunderbird to start in Workspace 1, Google Chrome in Workspace 2, and so on.
To achieve the same, enable the extension(01) and click on “Gear” button(02) to configure it:
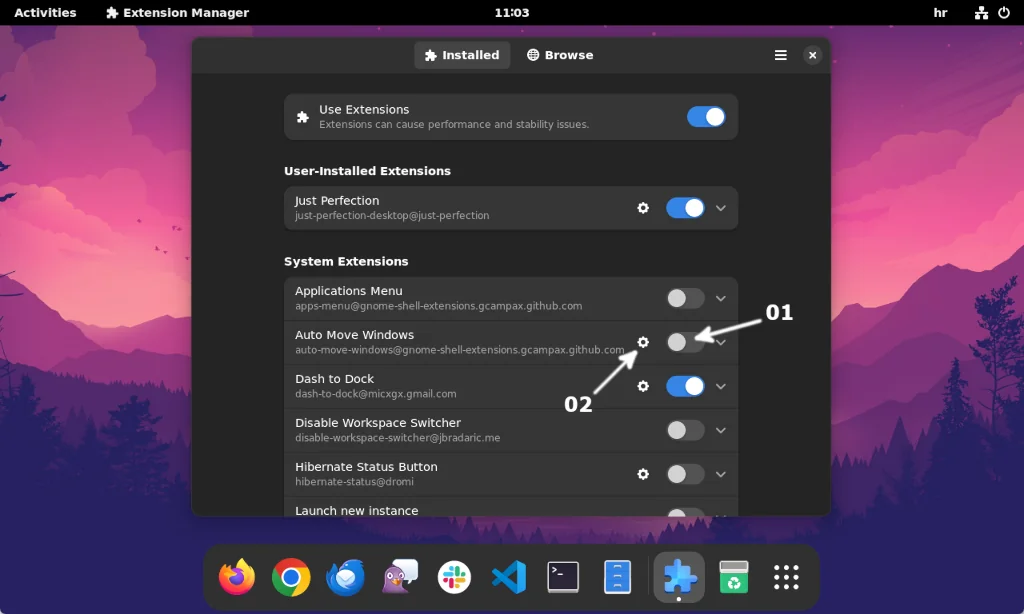
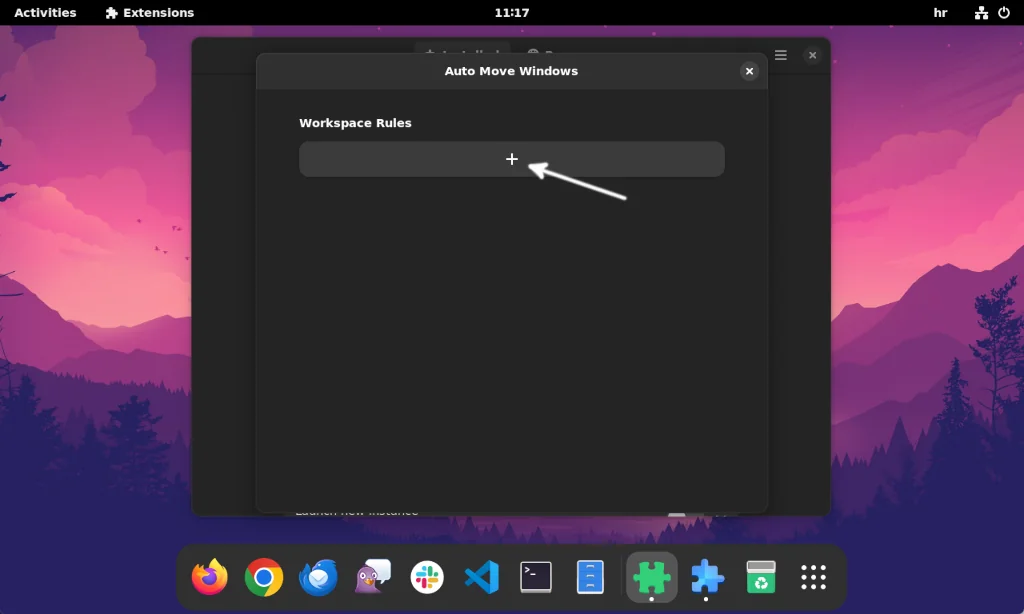
Now click on the “+” button to add a rule:
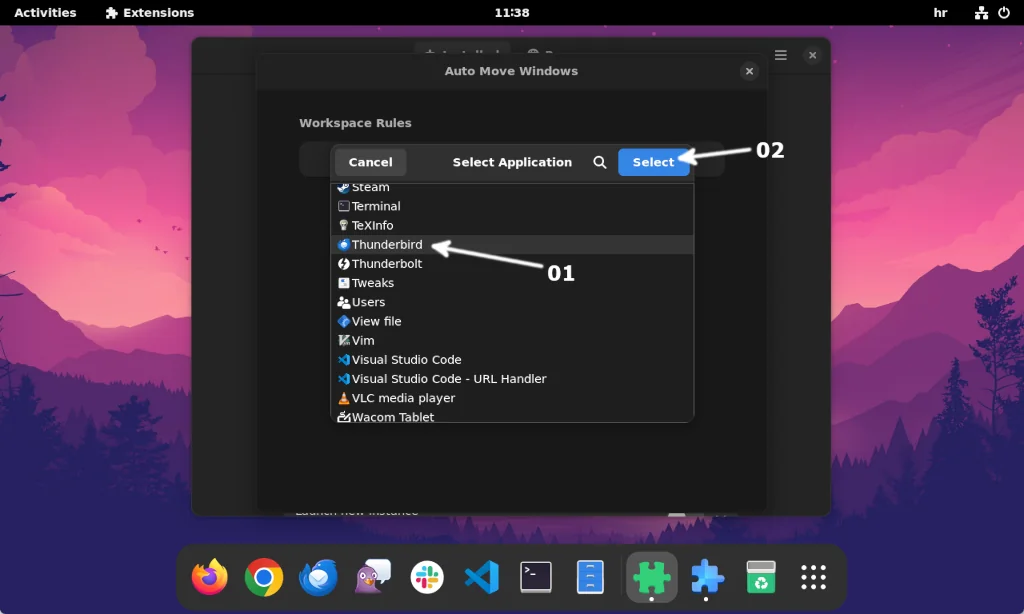
Select the desired application from the list(01), and click the Select button(02) to add it:
You can add the rest of the desired applications the same way. Once you do, you can use the “+/-” buttons to configure the workspace for each application:
Later in this guide, I will show you how to start those applications automatically (each in a configured workspace) at boot.
The next extension on the list is Dash to Dock. Click on the “gear” button to access it’s settings:
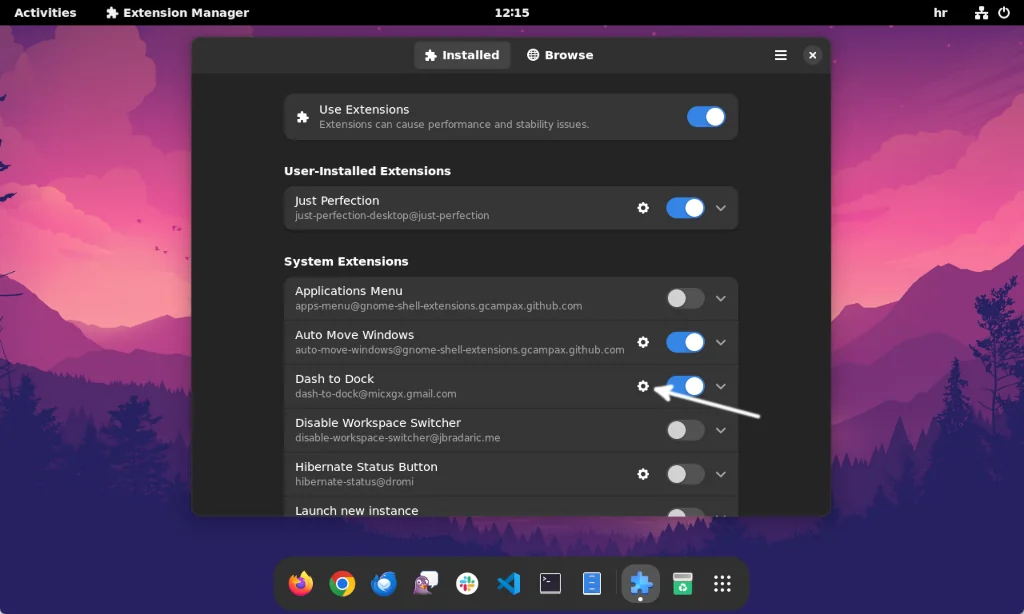
I like my dock icons to be a bit smaller than the default. To achieve this, I can scale them down(02) in the Position and size tab(01):
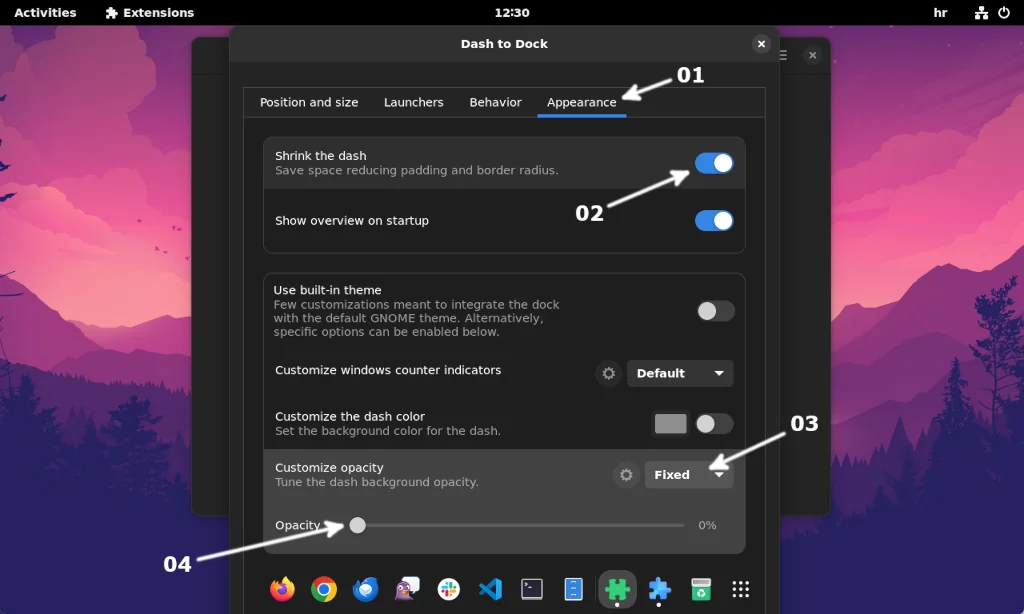
In the Appearance tab(01), I like to additionally shrink the size of the Dock(02), set fixed opacity(03), and lower it down completely(04) (make the Dock transparent):
There are a few more extensions I like to enable, starting with No overview at start-up(01). It will disable showing the “Activities” screen after you log in, and it will take you straight to your Desktop. User Themes(02) must be enabled so the GNOME Shell theme can be set (I will show you how later in this guide). I also like to enable Workspace Indicator(03) to see workspaces in the Panel(04). Optionally, you can also enable Screenshot Window Sizer, which will allow you to create custom-sized screenshots.

Please feel free to try other extensions also, as you may find a feature you like and I didn’t mention. Let me know in the comments.
GNOME Tweaks
Gnome Tweaks offers many options. This is where you can change your GNOME theme, icons, fonts, and many more, and I will show you how to do it. Once you start it, click on the Appearance tab(01), and this is where you can set icons(02), GNOME Shell theme(03), and GTK theme(04) (the ones you downloaded before), so please do so:

In the Fonts tab(01), you can adjust the fonts you want to use and their display sizes(02), and you can set antialiasing to be optimized for LCD screens(03):

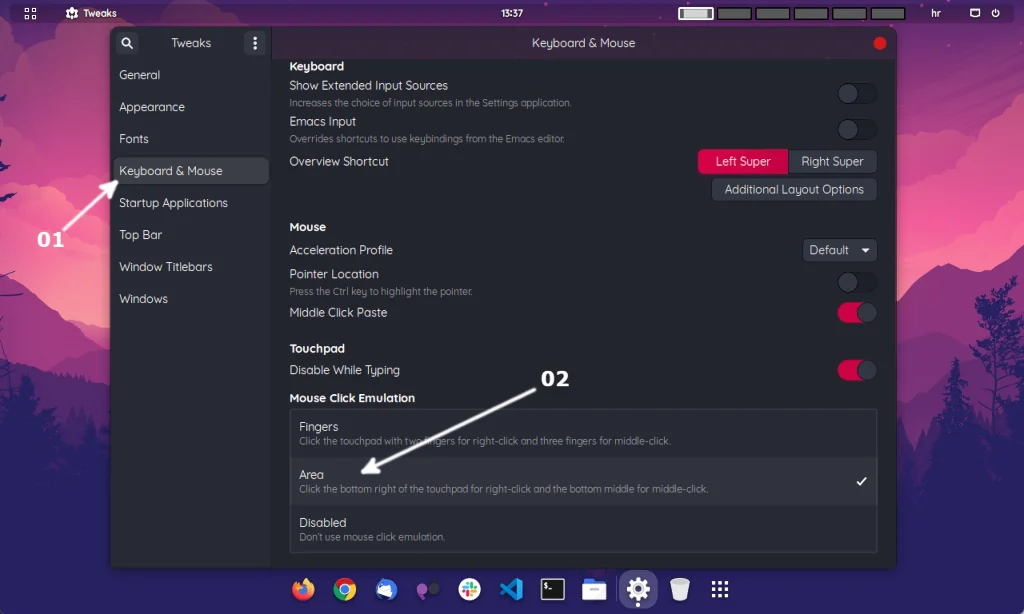
If you have a notebook, you can adjust the mouse emulation for your touchpad in the Keyboard & Mouse tab(01). I like to set it to Area(02) (see the picture below for the description):
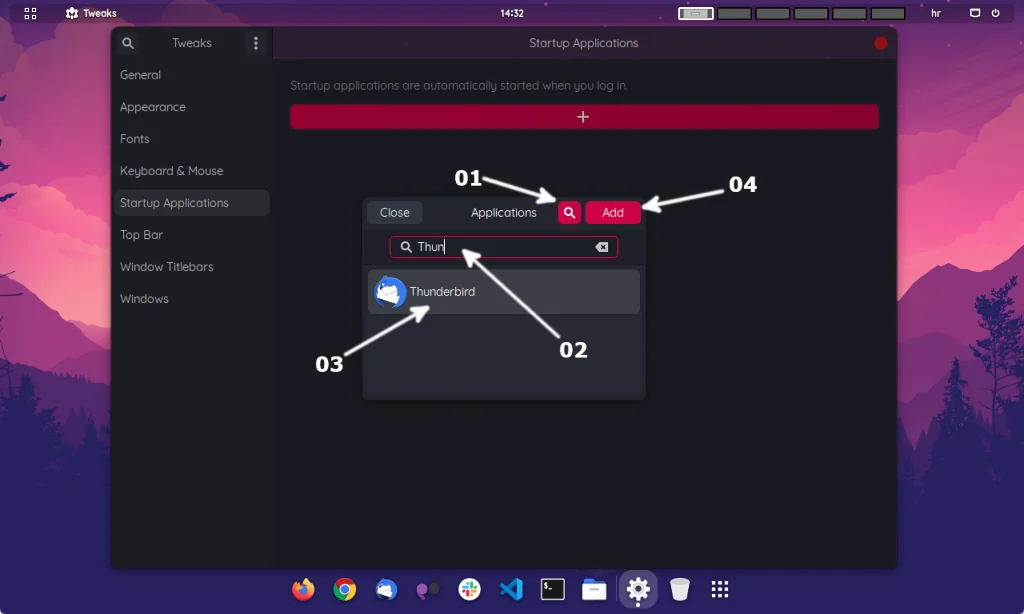
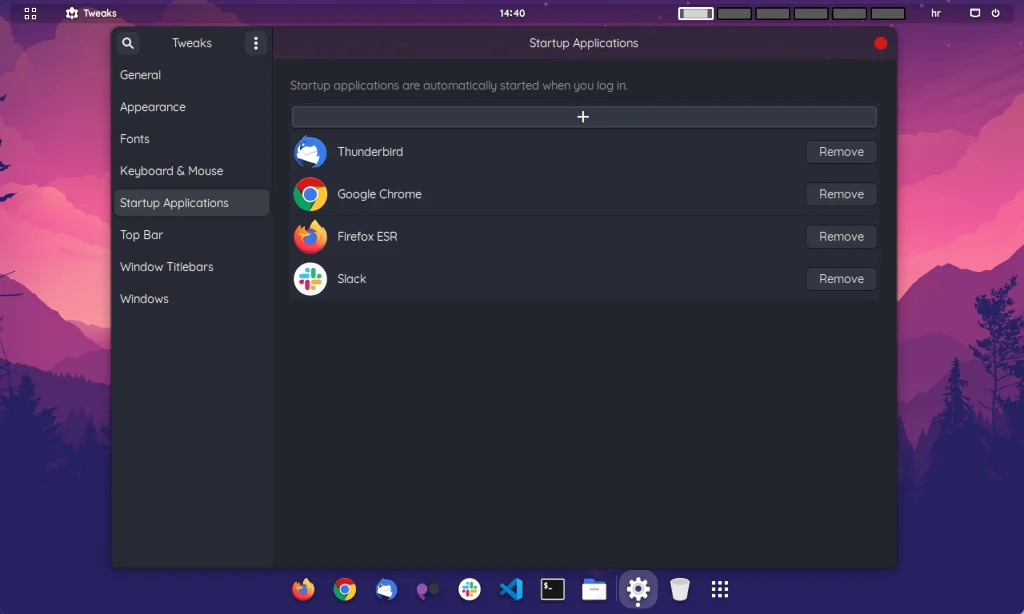
A bit above in this guide, I showed you how to configure specific applications to start in separate workspaces. Now, I will show you how to configure those same applications to automatically start once your computer boots and you log in. To do so, click on the Startup Applications(01) in Gnome Tweaks and then click on the “+” button(02):

Once a selection window opens, click the search button(01) and type the desired application name in the search box(02). When found, click on the application(03) and add it by clicking on the Add button(04):
You can add as many applications as you want, although I recommend adding only the ones you use regularly.
In the Window Titlebars tab, you can enable(01) the Minimize and Maximize titlebar buttons(02):

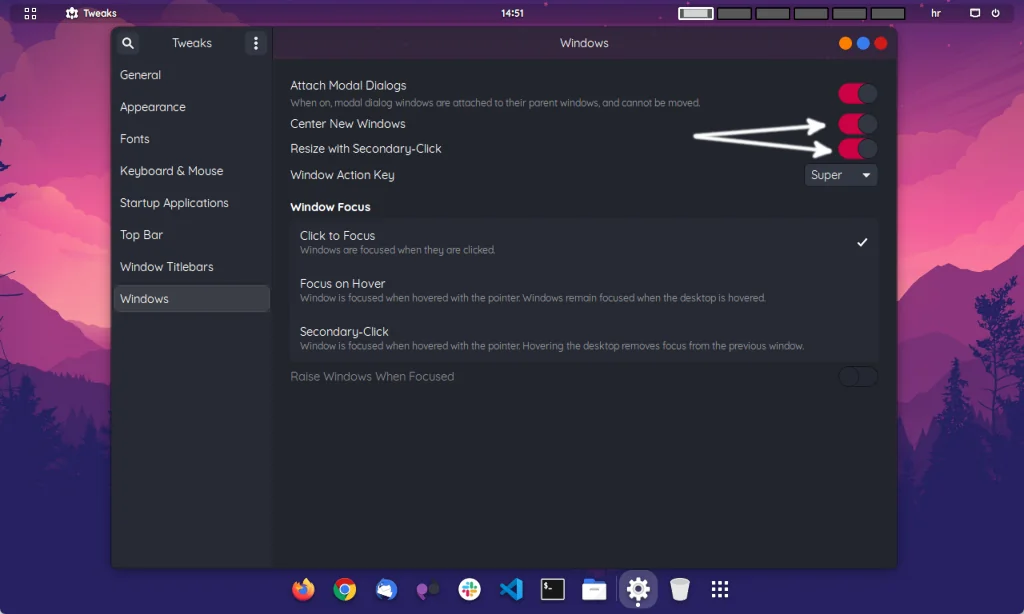
As a last option in Gnome Tweaks, you can enable Center New Windows and Resize with Secondary-Click options in the Windows tab:
GNOME Customization Optional Settings
With everything above completed, I am pretty satisfied with how everything looks. Still, there are a few more things I could do further to customize the GNOME desktop environment on my Debian even more.
Just Perfection Extension
Just Perfection extension will allow you to customize your GNOME even further, although I think of it as an overkill. I won’t go into details, but please feel free to check the extension options by accessing the Extension Manager. Maybe you will find something you like.
Conky System Monitor
Conky is a lightweight system monitor that can display all sorts of information on your desktop. It is up to you if you want to use it or not. I like to use it to display CPU and RAM usage along with the time and weather forecast in my region. Also, it looks nice on my desktop 🙂
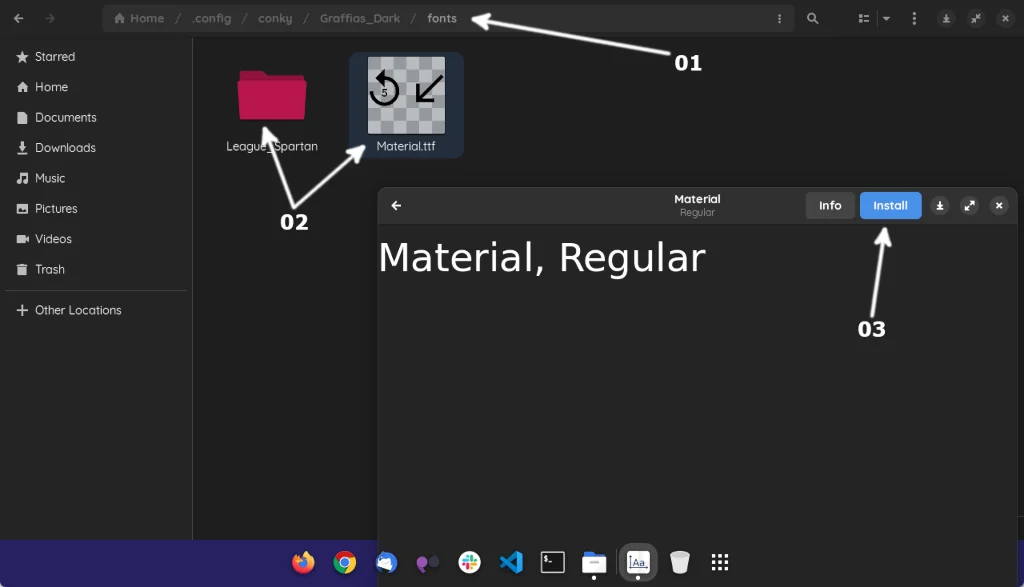
Above in this guide, I already showed you how to install Conky and where to set the theme for it, and now I will show you how to configure it. Now, usually, every Conky theme comes with a set of fonts that need to be installed. You can find those fonts in the themes directory(01). To install them, just double-click on the font file(02), and once the window opens, click on the Install button(03):
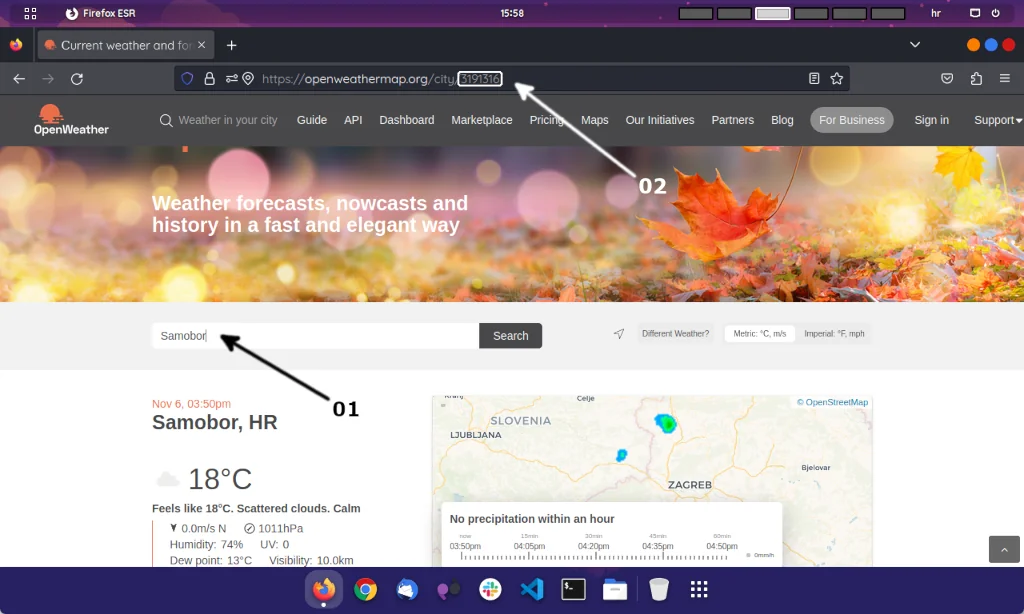
Also, most Conky themes support showing the weather forecast for your location. If you want that option, you must create a free account on OpenWeather. Once you sign up, you can create an API key, which is required to display the forecast in Conkey (search for API keys on the OpenWeather website menu once you log in).
You will also need your location ID. To get it, visit the OpenWeather website and type your location name in the search bar(01). Click on it once it pops up, and you will find the numerical code of your location in the address bar of your browser(02):
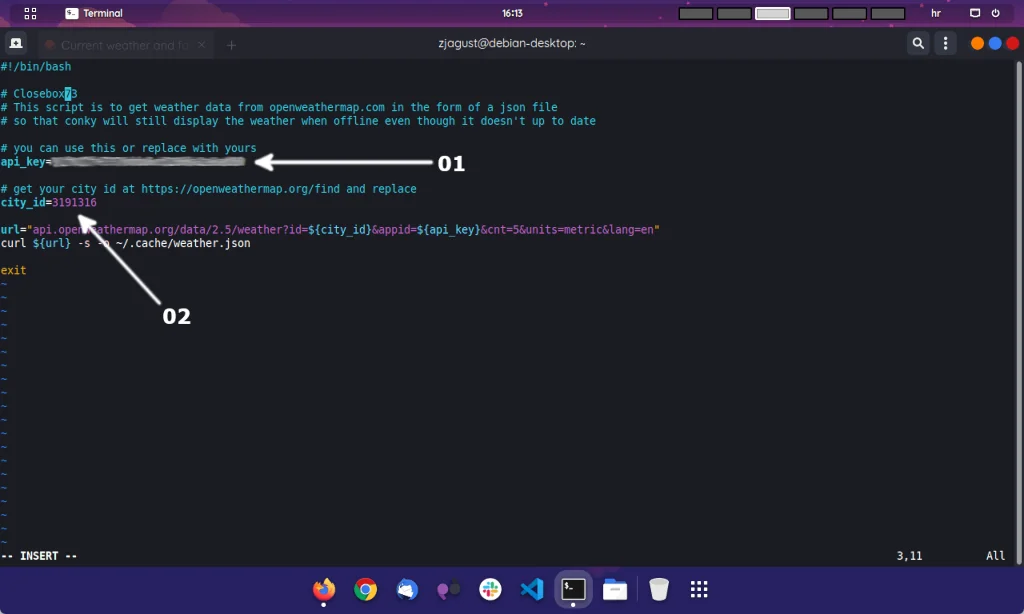
Now, you need to add both the API Key code and location ID code in Conky’s weather control script. Usually, the script is located in the theme’s “scripts” sub-directory, and you can open and edit it there (use Terminal):
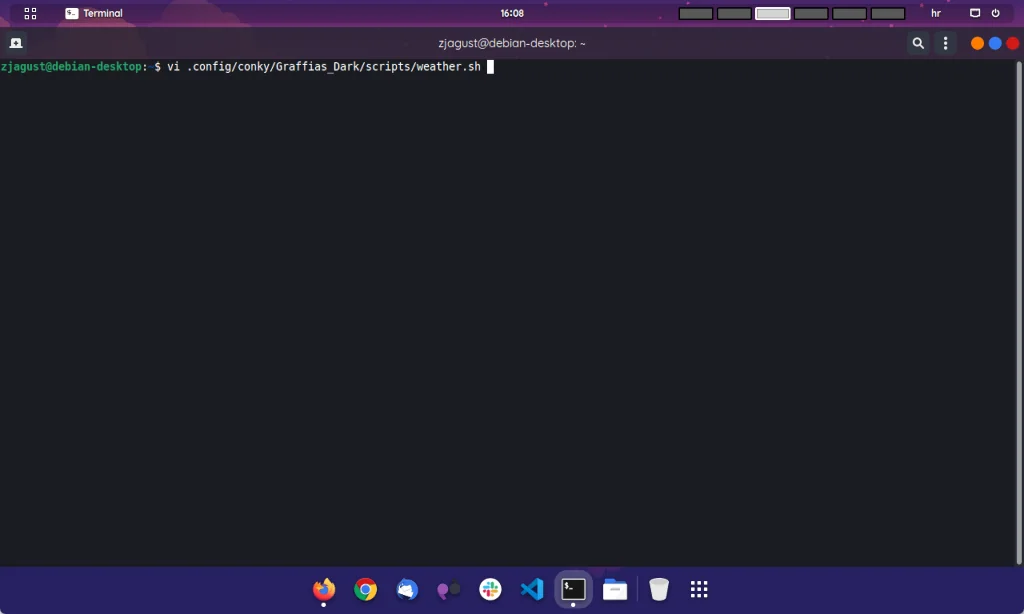
Paste API key code(01), and your location ID(02) and save and close the file:
Now open the Conky theme main configuration file:
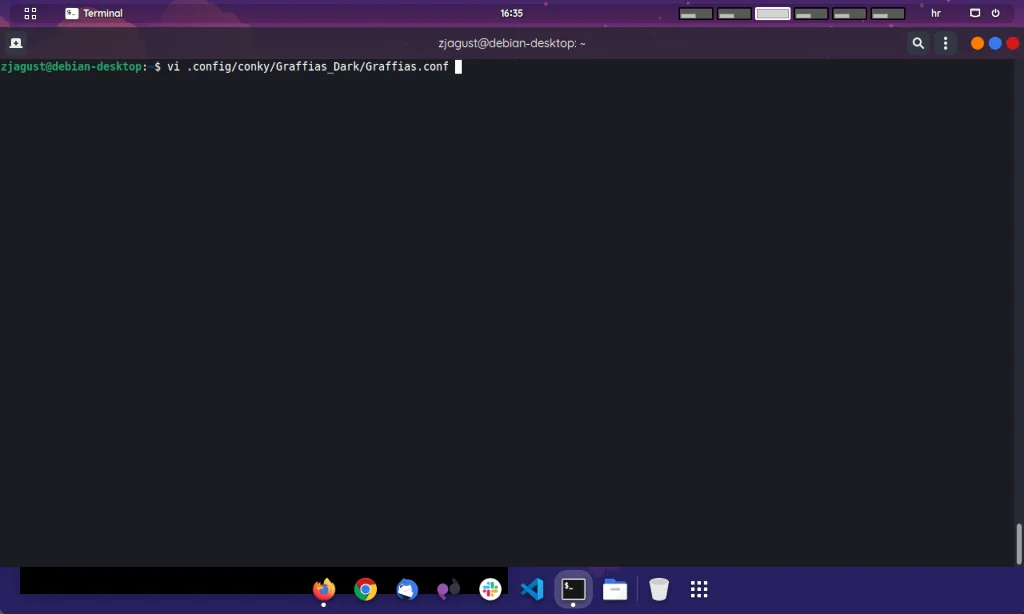
Locate the “own_window_argb_visual” option and change it’s value to true:
own_window_argb_visual = true,Save and close the file, and you can start Conky by executing start.sh script:

You can also configure Conky to start at boot. To do so, first open the new .desktop file:
cd
vi .config/autostart/conky.desktop
Now paste in the content below and save and close the file:
[Desktop Entry]
Type=Application
Exec=sh -c "killall conky; sleep 2; conky -c $HOME/.config/conky/Graffias_Dark/Graffias.conf &> /dev/null &"
Name=Conky
Comment=Autostart conky at login
And this is it; I have nothing else. Enjoy your new customized GNOME. Thank you for reading, and please share this article if you liked it.