Author:
Željko Jagušt
Publish Date:
January 11, 2024
Estimated Reading Time:
28 minutes
Welcome to our comprehensive guide on setting up a forward-only DNS server on Debian Linux. In this step-by-step tutorial, we’ll walk you through configuring a DNS server to forward queries efficiently. Whether you’re a beginner or an experienced Linux user, our guide ensures a smooth and optimized setup. Let’s dive in and empower your system with a streamlined DNS infrastructure.
Introduction
In this guide, I will show you how to configure a forward-only DNS on a small office or home server. I have a similar setup on my home server, which oversees every IP assignment on my local network. You can observe the topology on the diagram below:
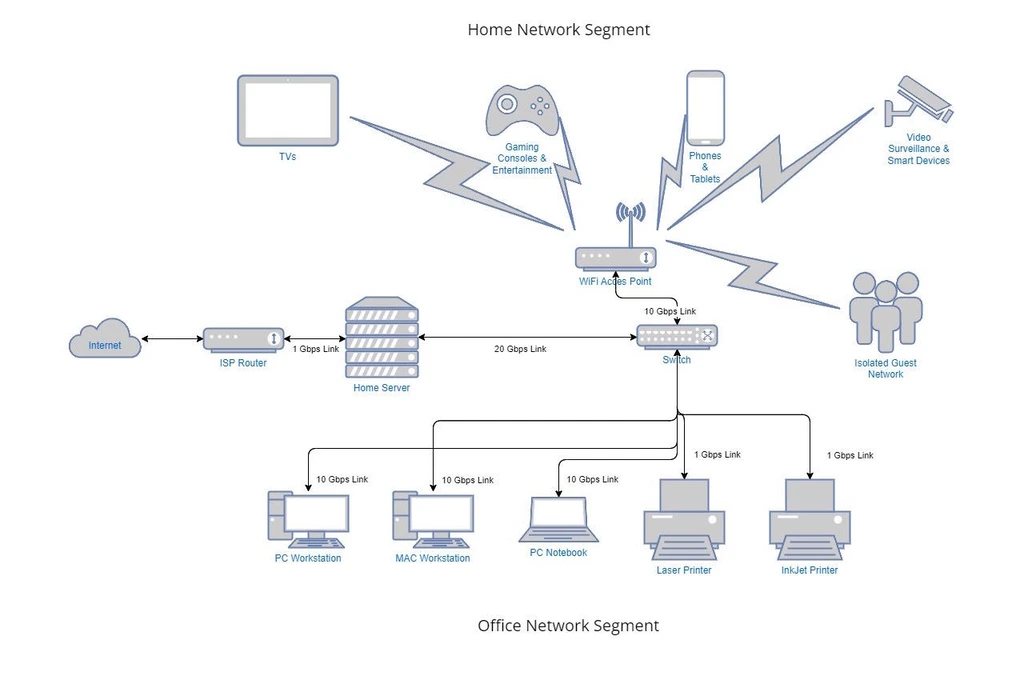
I will show you how to install a Bind 9 DNS System, which will be in charge of local network host resolution, and it will forward everything else to globally recognized DNS services (i.e., Google and CloudFlare). IP addresses for all devices on the local network will be provided by a DHCP service, which will automatically update DNS zones with a proper key, and I will also show you how to configure that. Let’s dig in!
Prerequisites
You will need Debian Linux (or any other Debian-based Linux distribution) installed on your computer or a server. If you don’t have one, we have a couple of articles that can help you with Debian installation and initial configuration:

Debian 11 Server – Minimal Installation Guide
Follow this guide for a Debian 11 Server minimal installation, providing a solid foundation for any server setup or project you want to build.

Debian 11 Server – Initial Customization Guide
Discover introductory steps to streamline performance, security, and administration in our Debian Server Initial Customization guide.
Two network interfaces on the computer or a server you will use are also required. One will be used as a “gateway” to the Internet, and the other one will be used for local network connections.
Home/Small Office Environment
This setup is ideally suited for a home or small office environment. If you check the topology above, you will notice an “ISP Router” is connected to the Internet and a “Home Server.” Sometimes, your ISP provider can give you a great router, and if you’re lucky, with all options unlocked. Then, you can configure all “routing” on that device, which omits the need for a home server. However, those cases are rare (at least with ISPs in Croatia), which brings the need for a server to handle the routing. In the rest of this section, I will explain how to prepare your initial environment.
ISP Router
Hopefully, you have an excellent broadband internet connection, and your ISP provided you with a router. To make this all work in the environment, I’m describing, you can turn off everything on the router except the internet connection. That includes Wi-Fi, DHCP, firewall, filtering, or anything/everything else that may be running on that router. Usually, you can do that over an administrative web interface. Once completed, a router can be connected to a home or small office server.
Home/Small Office Server
Depending on your needs, you can use anything from a simple unmanaged switch with a couple of 1GbE ethernet interfaces to a more robust managed switch with a combination of several 1GbE and 10GbE interfaces. One port on the switch will connect to the server, and devices on the local home or small office network will use everything else. We have a much more detailed home/small office networking guide, and you can check it out on the article below:

Home/Small Office Environment – Main Server
This article will guide you through the process of choosing the hardware and building a home/small office server.
Network Switch
Depending on your needs, you can use anything from a simple unmanaged switch with a couple of 1GbE ethernet interfaces to a more robust managed switch with a combination of several 1GbE and 10GbE interfaces. One port on the switch will connect to the server, and devices on the local home or small office network will use everything else. We have a much more detailed home/small office networking guide, and you can check it out on the link below:

Home/Small Office Environment – Network Overview
Home or small office network is exactly that, small. Yet it can still be complex to build and requires at least basic networking knowledge.
Bind 9 DNS Service
This section will show how to install and configure Bind 9 as a forwarding DNS server. Simply put, our DNS server will resolve all queries related to our local network, and for everything else, it will “forward” queries to public caching servers (we will define them later in this guide).
To continue with this, you have to know your ISP router IP address, and you will have to decide on which local network subnet and local domain name you will use. You can find your router IP Address either printed on the router itself (usually on a sticker) or in your router documentation (along with administrative login credentials). As for the local network subnet, you can use anything from the RFC1918 range. You can use something like “local.lan” or “home.net” for a local domain name. Just make sure it is not resolvable (present) on the Internet.
For this guide, 172.17.0.1 will be my router IP address, and I will use 192.168.100.0/24 subnet for my local network. On the devices itself, it will look like this:
- ISP Router primary interface IP Address (connected to the server): 172.17.0.1
- Server primary interface IP Address (eth0 – connected to ISP router): 172.17.0.2
- Local network subnet (configured on the server): 192.168.100.0/24
- Local domain name: local.lan
- Server secondary interface IP Address (eth1 – connected to the switch): 192.168.100.1
Once you gather all required IPs, you can install and configure Bind 9 DNS on your server, and I will show you how in the following sub-sections of this guide.
Bind 9 Installation
The Bind 9 installation on Debian is straightforward; the package is present in the official Debian repositories, and you can install it with APT:
apt install -y bind9Bind 9 Configuration
To start with the configuration, first turn off the Bind 9 service:
systemctl stop bind9.serviceNow, you can configure the primary network interface on your server (eth0). You must specify the IP address (172.17.0.2) and the gateway (ISP router primary IP address 172.17.0.1). To do so, please open the /etc/network/interfaces file and set the following configuration:
# This file describes the network interfaces available on your system
# and how to activate them. For more information, see interfaces(5).

source /etc/network/interfaces.d/*

# The loopback network interface
auto lo
iface lo inet loopback

# The primary network interface
auto eth0
iface eth0 inet static
    address 172.17.0.2/24
    gateway 172.17.0.1
A secondary server interface can now be configured (eth1 – 192.168.100.1). To do so, please open a new file at /etc/network/interfaces.d/if-eth1 and set the following configuration:
# Local DNS network interface
auto eth1
iface eth1 inet static
    address 192.168.100.1/24
    broadcast 192.168.100.255
    dns-search local.lan
    dns-nameservers 192.168.100.1
Since it is apparent that only IPv4 IP addresses are used, we can instruct the Bind 9 DNS server to serve only IPv4 (default is IPv4 and IPv6). To do so, please open file /etc/default/named and modify the OPTIONS option:
OPTIONS="-u bind -4"Now, you must set a TSIG signing key. This key will be used to “authenticate” all records (local network hosts IP assignments) our DNS server needs to write in its zones. I will show you how to create zones later in this guide. To create a TSIG signing key, first, enter the directory where Bind configurations are located:
cd /etc/bindYou can create a key now by using an HMAC-SHA512 algorithm whose name is local.lan and store it in ns-local-lan_rndc.key file. Also, modify permissions on the file so that only bind user can access it:
tsig-keygen -a HMAC-SHA512 local.lan > ns-local-lan_rndc.key
chown bind:bind ns-local-lan_rndc.key
chmod 640 ns-local-lan_rndc.key
Please remember the key name, as it is essential for the rest of the configuration. With the key in place, we can now edit the Bind 9 main configuration file located in /etc/bind/named.conf. Open that file and make the necessary changes:
// This is the primary configuration file for the BIND DNS server named.
//
// Please read /usr/share/doc/bind9/README.Debian for information on the
// structure of BIND configuration files in Debian, *BEFORE* you customize
// this configuration file.
//
// If you are just adding zones, please do that in /etc/bind/named.conf.local

// Managing ACLs
acl internals {
        127.0.0.0/8;
        192.168.100.0/24;
        localhost;
};

include "/etc/bind/named.conf.options";

// TSIG key used for the dynamic update
include "/etc/bind/ns-local-lan_rndc.key";

// Configure the communication channel for Administrative BIND9 with rndc
// By default, they key is in the rndc.key file and is used by rndc and bind9
// on the localhost
controls {
        inet 127.0.0.1 port 953 allow { 127.0.0.1; };
};

include "/etc/bind/named.conf.local";
include "/etc/bind/named.conf.default-zones";
Let me explain this a bit. In the ACL block, I have listed IP addresses or networks that should be allowed to use this DNS server. I also included the TSIG key for dynamic updates and controls clause. The controls clause defines access information and controls when using remote administration services, for example, the rndc utility. In my example, I’ve restricted it to allow access only from the local host (127.0.0.1), a.k.a. the server itself.
With the main configuration in place, you can continue with the DNS server options. Options configuration is located in /etc/bind/named.conf.options file, so please open it and make the necessary adjustments:
options {
    directory "/var/cache/bind";

    // Exchange port between DNS servers
    query-source address *;

    // If there is a firewall between you and nameservers you want
    // to talk to, you may need to fix the firewall to allow multiple
    // ports to talk.  See http://www.kb.cert.org/vuls/id/800113

    // If your ISP provided one or more IP addresses for stable
    // nameservers, you probably want to use them as forwarders.
    // Uncomment the following block, and insert the addresses replacing
    // the all-0's placeholder.

    forward only;
    forwarders {
        8.8.8.8;
        8.8.4.4;
        1.1.1.1;
    };

    auth-nxdomain no;   # conform to RFC1035

    //========================================================================
    // If BIND logs error messages about the root key being expired,
    // you will need to update your keys.  See https://www.isc.org/bind-keys
    //========================================================================
    dnssec-validation yes;

    // From 9.9.5 ARM, disables interfaces scanning to prevent unwanted stop listening
    interface-interval 0;
    listen-on-v6 { none; };
    listen-on { 192.168.100.1; };

    // Do not transfer the zone information to the secondary DNS
    allow-transfer { none; };

    // Accept requests for internal network only
    allow-query { internals; };
    allow-query-cache { internals; };

    // Allow recursive queries to the local hosts
    allow-recursion { internals; };

    // Do not make public version of BIND
    version none;

};
Let’s see what is important here:
- directory: this is where the DNS service will look for zone databases
- forward: set to “only” since this server will forward all requests and should not attempt to resolve requests on its own
- forwarders: IP addresses of the recursive name servers we want to forward requests to. In our guide, we will use Google and CloudFlare public DNS servers (8.8.8.8, 8.8.4.4, 1.1.1.1)
- dnssec-validation: explicitly set to “yes”
- listen-on-v6 and listen-on: explicitly turn off IPv6 and set listen-on to the port and IP address on which BIND will listen for incoming queries (port 53 is the default, and it doesn’t need to be defined explicitly)
- allow-transfer: set to none since there are no secondary DNS servers
- allow-query, allow-query-cache, and allow-recursion: explicitly set to match the ACL set in the main Bind 9 configuration (named.conf)
With all options in place, you can define local zones. To do so, please open file /etc/bind/named.conf.local and make the necessary adjustments:
//
// Do any local configuration here
//

// Manage the file logs
include "/etc/bind/named.conf.log";

// Domain Management local.lan
// ------------------------------
//  - The server is defined as the master on the domain.
//  - There are no forwarders for this domain.
//  - Entries in the domain can be added dynamically
//    with the key local.lan

// Forward Zone
zone "local.lan" {
    type master;
    notify no;
    file "/var/cache/bind/db.local.lan";
    allow-update { key local.lan; };
};

// Reverse zone
zone "100.168.192.in-addr.arpa" {
    type master;
    notify no;
    file "/var/cache/bind/db.100.168.192.in-addr.arpa";
    allow-update { key local.lan; };
};

// Consider adding the 1918 zones here, if they are not used in your
// organization
include "/etc/bind/zones.rfc1918";
From the example above, you can notice I defined two zones: local.lan, which is a forward zone, and 100.168.192.in-addr.arpa, which is a reverse lookup zone. Let’s observe the options set:
- type: set to master, which means the server reads the zone data directly from local storage (a zone file) and provides authoritative answers for the zone
- notify: yes is the default value, which means when a zone is loaded or changed, NOTIFY messages are sent to the name servers defined in the NS records for the zone
- file: the location of the zone database file on a local storage
- allow-update: enable Dynamic DNS updates explicitly over the key set in the main Bind 9 configuration file (named.conf – include “/etc/bind/ns-local-lan_rndc.key”;)
To comply with the include “/etc/bind/named.conf.log” clause set, you must create a new file at /etc/bind/named.conf.log and paste in the following content:
logging {
    channel update_debug {
        file "/var/log/update_debug.log" versions 3 size 100k;
        severity debug;
        print-severity  yes;
        print-time      yes;
    };

    channel security_info {
        file "/var/log/security_info.log" versions 1 size 100k;
        severity info;
        print-severity  yes;
        print-time      yes;
    };

    channel bind_log {
        file "/var/log/bind.log" versions 3 size 1m;
        severity info;
        print-category  yes;
        print-severity  yes;
        print-time      yes;
    };

    category default { bind_log; };
    category lame-servers { null; };
    category update { update_debug; };
    category update-security { update_debug; };
    category security { security_info; };

};
File named.conf.log is not mandatory, but I still recommend creating it. To check all the available options, please reference the DNS BIND9 logging Clause guide.
With this completed, all the configuration files are set, and now you can set the zone database files. To create the forward zone database, please open a new file at /etc/bind/db.local.lan and paste in the following content:
; zone local.lan
;
$TTL    86400
@       IN      SOA     local.lan. root.local.lan. (
                              1         ; Serial
                         604800         ; Refresh
                          86400         ; Retry
                        2419200         ; Expire
                          86400 )       ; Negative Cache TTL
;
@       IN      NS      home-server-test-env.local.lan.
home-server-test-env    IN  A   192.168.100.1
Please make sure to replace every home-server-test-env occurrence with your server’s hostname. If you’re unsure what your hostname is, you can execute the “hostname” command, and it will be displayed.
To create the reverse lookup zone database, please open a new file at /etc/bind/db.100.168.192.in-addr.arpa and paste in the following content:
; reverse zone 100.168.192.in-addr.arpa
;
$TTL    86400
@       IN      SOA     local.lan. root.local.lan. (
                              1         ; Serial
                         604800         ; Refresh
                          86400         ; Retry
                        2419200         ; Expire
                          86400 )       ; Negative Cache TTL
;
@       IN      NS      home-server-test-env.local.lan.
1       IN      PTR     home-server-test-env.local.lan.
Also, replace every home-server-test-env occurrence with your server’s hostname.
You should not touch those two zone files ever again. Every future update of zones will be performed dynamically, and for that purpose, both files need to be symlinked to /var/cache/bind directory:
cd /var/cache/bind/
ln -sf /etc/bind/db.local.lan
ln -sf /etc/bind/db.100.168.192.in-addr.arpa
Before you can actually start the DNS service, you need to restart the network first and reconfigure resolvconf. To do so, please execute the following commands:
systemctl restart networking.service
resolvconf -u
Log files must also be created. To do so, please execute the following command:
touch /var/log/{update_debug.log,security_info.log,bind.log}
cd /var/log/
chown bind:bind bind.log security_info.log update_debug.log
Now you can start the Bind 9 DNS server by executing the following command:
systemctl start bind9.serviceWith this complete, you now have a fully functional forwarding-only DNS server. For all other devices on your local network to use your new DNS service, there needs to be a way to assign them with IP addresses and write their records to the local zones. To do so, a DHCP service will be used, and I will show you how to install and configure one in the next section of this guide.
DHCP Service
This section will show you how to install and configure a DHCP service. DHCP will assign all devices on a local network (192.168.100.0/24) with an IP address. It will also perform dynamic updates on the DNS server, writing records to its forward and reverse zones. Let’s start with the installation.
DHCP Installation
Same as Bind 9, DHCP can also be installed from the Debian official repositories, so let’s do just that:
apt install -y isc-dhcp-serverWhen asked to define the interface DHCP will use to listen to connections, leave it empty and press Enter to continue the installation. We are going to handle that later in this guide. Also, after installation, if you receive an error about the service failing to start, ignore that for now also.
DHCP Configuration
The interface for the local network (192.168.100.0/24) on the server is set to eth1 or a secondary interface, and as a first step, we will instruct the DHCP service to use that interface. To do so, open the file /etc/default/isc-dhcp-server and modify the following line:
INTERFACESv4="eth1"Save and close the file. Now, for the DHCP service to be able to write records to DNS zones, authorization is needed. For that purpose, the same TSIG key the DNS server uses for the dynamic updates will be used. The key is located at /etc/bind/ns-local-lan_rndc.key, so we’re going to symlink it to the DHCP configuration directory:
cd /etc/dhcp
ln -sf /etc/bind/ns-local-lan_rndc.key
We can set the main DHCP configuration now. To do so, open file /etc/dhcp/dhcpd.conf and make the necessary adjustments:
# dhcpd.conf
authoritative;
option domain-name "local.lan";
option domain-name-servers home-server-test-env.local.lan;

ddns-updates on;
ddns-update-style interim;
ignore client-updates;
update-static-leases on;

default-lease-time 600;
max-lease-time 7200;
log-facility local7;


include "/etc/dhcp/ns-local-lan_rndc.key";

zone local.lan. {
    primary 192.168.100.1;
    key local.lan;
}

zone 100.168.192.in-addr.arpa. {
    primary 192.168.100.1;
    key local.lan;
}


subnet 192.168.100.0 netmask 255.255.255.0 {
    range 192.168.100.10 192.168.100.254;
    option routers 192.168.100.1;
    option domain-name-servers 192.168.100.1;
}
As you can see, dynamic DNS updates are allowed (ddns-update on;) using interim style with the “ignore client-updates” option set. This means that the server will also send a response in the DHCP packet using the FQDN Option, which implies that the client should perform its own updates if it chooses to do so. Also, update-static-leases set to on causes the DHCP server to do DNS updates for clients even if those clients are being assigned their IP address using a fixed-address statement – that is, the client is being given a static assignment. This is only possible if an interim update style is set.
In the next section of the configuration, I have included the TSIG signing key (ns-local-lan_rndc.key), and I have defined the DNS zones that the DHCP server should try to update when assigning client leases (local.lan. and 100.168.192.in-addr.arpa. zones).
The last section of the configuration defines the local network subnet (192.168.100.0/24) from which the DHCP server should assign client leases along with resolve client options (option routers and option domain-name-servers).
With everything in place, the DHCP service can now be started. To do so, please execute the following command:
systemctl start isc-dhcp-server.serviceNow you can connect the secondary server interface (eth1) to the switch, and you can also connect all other devices you need on your network for them to start receiving IP leases from your DHCP server.
Basic Firewall
With all the setup above done, your devices on the local network will receive their respective IP addresses from the DHCP server, and their DNS records will be written to zone databases. They will be able to communicate with each other on the local network, but they cannot access the Internet. To “fix” that, we first need to enable packet forwarding for IPv4 on the server. To do so, please open the file /etc/sysctl.conf and uncomment the following line:
net.ipv4.ip_forward=1To apply the changes, please execute the following command:
sysctl -pWith packet forwarding enabled, we need to set a few additional firewall rules on the server and (optionally) on the clients. Let’s see how to do that in the following subsections.
Server Firewall Rules
Simply put, our server is “sitting” between our local network and the Internet. We need to instruct it to “forward” requests originating on local network devices so that they can access the Internet. To do so, we need to set a couple of firewall rules on the server, and we will do that with the help of iptables.
First, we need to enable something that can be considered as a NAT. To do so, please set the following rule:
iptables -t nat -A POSTROUTING -o eth0 -m comment --comment "Masquarade Local Traffic" -j MASQUERADEWith this rule, we allowed devices on our local network that don’t have a public IP address to communicate with other computers on the Internet with the help of another computer sitting between it and the Internet: our server. Now, we need to enable “forwarding” between the public (eth0) and private (eth1) interfaces on our server. To do so, please add the following rules:
iptables -A FORWARD -i eth0 -o eth1 -m state --state RELATED,ESTABLISHED -m comment --comment "Forward to Local LAN" -j ACCEPT
iptables -A FORWARD -i eth1 -o eth0 -m comment --comment "Forward from Local LAN" -j ACCEPT
Client Firewall Rules
If you have a properly configured firewall on the server, there is a 99.9% chance you can leave the firewall on the clients completely turned off. I use a pretty “strict” firewall on all my computers based on my preferences. If you’re doing the same, you will probably have to add a rule or two on the client machines, depending on your firewall configuration. You’re on your own here, and if you know your way around firewalls and iptables, you should quickly figure out what is missing.
Summary
At this point, you can add your local network devices, which should receive their IP address from the DHCP server. Their records should be successfully added to DNS zones (dynamic updates), and they should be able to communicate amongst themselves and the Internet.
I have added my first client computer named home-client-test-env, so let’s check out what is happening. To check if the client got its IP address, please execute the following command on the server:
journalctl -u isc-dhcp-server.serviceIf everything is OK, you should see the following lines telling you the client successfully acquired the IP address:
DHCPDISCOVER from 52:54:00:ef:29:17 via eth1
DHCPOFFER on 192.168.100.10 to 52:54:00:ef:29:17 (home-client-test-env) via eth1
DHCPREQUEST for 192.168.100.10 (192.168.100.1) from 52:54:00:ef:29:17 (home-client-test-env) via eth1
DHCPACK on 192.168.100.10 to 52:54:00:ef:29:17 (home-client-test-env) via eth1
You should also see the following two lines telling you the dynamic update of DNS zones is successful:
Added new forward map from home-client-test-env.local.lan to 192.168.100.10
Added reverse map from 10.100.168.192.in-addr.arpa. to home-client-test-env.local.lan
Let’s observe the DHCP lease file /var/lib/dhcp/dhcpd.leases. You should see the lease for your new client is written in that file:
lease 192.168.100.10 {
  starts 4 2024/01/11 11:17:02;
  ends 4 2024/01/11 11:27:02;
  cltt 4 2024/01/11 11:17:02;
  binding state active;
  next binding state free;
  rewind binding state free;
  hardware ethernet 52:54:00:ef:29:17;
  uid "\377\000\357)\027\000\001\000\001-.\277\337RT\000\357)\027";
  set ddns-rev-name = "10.100.168.192.in-addr.arpa.";
  set ddns-txt = "310566682b916b815fde30ae6dd4d912ff";
  set ddns-fwd-name = "home-client-test-env.local.lan";
  client-hostname "home-client-test-env";
}
DNS zone databases should also be updated, so let’s check that out. In the forward zone at /var/cache/bind/db.local.lan, you should notice the serial increment (due to writing a new client record) and that A and TXT records for your new client are added successfully:
5          ; serial
...
home-client-test-env    A       192.168.100.10
                        TXT     "310566682b916b815fde30ae6dd4d912ff"
For reverse zone at /var/cache/bind/db.100.168.192.in-addr.arpa, you should also notice the serial increment (due to writing a new client record) and a PTR record for your new client:
4          ; serial
...
10                      PTR     home-client-test-env.local.lan.
As a last check, please observe the DNS update log at /var/log/update_debug.log. You should notice the following lines telling you the dynamic update of DNS zones for your new client was successful:
info: client @0x7fe2542f7768 192.168.100.1#55543/key local.lan: signer "local.lan" approved
info: client @0x7fe2542f7768 192.168.100.1#55543/key local.lan: updating zone 'local.lan/IN': adding an RR at 'home-client-test-env.local.lan' A 192.168.100.10
info: client @0x7fe2542f7768 192.168.100.1#55543/key local.lan: updating zone 'local.lan/IN': adding an RR at 'home-client-test-env.local.lan' TXT "310566682b916b815fde30ae6dd4d912ff"
info: client @0x7fe2542f7768 192.168.100.1#55543/key local.lan: signer "local.lan" approved
info: client @0x7fe2542f7768 192.168.100.1#55543/key local.lan: updating zone '100.168.192.in-addr.arpa/IN': deleting rrset at '10.100.168.192.in-addr.arpa' PTR
info: client @0x7fe2542f7768 192.168.100.1#55543/key local.lan: updating zone '100.168.192.in-addr.arpa/IN': adding an RR at '10.100.168.192.in-addr.arpa' PTR home-client-test-env.local.lan.
And that is it! You have a fully functioning forwarding DNS server with DHCP support, which will resolve all devices on the local network and will forward everything else to globally recognized DNS servers (Google and CloudFlare). Thank you for reading, and please share this guide if you like it.
‘chown root:bind “/etc/bind/ns-local-lan_rndc.key”‘ solves my reported problem.
Possibly you should change this in this great HOWTO.
Kind regars
Peter
Hello Peter,
Thank you for reporting this in, and I’m glad you resolved your issue. I’ll be sure to check this out once again, although I’m pretty sure this worked for me “out of the box.”
BR,
Zack
“Can’t open /etc/dhcp/local.lan.key: Permission denied”
I’ll try to fix it. Please do so also.
Beside of this thank you for that tut.
King regards