
Author:
Željko Jagušt
Publish Date:
February 26, 2022
Estimated Reading Time:
7 minutes
There used to be a saying that 90% of all internet traffic is email (of which most is considered spam). I don’t know if it’s still relevant today, but the fact still stands: we all use email. Smart ones will use one of many email services available in the cloud, like Gmail, Microsoft Outlook, and similar. They are even suitable for business. Yet, there are cases where you will need a client to access your email, and Thunderbird is one of the most common and widely used ones.
Introduction
As mentioned above, many services will provide free and reliable email service. Gmail and Microsoft Outlook Live even offer business support. You can register your private or business domain with them and use that instead of standard suffixes (e.g., @gmail.com). You will also have many options regarding security, spam protection, message filtering, and others.
While that sounds great, there are situations where an old-school email client like Thunderbird will be required. For instance, you may get a job at a company with its email server, and Thunderbird is the only allowed client. Usually, a system administrator will install and configure it for you in such an environment. But you may be a small business owner who needs to do it yourself. You may even configure your Gmail account to work with Thunderbird. We will show you how to install and configure Thunderbird yourself in the rest of this article.
Thunderbird – Download & Install
We will cover installation and configuration on both Windows and Linux systems, Windows 11, and Ubuntu Linux since those are the ones we use. We will also try to simplify the guide as much as we can. While Thunderbird is available through the Ubuntu Software Center application, that is not true with Windows and its Microsoft Store application. But don’t worry; we will show you how to install it manually.
Windows 11 Installation
As mentioned in this guide, Mozilla Thunderbird is unavailable in the Microsoft Store application. So, to get it, fire up any web browser you use and go to the Thunderbird website. When you open the site, you should see a download button. Click on it, and the download should start automatically. Save the file in your default download location (usually the Downloads folder on MS Windows).
Once the download is complete, locate the file and double-click on it to start the installation. The installation is straightforward, so click the Next button until it is complete.
Ubuntu Installation
On Ubuntu, a user can install Thunderbird from the Ubuntu Software application. You can start Ubuntu Software by clicking the All Applications button on the sidebar of your main screen. From there, please type Ubuntu Software in the search bar. Once the application icon pops up, click it to start Ubuntu Software.

In the Ubuntu Software app, click on the Search button, and once the search bar is displayed, type in Thunderbird. The search will start automatically, and the Thunderbird Mail app will pop up as the first result:
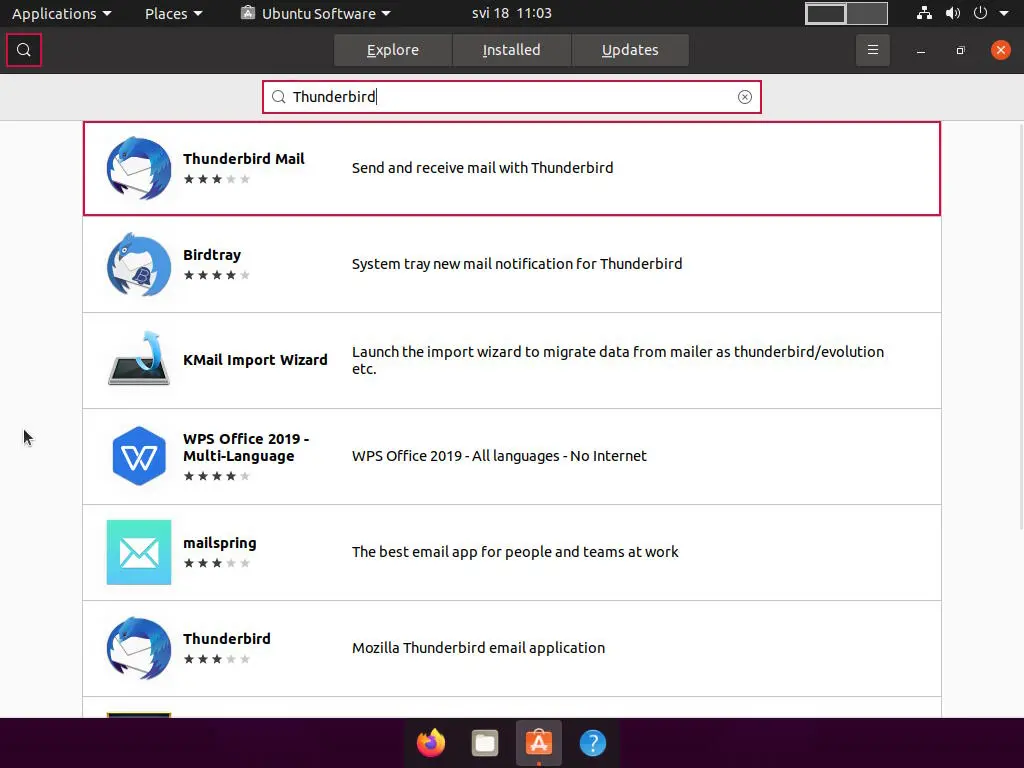
Source: zacks.eu
Once you click on Thunderbird Mail, a new window will open. There, please click on the Install button to install the application. When prompted, please enter your password (the one you use to log in). Once you do, the installation will start:

Source: zacks.eu
If all goes well, you should have the Thunderbird email client successfully installed on your system.
Email Account Setup
With Thunderbird installed, you can now set up your email account. Before you can continue, you will require some data, such as your email address, account username, password, incoming and outgoing server addresses, etc. We will go over everything in the next section.
Requirements
To successfully set up your email account, you will require some data provided by your email provider, or you will find that data on your provider’s website. The data required is the following:
- Email Address
- Your actual email address in the form of [email protected] or similar.
- Username
- Your account username (usually, it’s the same as your email address).
- Password
- Your account password.
- Incoming/Outgoing Server
- The addresses (FQDN) of your incoming (POP3/IMAP) and outgoing (SMTP) mail servers.
- Server Ports
- The listening ports of your incoming and outgoing servers are as follows: Port 110 is the default for POP3, port 143 is the default for IMAP, and port 25 is the default for SMTP.
- SSL and Authentication Type
- A security-based option, of which, at least, your password is used for authentication. SSL gives an extra layer of security, and the options are SSL/TLS/STARTTLS.
You can set up your account once you have all the required data.
Thunderbird Account Setup
Once you gather all the data from the list above, fire up the Thunderbird and start with the setup.
As soon as Thunderbird starts, the Account Setup tab will open. You must enter your full name, email address, and password. If you click on the Continue button at this point, Thunderbird will create your account. Gmail is a well-known service, and Thunderbird will “pull” all the data required for account setup automatically. But for the sake of this guide, please click on Configure Manually:
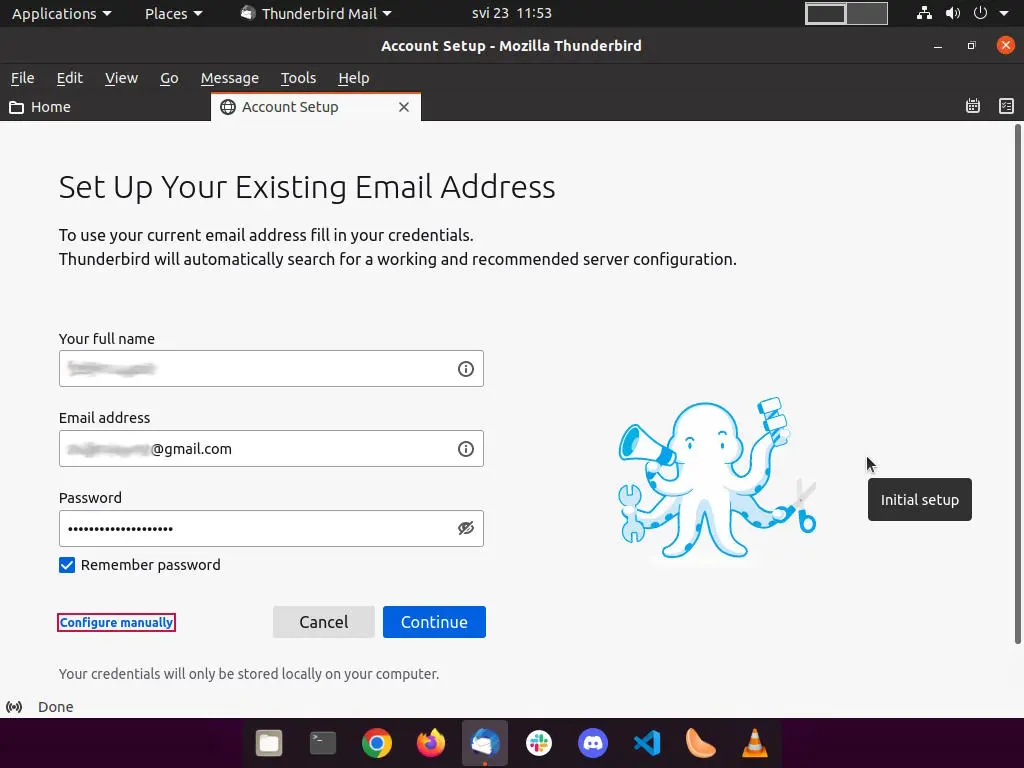
Source: zacks.eu
Once you click on Configure Manually, scroll down to the bottom of the tab and click on Advanced Config:
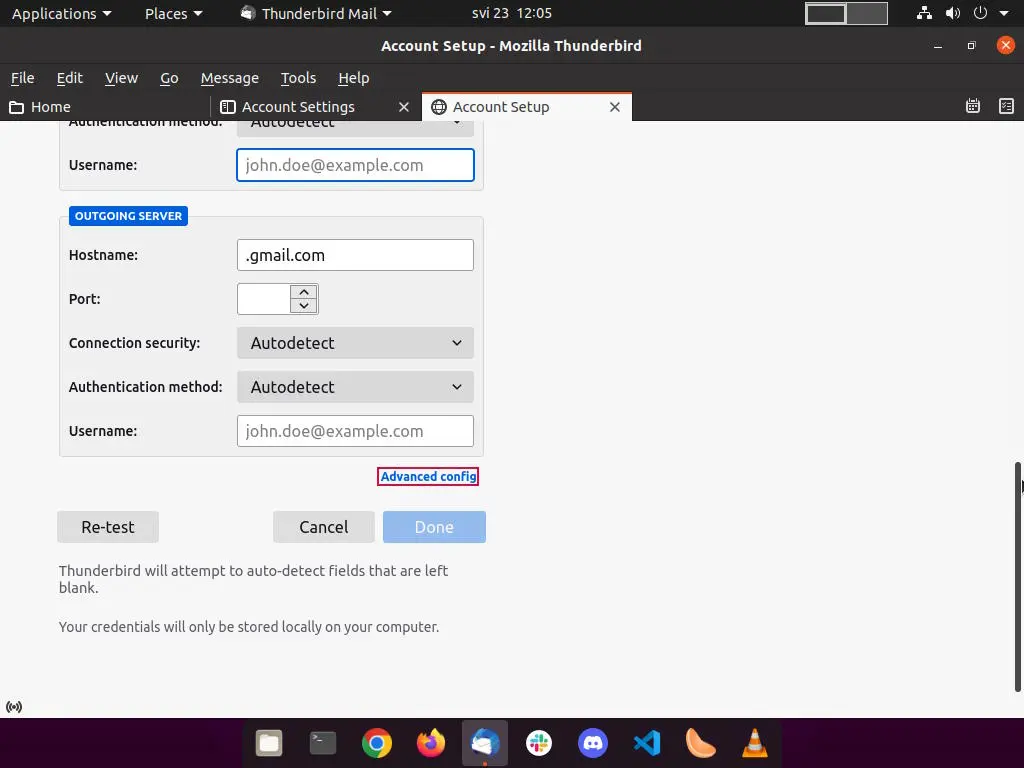
Source: zacks.eu
Server Settings will now open, and here, you need to fill in the required data for your incoming server. As per the example below, mine looks like this:
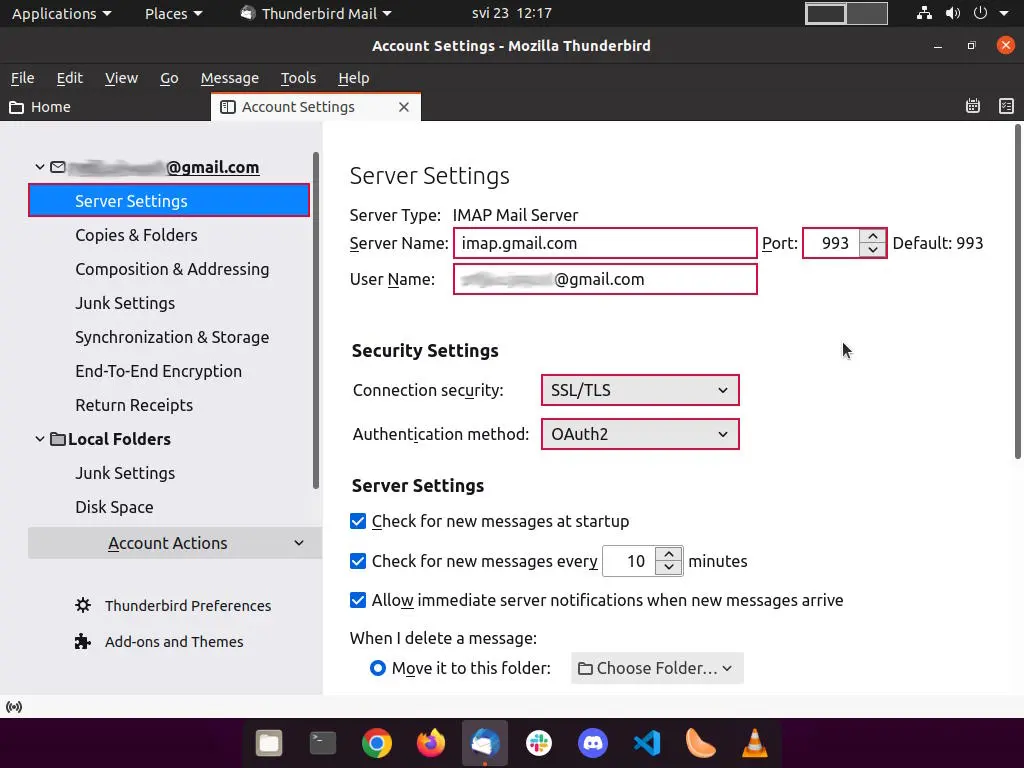
Source: zacks.eu
While still in the Server Settings tab, please scroll to the bottom and make sure you:
- Next to “When I delete a message,” select Just mark it as deleted.
- Uncheck Clean up (‘Expunge’) Inbox on Exit and Empty Trash on Exit.
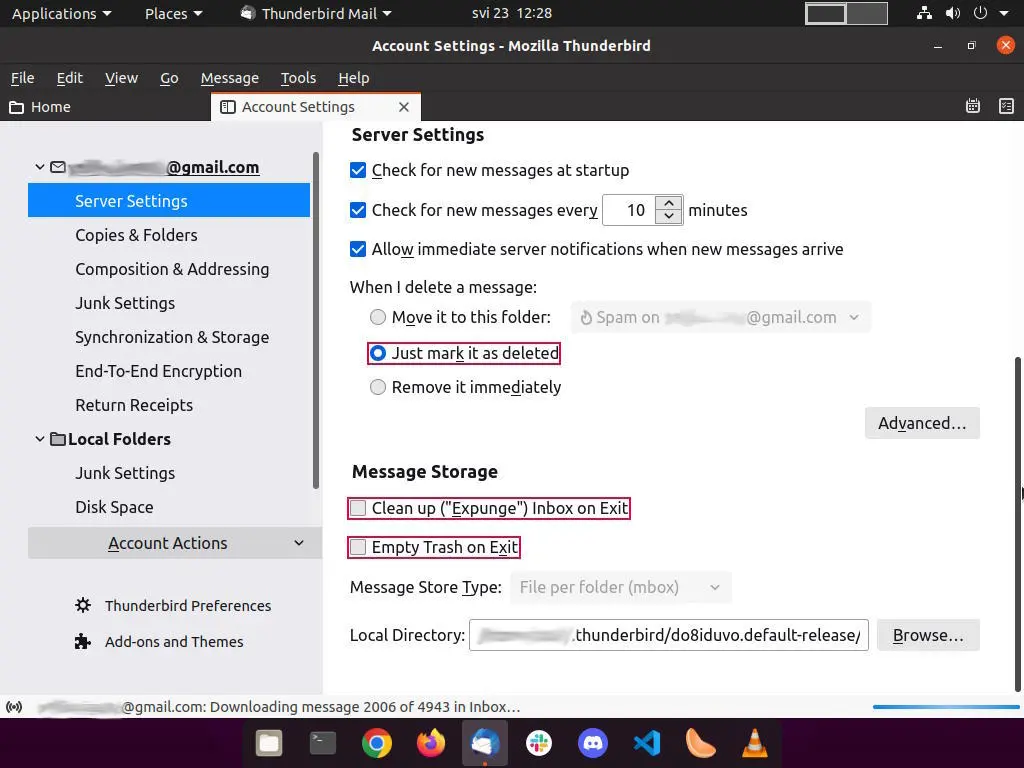
Source: zacks.eu
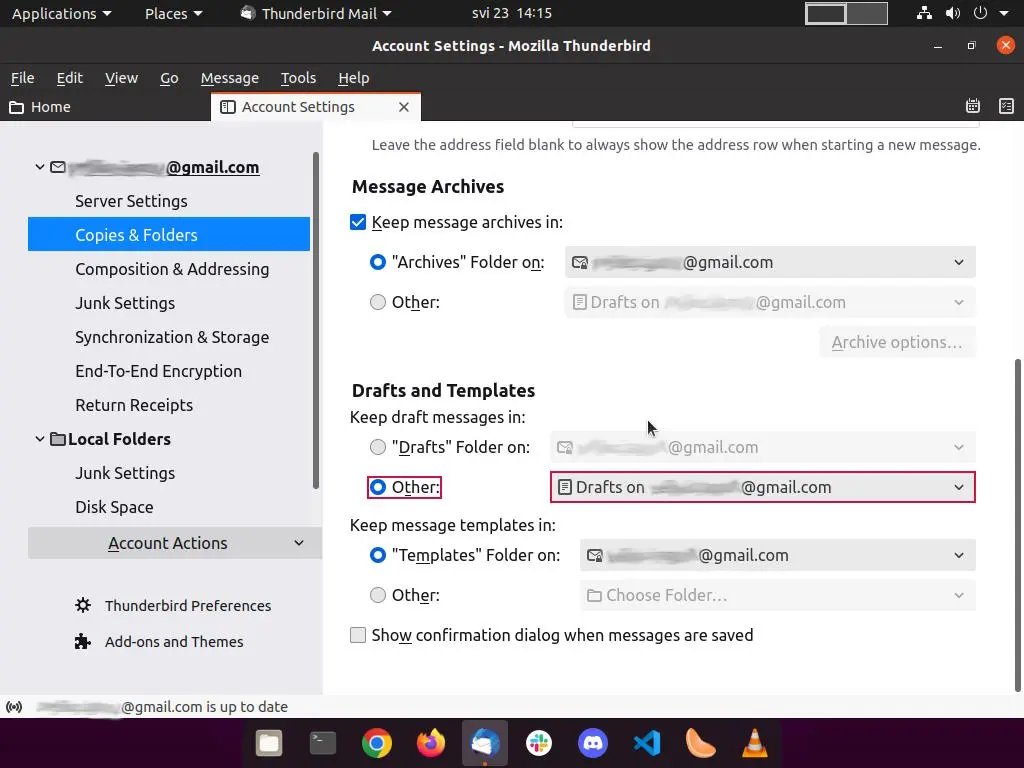
Now, click on the Copies & Folders tab and set the following options:
- Under the When sending message, automatically section, please uncheck Place a copy in.
- Under the Drafts and Templates section, check Other for Keep Draft messages in. Please select your email -> [Gmail] -> Drafts on the drop-down menu beside Other.
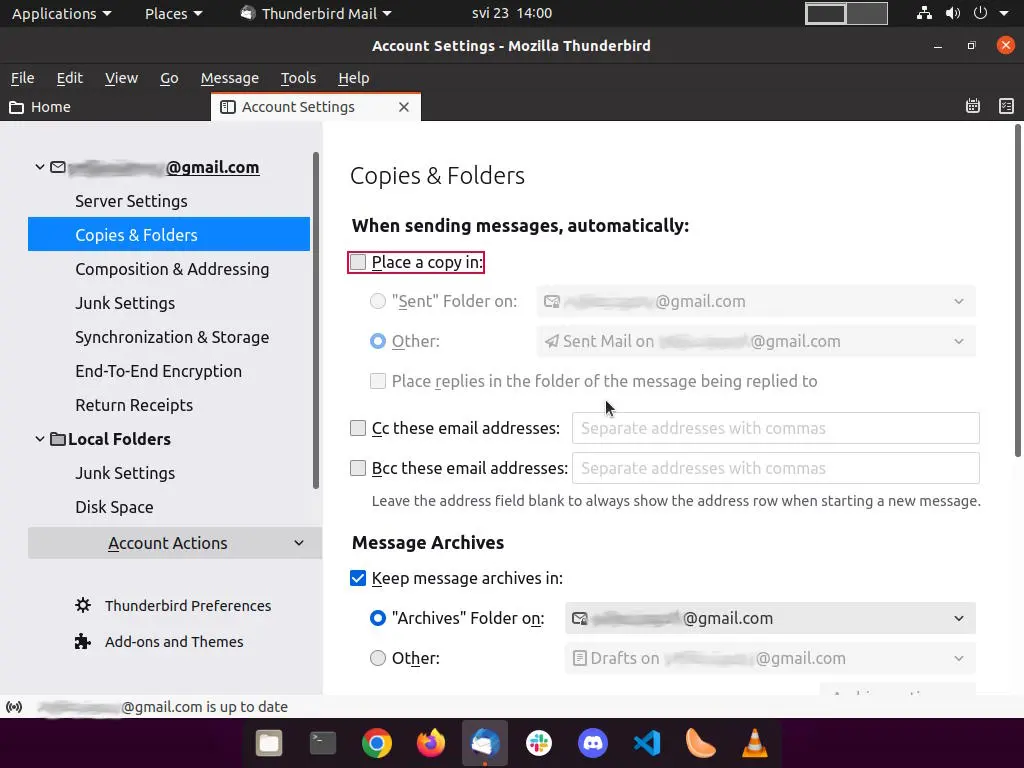
Source: zacks.eu
Source: zacks.eu
Click on the Junk Settings tab. A little explanation is required here. Since I use a Gmail account, I will turn off all junk settings. Gmail, like all major email services, such as Microsoft’s, automatically sorts spam and malware before reaching my client.
If you’re using those services also, please make sure to Enable adaptive junk mail controls for this account and Trust junk mail headers set by options are unchecked:
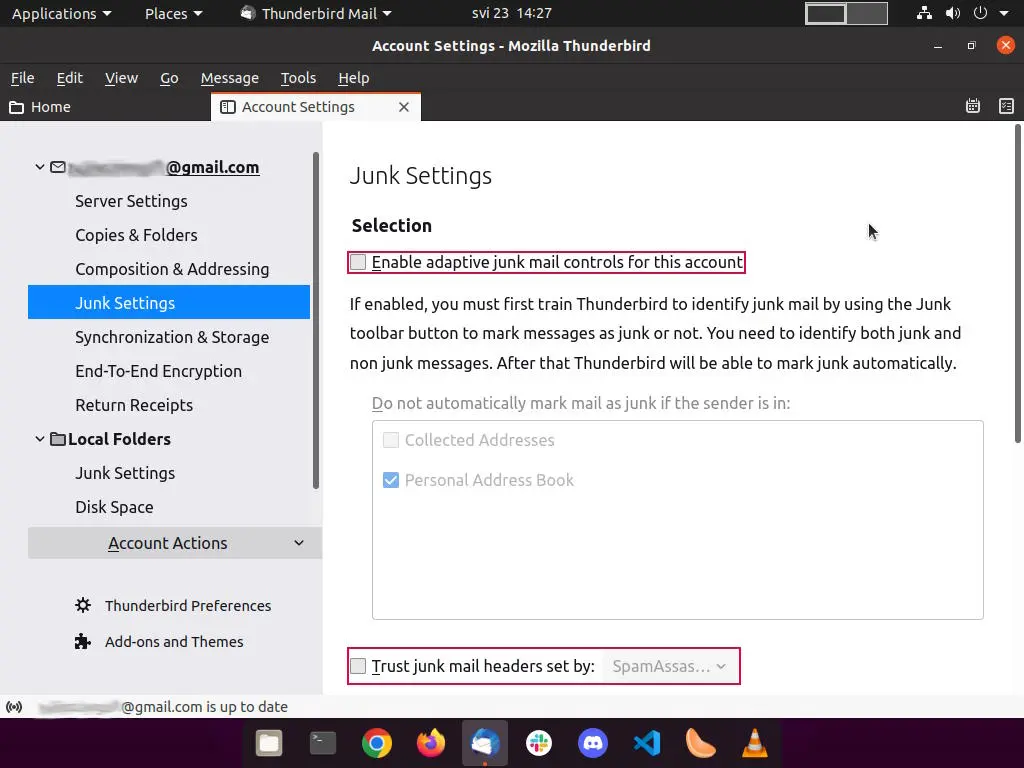
Source: zacks.eu
If your email provider doesn’t offer any spam/malware protection, by all means, turn on both of those options and train your Thunderbird to identify junk correctly (as described in the picture above).
The last thing to do here is to use outgoing email settings. Click on the Outgoing Server (SMTP) tab, and from there, click on the Add… button:

Source: zacks.eu
Once you click the Add… button, a new window will pop up, letting you fill in your SMTP server settings:
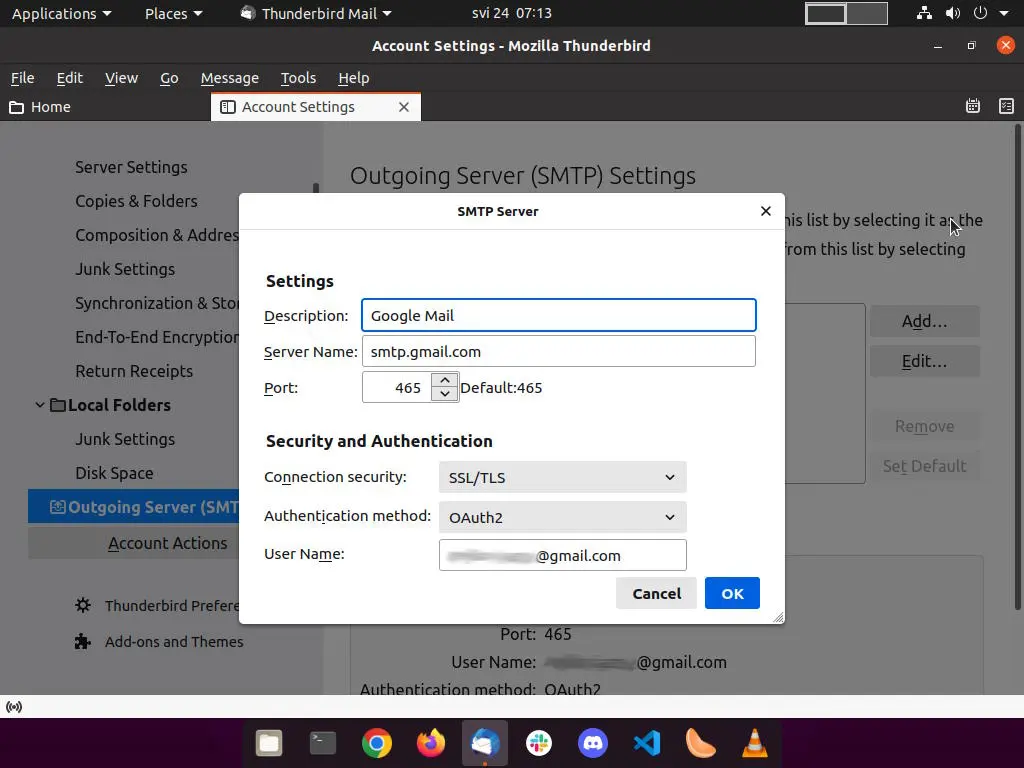
Source: zacks.eu
Your Thunderbird can send and receive email messages with an SMTP server set. You can close the Account Settings tab, which will automatically switch you to the Home tab, where you will see your Inbox. The last thing you can do is disable the Message pane. Once you switch to the Home tab, press the F8 key. And you’re done. Once again, thank you for reading.