


Author:
Željko Jagušt
Publish Date:
February 13, 2022
Estimated Reading Time:
14 minutes
Ubuntu itself has an abundance of software available in its official repositories. You can also “extend” that by adding countless third-party repositories, which will make your Ubuntu a software choice powerhouse. This article will stick to the basics—the software that most of us use daily.
Table of Content
There are countless articles on “Ubuntu Desktop 20.04 – Recommended Apps” or ” Best Applications for Ubuntu” and similar on the Internet. This brings us to the following: there is no “right software” or “best application,” only a personal choice. The applications described in this article are my choice. So please don’t judge me for it 🙂
Like many of you, when I find an application I like, I stick to it. There may be better ones; I may be told, “Hey, you should try this one and that one,” but I will probably stick with my original choice. And that is just fine. But that also doesn’t mean you should not try something else. The applications in this article are something I consider to be well-known, rock-solid, and reliable software. You may like it, and you may not. If you do, well, here they are.
Prerequisites
You will, of course, need to install Ubuntu Desktop 20.04. If you have one, great, and if you don’t, you can check our article on how to install Ubuntu Desktop 20.04:

Ubuntu Desktop 20.04 – Installation Guide
Always wanted to try Linux? Why not start with the rock-solid 20.04 latest stable release of the Ubuntu Desktop operating system.
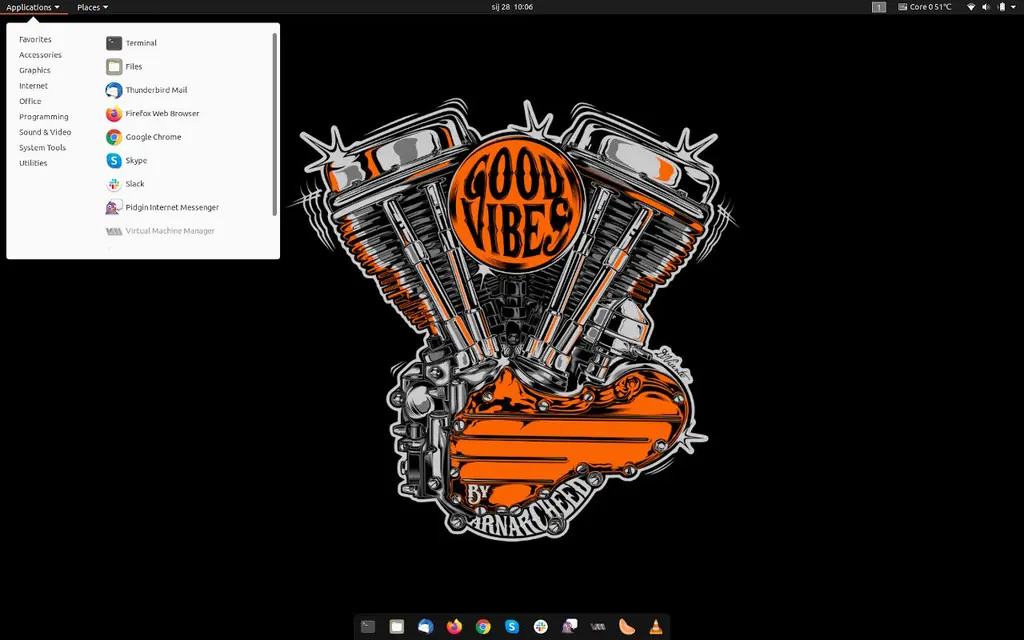
Optionally, if you would like to customize your basic Ubuntu Desktop installation further, you can also check our article on that topic:
Source: zacks.eu
Customize Ubuntu 20.04 Desktop Environment
You don’t like the default Ubuntu Desktop look and feel? This guide will show you how to customize Ubuntu 20.04 – Focal Fossa.
You can start installing the apps once you have satisfied all the prerequisites. They will be divided into logical sections, beginning with the web and email.
Web & Email
Ubuntu comes with the Firefox web browser out of the box. Along with it, I also installed Google Chrome. Suppose you wonder why there are two web browsers; the reason is the following. I use Firefox with custom proxy settings required for my work, and I also set it up so no history/browsing data is recorded. On the other hand, I leave Chrome to roam the Internet without restrictions. As for Thunderbird, well, I’ve been using it for such a long time I have nothing else to recommend here 🙂
Google Chrome
Unfortunately, we can’t install Google Chrome through the Ubuntu Software application because it is not in the catalog, so you must use the Terminal application. Google software repositories also need to be present, and if you followed our Customize Ubuntu 20.04 Desktop Environment article from the prerequisites, you should be ready.
Once you open the Terminal application, please execute the following commands:
sudo apt update
sudo apt install google-chrome-stable
Mozilla Thunderbird
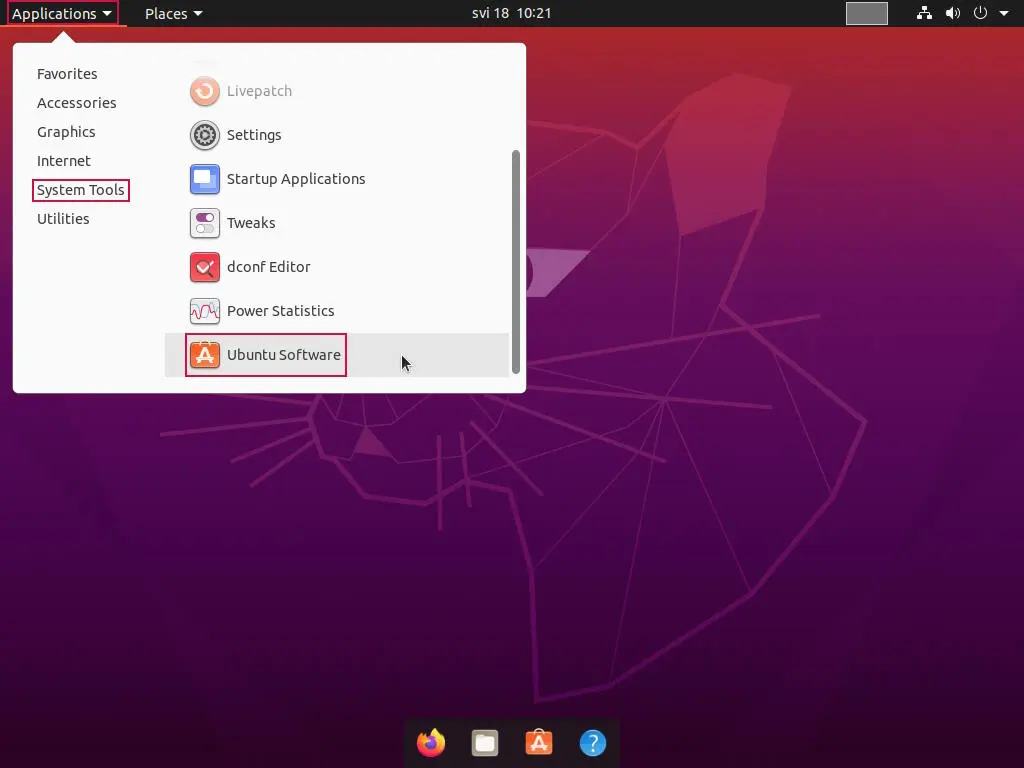
Thunderbird is in the Ubuntu Software catalog so that you can install it from there. To start the Ubuntu Software, please click on the Applications menu in the upper-left corner of your screen. From there, click on System Tools and then on Ubuntu Software:
Source: zacks.eu
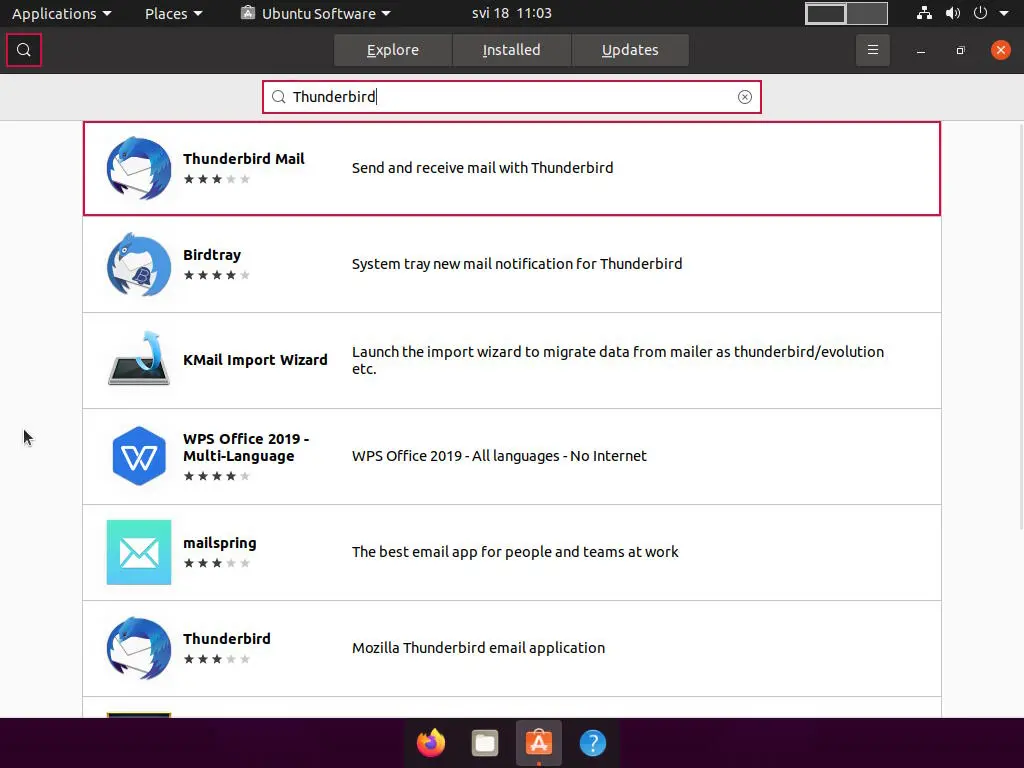
In the Ubuntu Software app, click on the Search button, and once the search bar is displayed, type in Thunderbird. The search will start automatically, and you will be presented with the Thunderbird Mail app as the first result:
Source: zacks.eu
Once you click on Thunderbird Mail, a new window will open. There, please click on the Install button to install the application. Please be aware that you will be asked to enter your password (the one you use to log in), so please do it. Once you do, the installation will start:

Source: zacks.eu
With Thunderbird installed, please minimize the Ubuntu Software application, as we will need it to install other apps.
If you would like to know how to customize your Thunderbird further, you can check our Thunderbird installation and configuration article by clicking on the button below:
Office
There are several different types of office applications you can use in Ubuntu. The most popular ones are OpenOffice, LibreOffice (a fork of OpenOffice), and Google Docs. While you can use Google Docs directly in a web browser, Libre and OpenOffice require installation. For this tutorial, I will show you how to install LibreOffice.

LibreOffice
In the LibreOffice suite, you will find well-known office tools like a rich-text editor (LibreOffice Writer), a table/cell editor (LibreOffice Calc), a presentation tool (LibreOffice Impress), and others. You can install them all or only the ones you use ( I only use Writer and Calc). We will again use the Ubuntu Software app for installation, so if you’ve followed this guide up until now, you should already have it running.
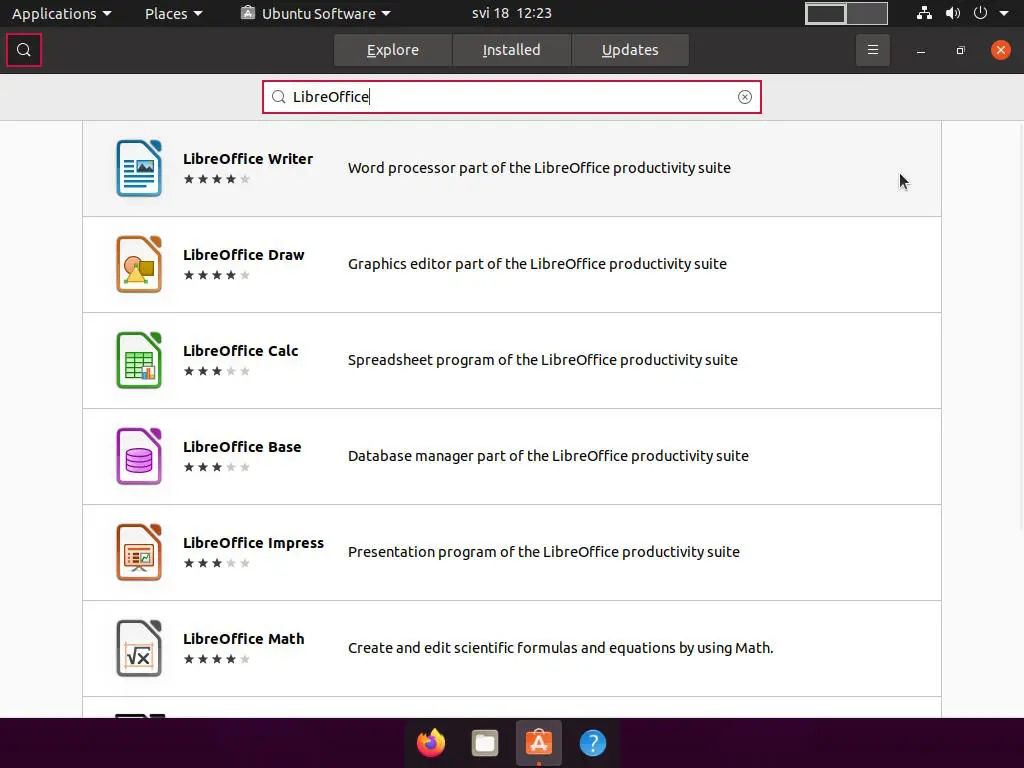
In the Ubuntu Software, click on the Search button and type LibreOffice in the search bar:
Source: zacks.eu
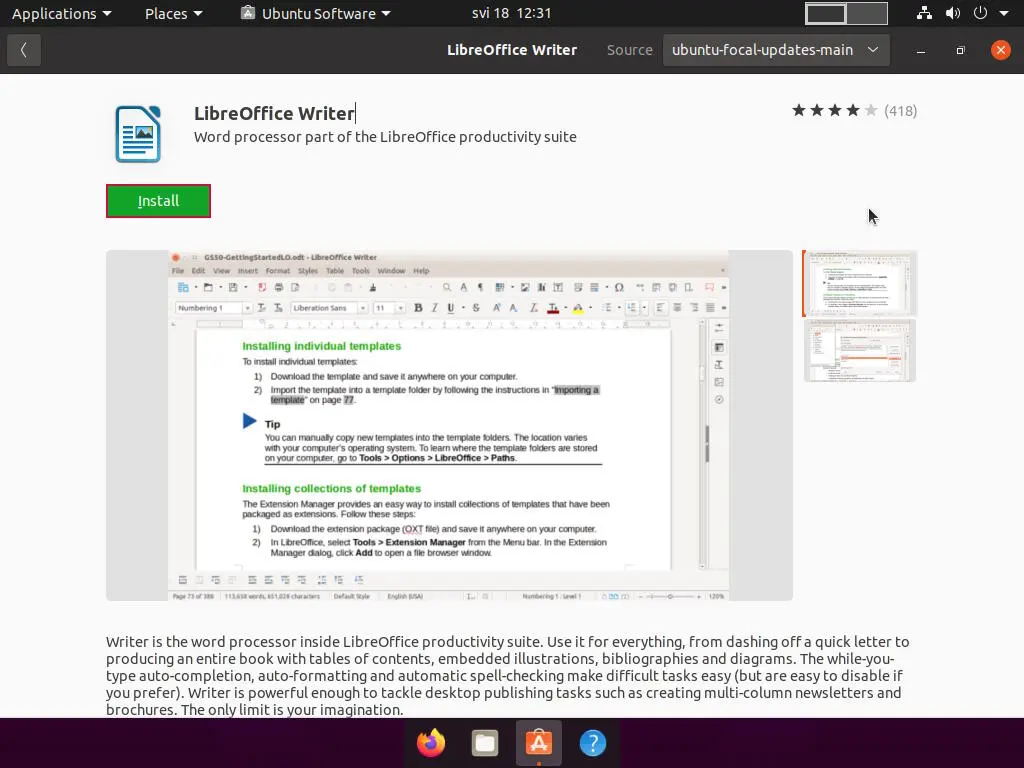
As shown in the image above, all the LibreOffice applications are displayed. To install, for instance, LibreOffice Writer, please click on it on the list, and once the new window opens, click on the Install button:
Source: zacks.eu
You can install all other LibreOffice apps the same way (or only the ones you require).
Development/Coding
As I am not much of a coder, my recommendation is limited to only one application. It is a Microsoft application, and it’s free (go figure), called Visual Studio Code. Now, this app is fantastic. It will meet all your IDE expectations and more. It supports almost any coding language, including linting, code auto-insert, git support, and all other excellent features any developer would require.
Visual Studio Code
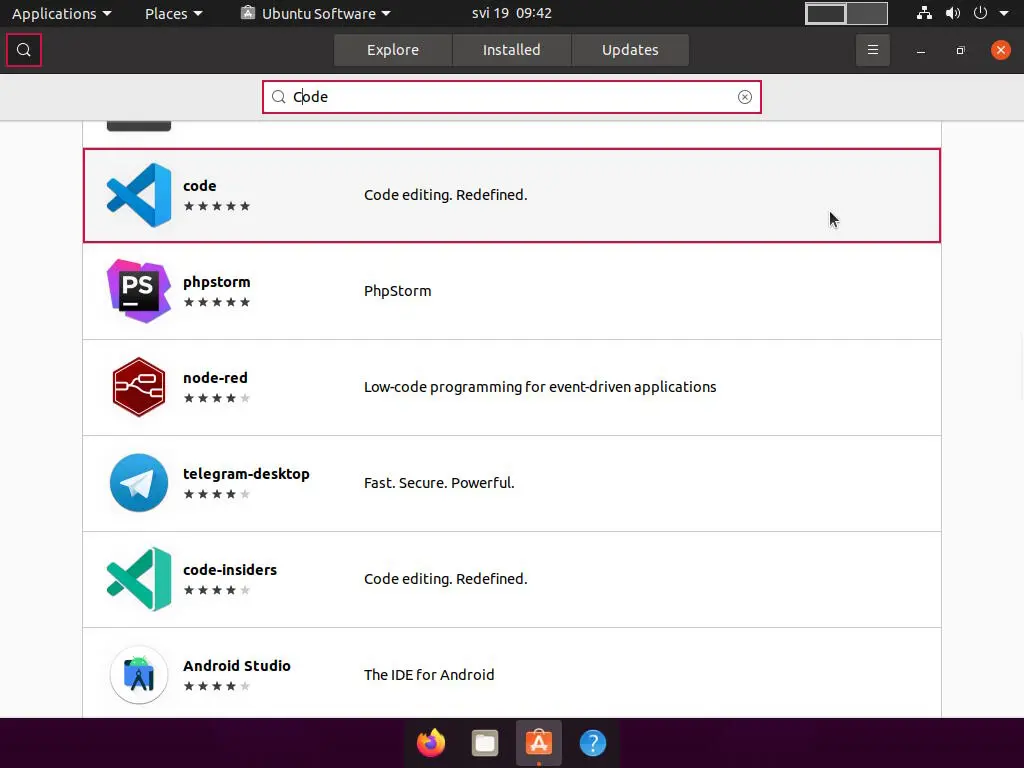
Visual Studio Code is available in the Ubuntu Software catalog, so the installation procedure is simple. Start the Ubuntu Software, click on the Search button, and type Code in the search bar:
Source: zacks.eu
Click on the highlighted result, and when a new window opens, click on the green Install button to install the application.
Utility
This section includes “everything else.” The stuff is not related to any other category but is still required. And there is one thing (I have no better word for it) you will most definitely need: a Java Runtime. You can install OpenJDK here.
OpenJDK
To install OpenJDK, please open the Ubuntu Software application, click on the Search button, and type OpenJDK in the search bar:

Source: zacks.eu
Click on the highlighted result, and when a new window opens, click on the green Install button to install the application.
Graphics
There is an abundance of graphics editing software available for Linux, but since graphics editing is not something I do regularly, my recommendation is also limited here. But still, if you are in photo retouching, image composition, and image authoring, I would recommend GIMP. You may consider it an excellent and free alternative to Adobe Photoshop.
On the other hand, if you’re more of a “creator” and like to illustrate, and “vector” is not a foreign concept to you, I would recommend Inkscape. You may consider it a good and free alternative to Adobe Illustrator.
GIMP
To install Gimp, please open the Ubuntu Software application, click on the Search button, and type Gimp in the search bar:

Source: zacks.eu
Click on the highlighted result, and when a new window opens, click on the green Install button to install the application.
Inkscape
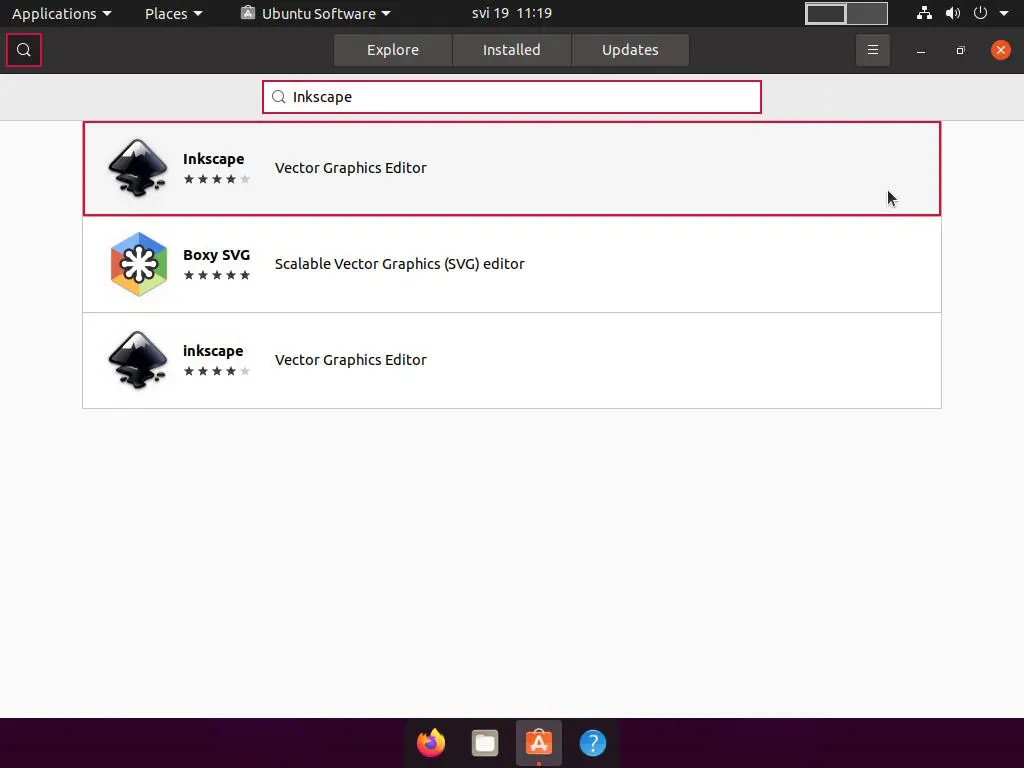
Same as you did with Gimp, please open the Ubuntu Software application, click on the Search button, and type Inkscape in the search bar:
Source: zacks.eu
Click on the highlighted result, and when a new window opens, click on the green Install button to install the application.
Sound & Video
Like graphics tools, Linux offers a wide selection of sound and video editors. According to my research, the most popular ones are Audacity (for audio editing) and OpenShot (for video editing).
Audacity
To install Audacity, please open the Ubuntu Software application, click on the Search button, and type Audacity in the search bar:

Source: zacks.eu
Click on the highlighted result, and when a new window opens, click on the green Install button to install the application.
OpenShot
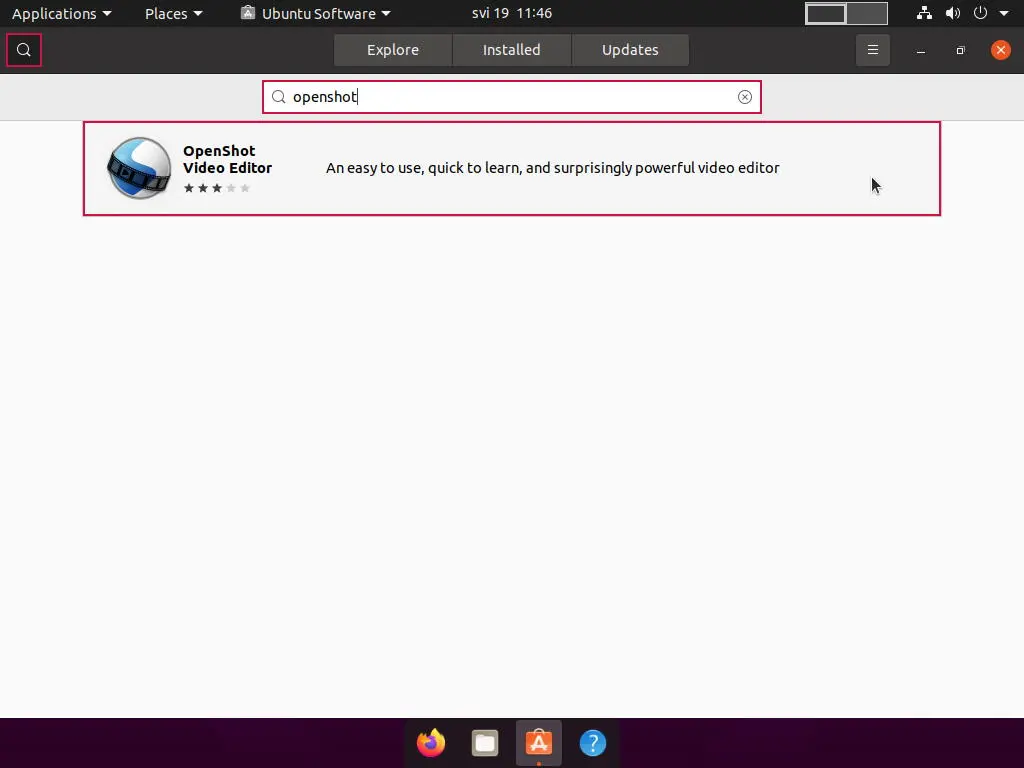
To install OpenShot, please open the Ubuntu Software application, click on the Search button, and type Openshot in the search bar:
Source: zacks.eu
Click on the highlighted result, and when a new window opens, click on the green Install button to install the application.
Entertainment
You will find endless debates on the Internet regarding audio and video players. If you ask ten different people, you will get ten different opinions regarding which audio or video player is best. I’d say that today, all those debates are futile. With platforms like YouTube, Spotify, Netflix, Amazon Prime, and similar, all you need is a Smart TV or one of those home entertainment boxes you can hook to your TV if you still don’t have a Smart TV. Who needs video or audio player software with all that?
Well, I do 🙂 I still have a massive collection of MP3s, TV shows, and movies lying around, so I need something to play that (on my computer). And my candidates are Clementine for audio and VLC Player for video.
Clementine
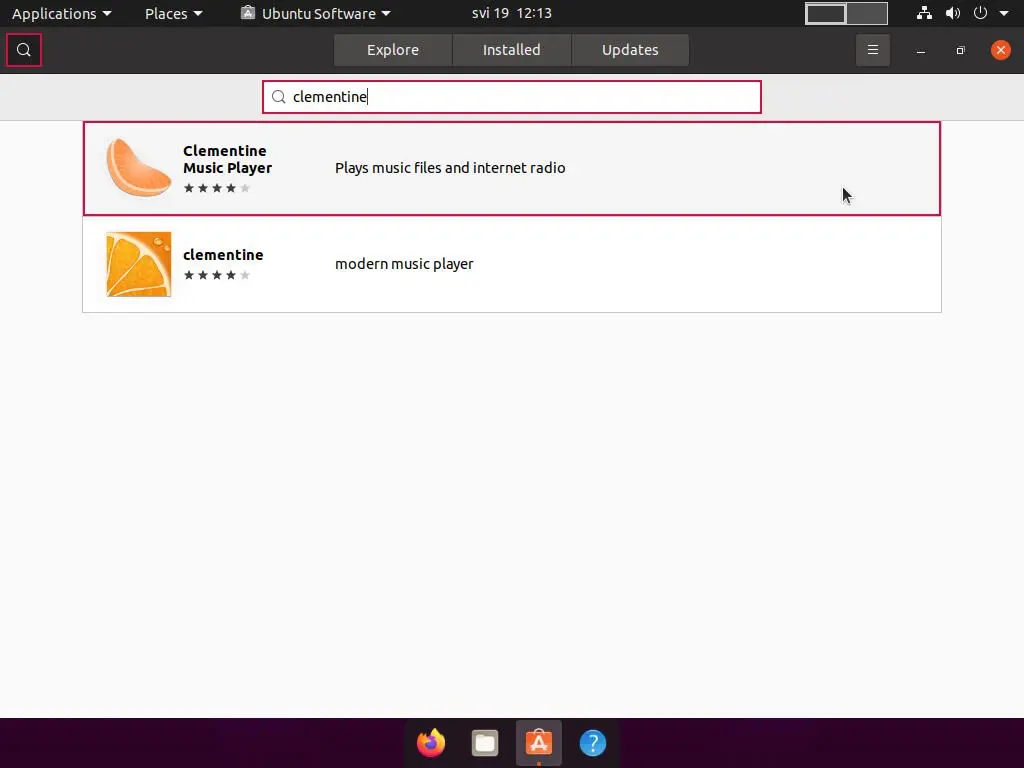
To install Clementine, please open the Ubuntu Software application, click on the Search button, and type Clementine in the search bar:
Source: zacks.eu
Click on the highlighted result, and when a new window opens, click on the green Install button to install the application.
VLC Player
To install VLC, please open the Ubuntu Software application, click on the Search button, and type VLC in the search bar:

Source: zacks.eu
Click on the highlighted result, and when a new window opens, click on the green Install button to install the application.
Communication
Today, communication applications on your phone or web browser are typical. Yet, people like me will still rely on a good old desktop client. And since I use those applications primarily for business purposes, my favorites are Slack and Discord. Both support text chat, audio/video calls, file sharing, grouping, persistent chat rooms, and all other features of modern communication apps. Slack is more workplace-oriented, and Discord is essential in online gaming.
Slack
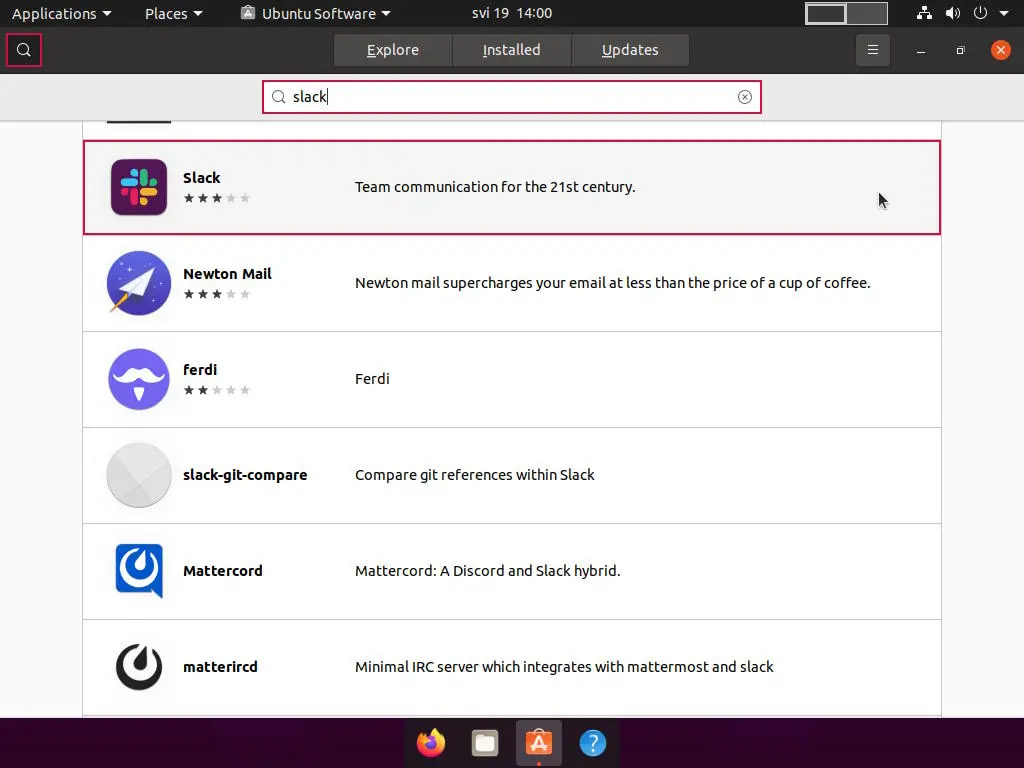
To install Slack, please open the Ubuntu Software application, click on the Search button, and type Slack in the search bar:
Source: zacks.eu
Click on the highlighted result, and when a new window opens, click on the green Install button to install the application.
Discord
To install Discord, please open the Ubuntu Software application, click on the Search button, and type Discord in the search bar:

Source: zacks.eu
Click on the highlighted result, and when a new window opens, click on the green Install button to install the application.
Gaming
Gaming on Linux is not a term you hear every day. With Microsoft Windows, which was always a go-to platform for PC gaming and all the gaming consoles, Linux is not something one will consider for gaming. But as with everything, there have been significant improvements regarding gaming on Linux in the last couple of years. More and more gaming studios are creating games that will run natively on Linux and usually distribute them on platforms such as Steam (my recommendation) and GOG.
Now, if there is a game not available for Linux but only for Windows, there is still a way you might be able to play it. Wine will present you with that option. But be aware that Wine is quite “complicated” by itself, so you may consider PlayOnLinux, a Wine graphical frontend that is much more user-friendly.
Steam
Steam has a native client for Linux and a massive library of games for Linux. To install it, please open the Ubuntu Software application, click on the Search button, and type Steam in the search bar:

Source: zacks.eu
Click on the highlighted result, and when a new window opens, click on the green Install button to install the application.
PlayOnLinux
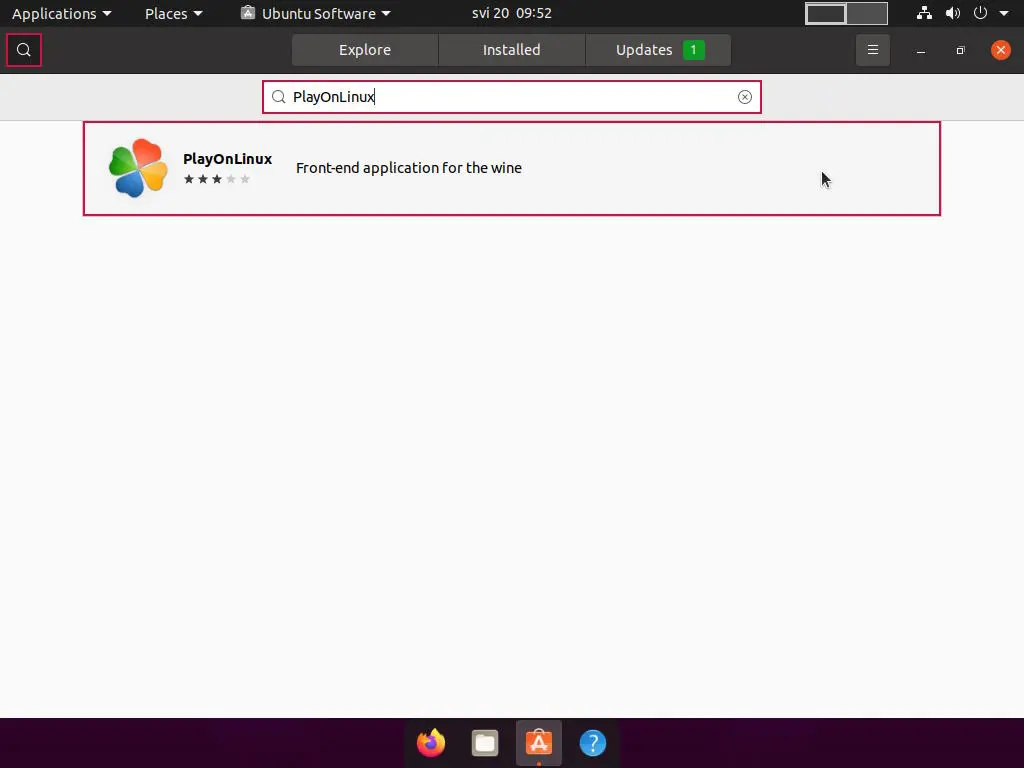
PlayOnLinux will allow you to install Windows-based games and other applications on your Linux machine. To install it, please open the Ubuntu Software application, click on the Search button, and type PlayOnLinux in the search bar:
Source: zacks.eu
Click on the highlighted result, and when a new window opens, click on the green Install button to install the application.
This pretty much wraps up this guide. If you require any additional applications, please feel free to use the Ubuntu Software app. I hope you’ve gotten a grip on it by now. For all of you who followed our Ubuntu Desktop 20.04—Installation Guide and Customize Ubuntu 20.04 Desktop Environment guides, there is a bit more additional reading below. Enjoy!
Optional – Favourite Apps in Dock
There are a few apps you use much more than others. Usually, you place a desktop shortcut for such apps, but I wouldn’t say I like desktop shortcuts, and I want to keep my desktop clean. So, I added shortcuts for such apps to the Dock. The Dock is a “launcher bar” visible at the bottom edge of your screen if you’re wondering.
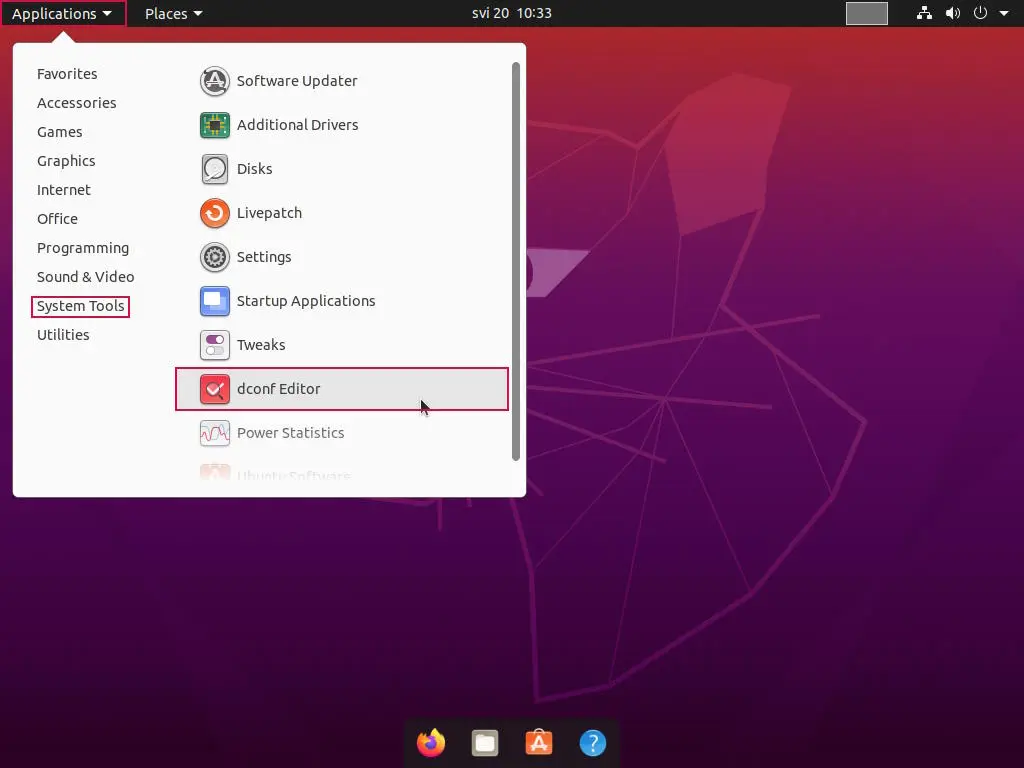
So, how does one add shortcuts to it? First, you need to enable the All Applications button. To do so, please click on the Applications menu, and from there, go to System Tools -> dconf Editor:
Source: zacks.eu
Once dconf Editor starts, you will see a list of subfolders. Click on org and continue to click in the following order: gnome -> shell -> extensions -> dash-to-dock. Once there, scroll down until you find the show-show-apps-button option:
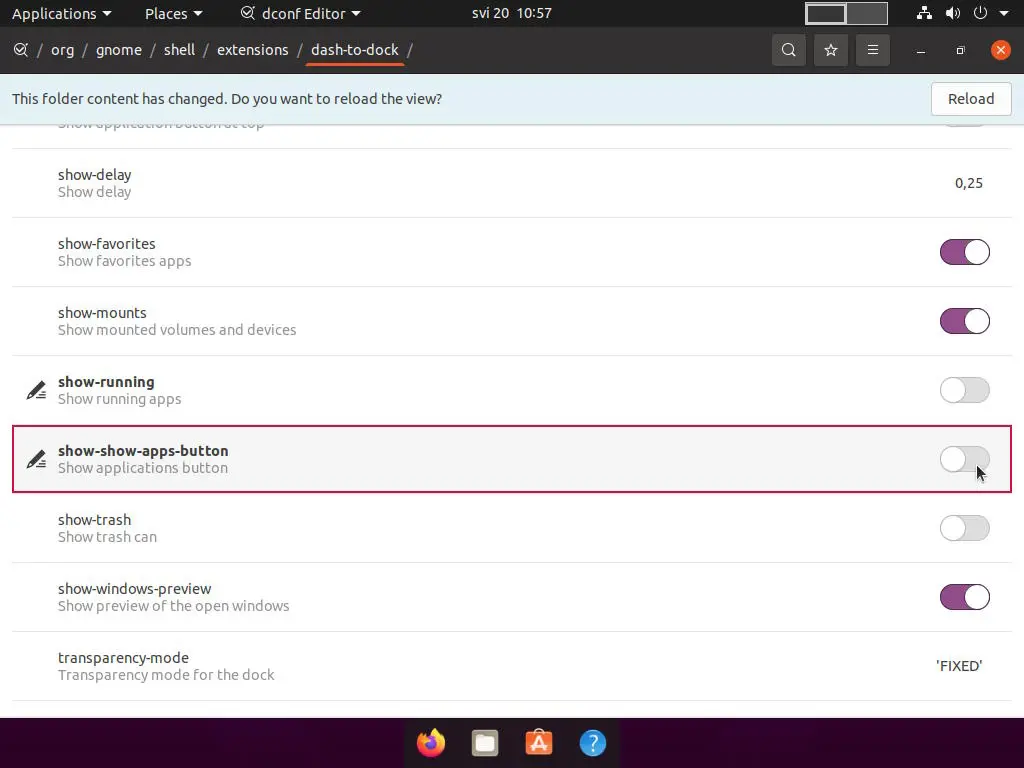
Click on the slider button on the right to enable the All Applications button, and you will automatically see it appear in your Dock:
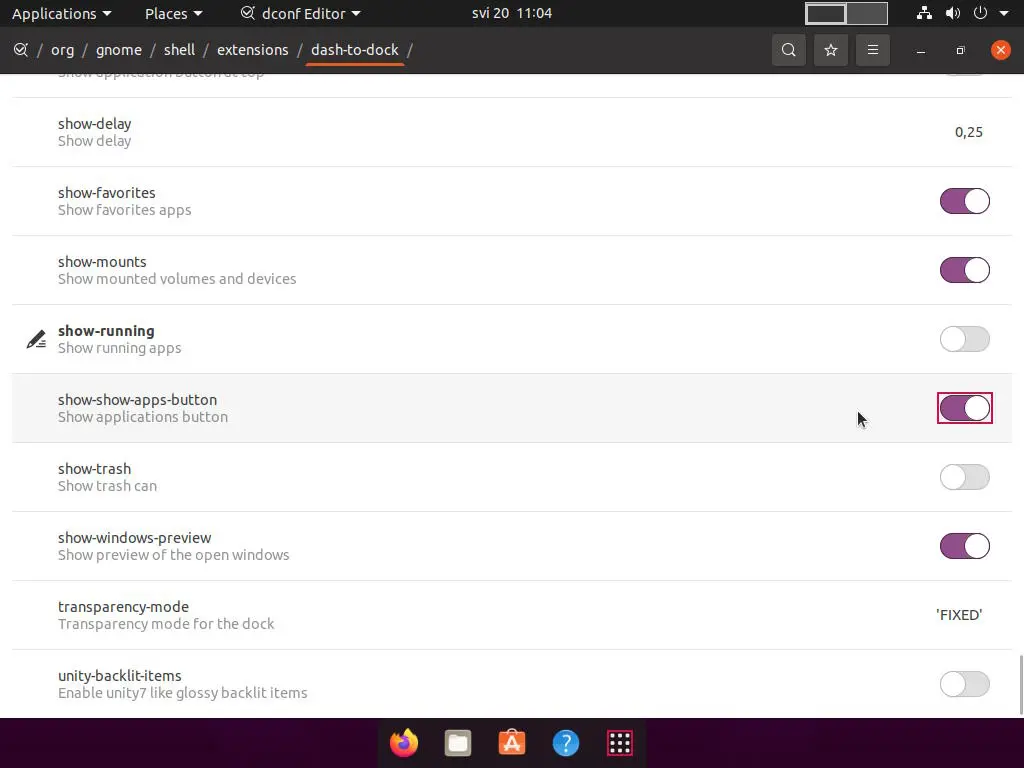
Source: zacks.eu
Now, you can minimize dconf Editor and click the All Applications button. Once all apps are shown, you can add your favorite ones simply by locating the application icon and dragging it to the Dock:
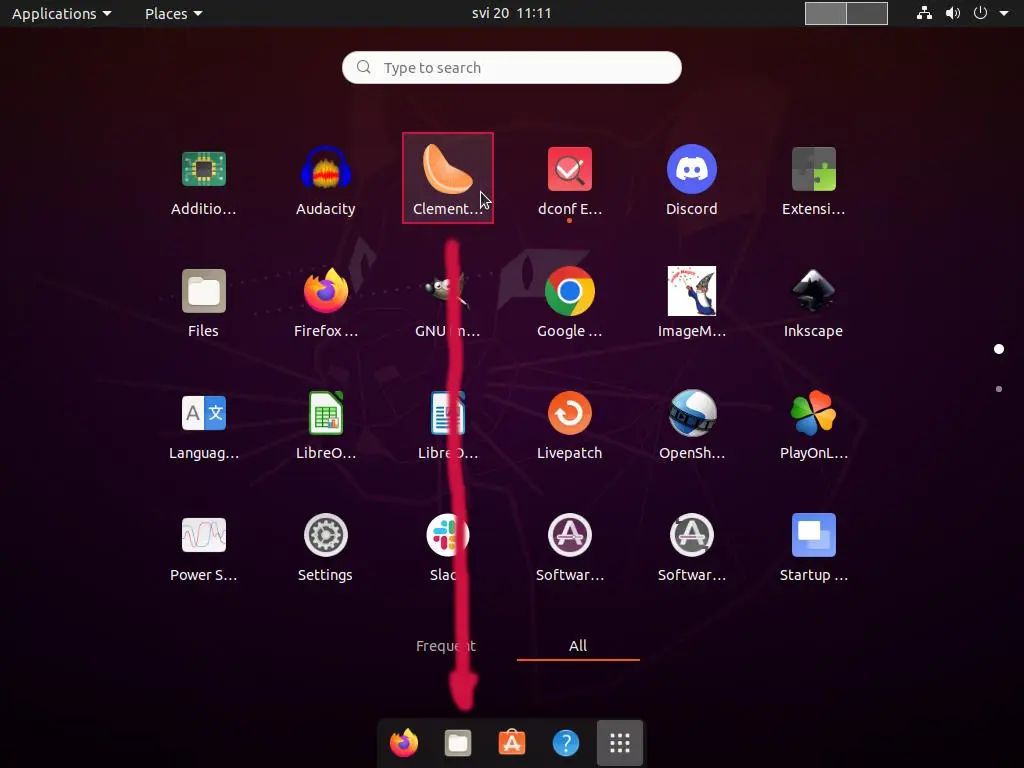
If you would like to remove something from your Dock, you can do it by simply right-clicking on the application you don’t want in your Dock and selecting Remove from Favourites next:
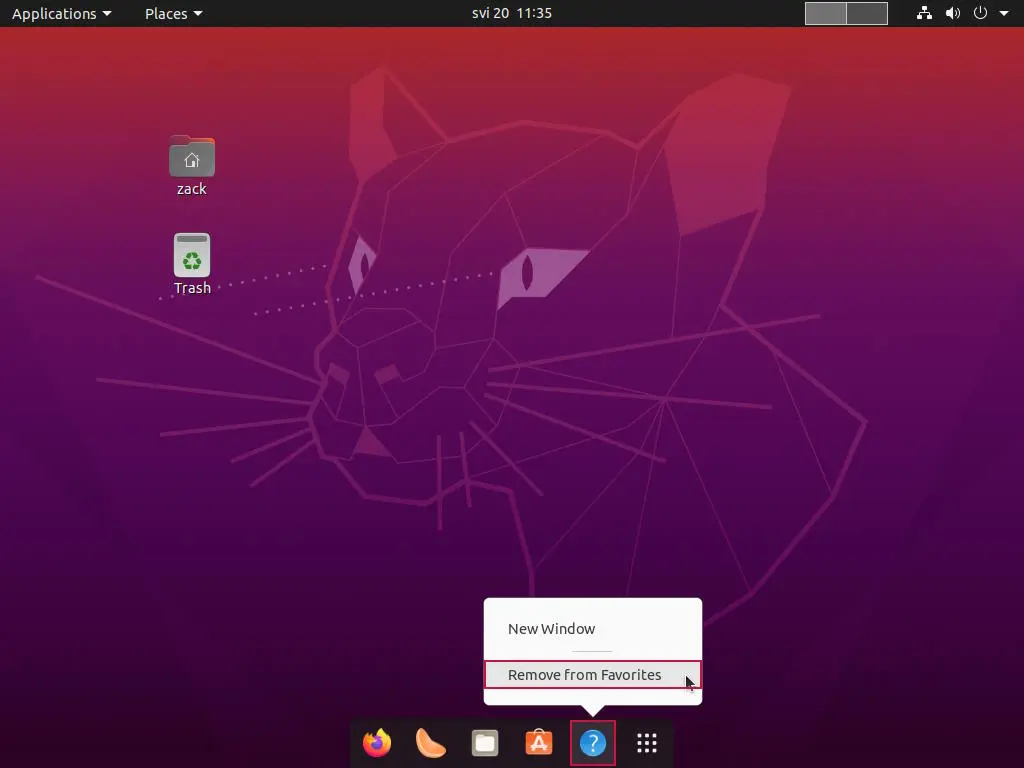
Re-arranging the order of your applications in the Dock is also really simple. Click on the application you want to move and drag it right or left. The picture below shows how I did it:
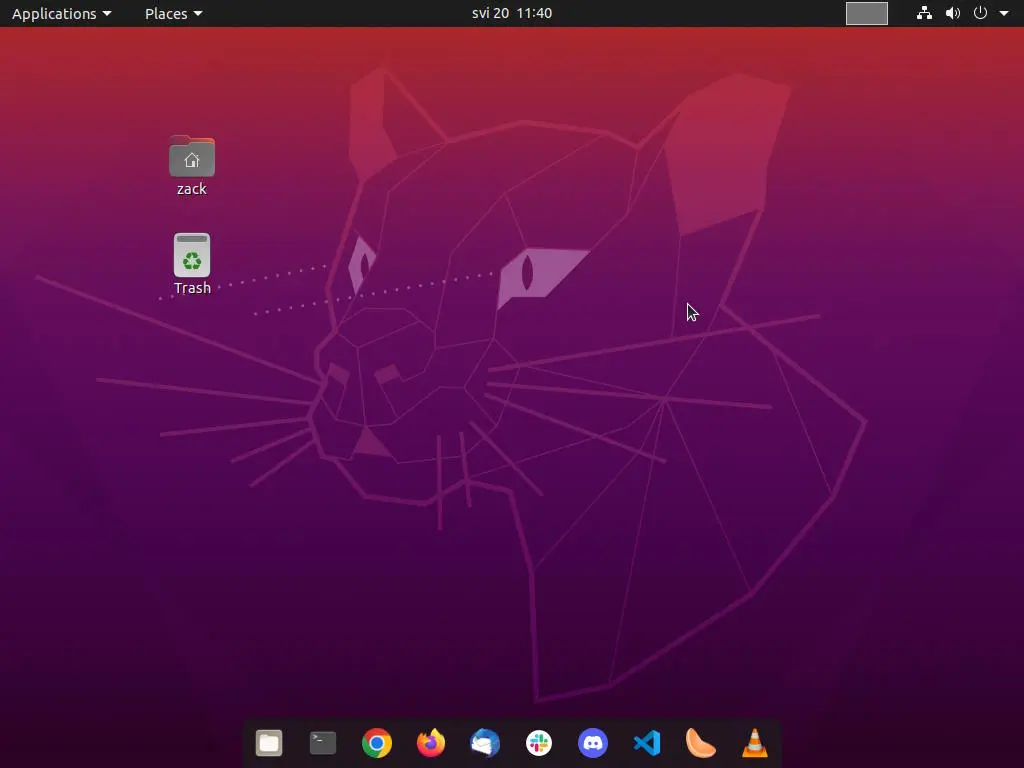
As a final step, you can bring back the dconf Editor and turn off the show-show-apps button, or you may leave it as it is. It’s all up to you. I hope you enjoyed this guide. Thanks for reading.
