Author:
Željko Jagušt
Publish Date:
October 16, 2023
Estimated Reading Time:
17 minutes
This comprehensive guide will walk you through performing local file backups on your Debian system and seamlessly syncing them with Google Drive. With the power of Rclone and Lsyncd, safeguarding your valuable data on Debian has never been easier. Follow our step-by-step instructions to ensure your files are protected and accessible whenever needed.
Introduction
There are quite a few Linux clients you can install on Debian, providing an option to backup your local files on Google Drive. While it is perfectly fine to use them, in this Google Drive Backup on Debian guide, we will focus on utilizing tools available within the operating system to do the same job.
With clients, a sync or a backup job depends on a schedule you define in client settings. That means the backup will run at specific periods, like once a week, a day, or even an hour. With Lsyncd, you get the option of “instant” backup. Lsyncd utilizes a local directory tree event monitor interface (inotify or fsevents), aggregates and combines events for a few seconds, and then spawns one (or more) process(es) to synchronize the changes.
In layman’s terms, Lsyncd watches all files and directories you marked for backup. As soon as it registers a change (a new or deleted file or directory or a change to the same), it automatically triggers a sync to Google Drive. It is easy to configure and works in the background with minimal resource usage. Let’s see how.
Prerequisites
For this to work, you will need a Debian with GNOME Desktop Environment installed along with Rclone and Lsyncd. If you don’t have it, we have a series of guides you can check on how to do it:

Debian 11 Server – Minimal Installation Guide
Follow this guide for a Debian 11 Server minimal installation, providing a solid foundation for any server setup or project you want to build.

Debian 11 Server – Initial Customization Guide
Discover introductory steps to streamline performance, security, and administration in our Debian Server Initial Customization guide.

Install GNOME Desktop Environment on Debian – Easy Guide
Discover the GNOME Desktop Environment elegance and modern features. Follow our Debian installation guide for a seamless experience.

Encrypting your hard drive is something you may consider if you intend to install GNOME Desktop Environment along with Debian on your notebook computer. Hypothetically, you may leave your notebook unattended, and it might get stolen. With a hard drive encrypted, accessing the data on your laptop and booting the operating system will be almost impossible. In combination with our Home/Small Office – Debian Server guide, you can also check our guide on encrypting hard drives:

Securing Your Data – Installing Debian Linux with Disk Encryption
This step-by-step guide will teach you how to set up “almost” full disk encryption on the Debian Linux operating system.
You will also need a Google Account, so please create one if you don’t have one.
Google Drive Backup on Debian – The Setup
With Debian Desktop and GNOME installed, you must first set up and configure access to Google Drive with Rclone. Once that is done, you must decide what you want to backup. As an example for this guide, I will demonstrate how to back up my user’s home directory and all the files in it. The final step will be configuring Lsyncd, which will perform the backup. Let’s get started.
Rclone Setup
Rclone will be used for Google Drive authentication. We will also use it to mount Google Drive to our system. If you followed our prerequisite guides, you should have installed Rclone. If not, please start up the Terminal and execute the following:
sudo apt install rcloneOnce Rclone is installed, you can start with the configuration. To do so, execute the following in the Terminal:
rclone configFirst, you will be asked to create a new “remote” connection. Type n to continue:
No remotes found, make a new one?
n) New remote
s) Set configuration password
q) Quit config
n/s/q> n
Next, you will be asked to enter the name of your connection. This is purely descriptive, so you can name it however you want:
Enter name for new remote.
name> my-google-drive
In the next step, you will be asked what type of storage you want to use. To select Google Drive, type drive:
Option Storage.
Type of storage to configure.
Choose a number from below, or type in your own value
...
18 / Google Drive
   \ (drive)
...
Storage> drive
In the following step, things get a bit more complicated. You will be asked to provide your Google Application Client ID. While I highly recommend to create and use your own, due to the simplicity of this guide, we will continue without it, so just press Enter to continue:
Option client_id.
Google Application Client ID
Setting your own is recommended.
See https://rclone.org/drive/#making-your-own-client-id for how to create your own.
If you leave this blank, it will use an internal key which is low performance.
Enter a value. Press enter to leave empty.
client_id>
Just as in the previous step, you can press Enter to continue here also:
Option client secret.
OAuth Client Secret.
Leave blank normally.
Enter a value. Press Enter to leave empty.
client_secret>
In the next step, we will grant Rclone full access to Google Drive. To do so, please type in 1 and press Enter to continue:
Option scope.
Scope that rclone should use when requesting access from drive.
Choose a number from below, or type in your own value.
Press Enter to leave empty.
...
1 / Full access all files, excluding Application Data Folder.
  \ (drive)
...
scope> 1
You can also press Enter to continue in the following step:
Option service_account_file.
Service Account Credentials JSON file path.
Leave blank normally.
Needed only if you want use SA instead of interactive login.
Leading '~' will be expanded in the file name as will environment variables such as '${RCLONE_CONFIG_DIR}'.
Enter a value. Press Enter to leave empty.
service_account_file>
For the next two steps, also press Enter to continue:
Edit advanced config?
y) Yes
n) No (default)
y/n>
Use auto config?
* Say Y if not sure
* Say N if you are working on a remote or headless machine
y) Yes (default)
n) No
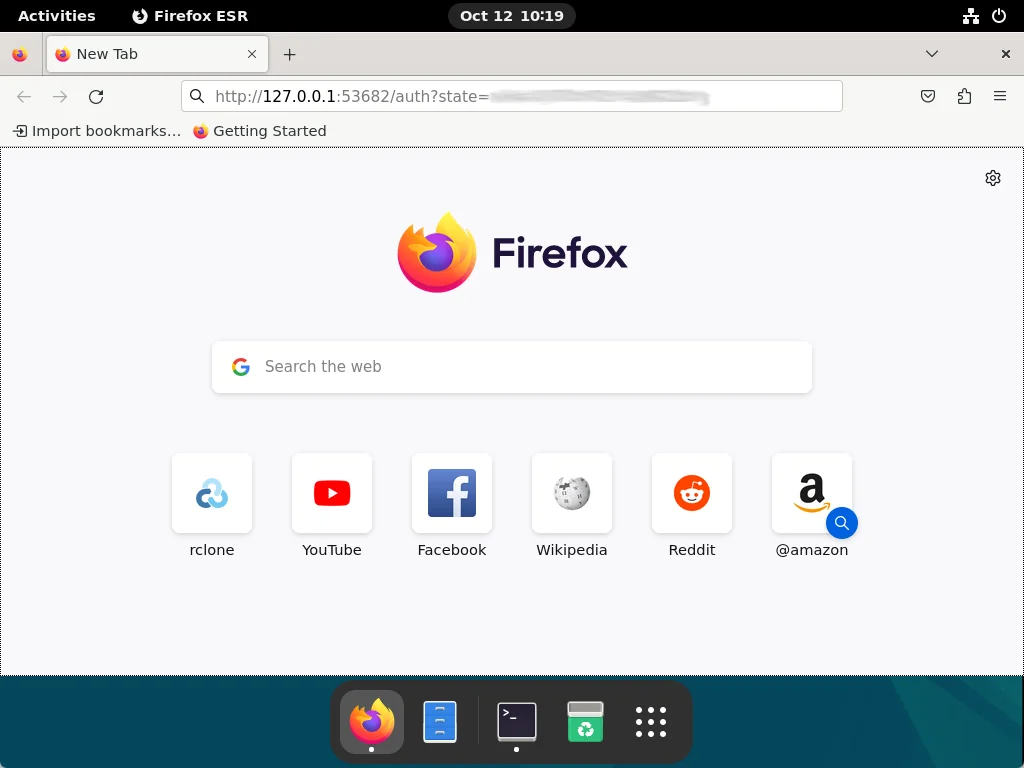
y/n>In the next step, your browser should open automatically and display an authorization dialogue for Rclone… but only if you have Google Chrome installed. Since this is not the case, please follow the instructions displayed:
If your browser doesn't open automatically go to the following link: http://127.0.0.1:53682/auth?state=XXXXXXXXX
Log in and authorize rclone for access
Waiting for code...
If you followed our prerequisites, you should have Firefox installed. Fire it up, and paste in the link from the instructions displayed (http://127.0.0.1:53682/auth?state=XXXXXXXXXXX) in the address bar:
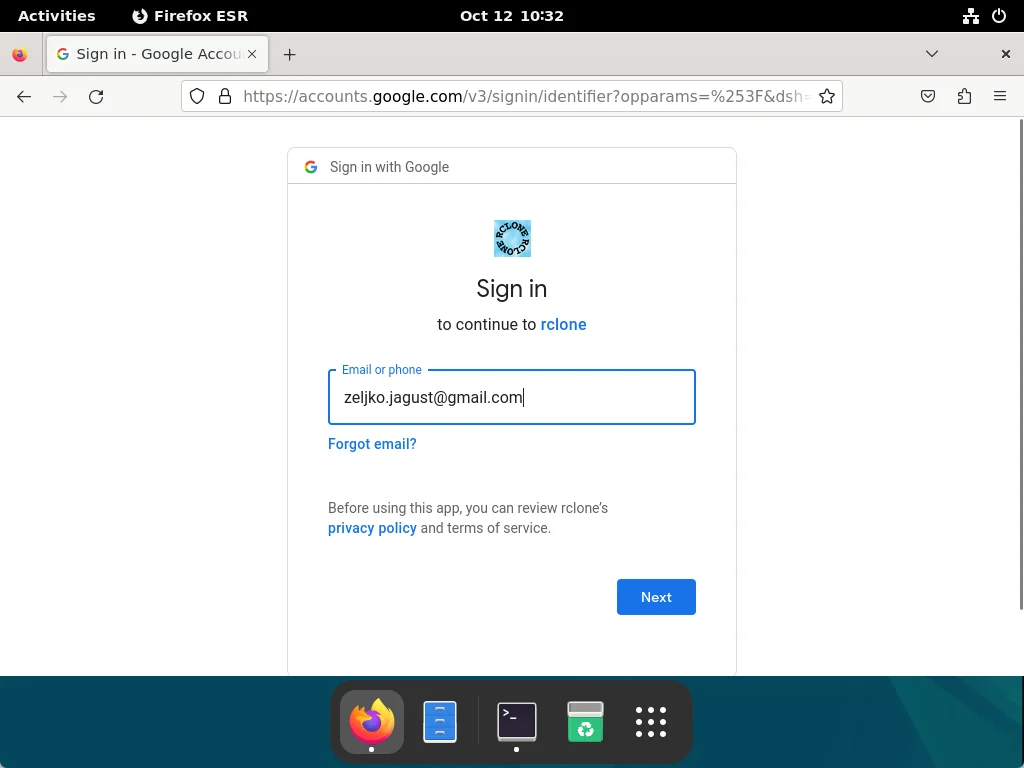
Once you press Enter, you will be asked to enter your Google (Gmail) email address, so please do so:
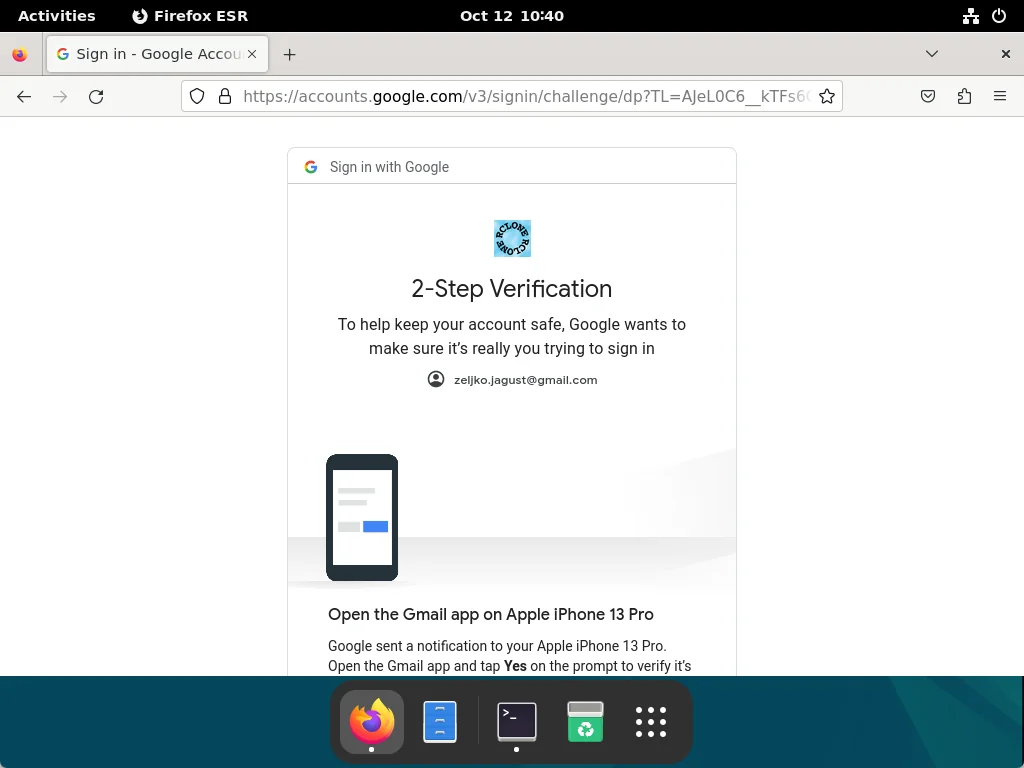
Do the same with the password in the next step:

You will see a dialog on how to proceed depending on how you’ve set up your 2FA, so please do as instructed. In the picture below, you can see that I was asked to open a Gmail app on my phone to confirm sign-in, and you might as well see the same:
In the next step, you will be asked to grant Rclone access to your Google Drive, so please allow it:
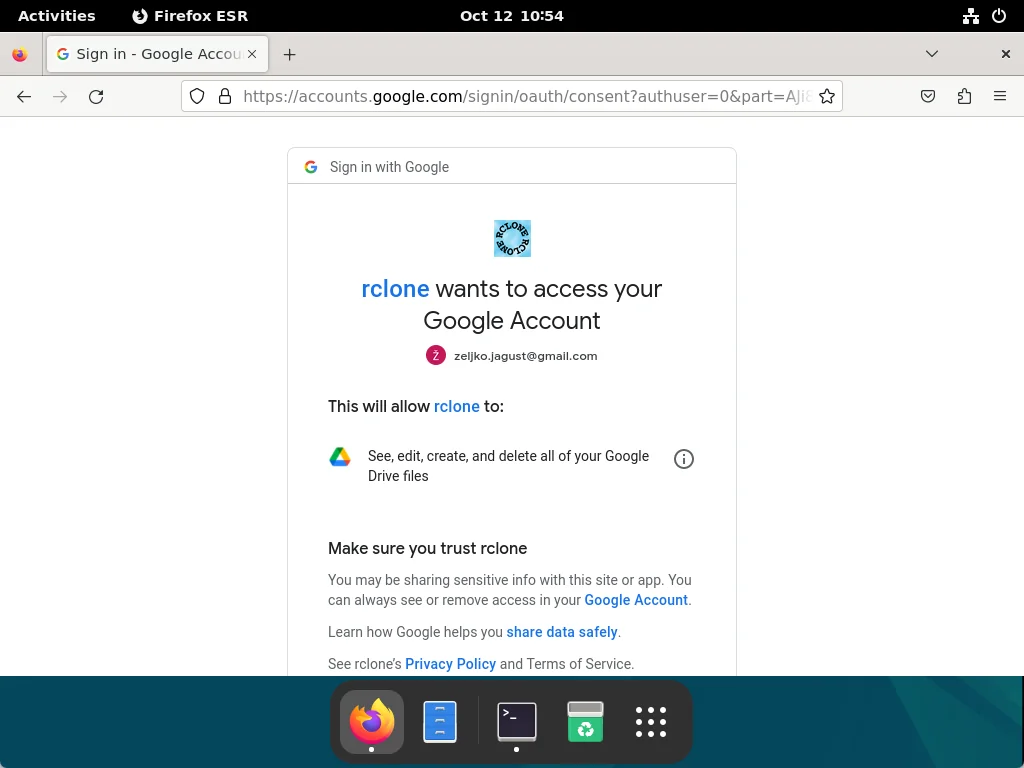
Once you confirm the access, you will see a “Success” message. You will also get a confirmation email on your Gmail account (which you used for the Rclone setup). Go back to the terminal, and you will see the “Got the code” notice there:
If your browser doesn't open automatically go to the following link: http://127.0.0.1:53682/auth?state=XXXXXXXXX
Log in and authorize rclone for access
Waiting for code...
NOTICE: Got the code
In the next step, press Enter to accept the defaults:
Configure this as a Shared Drive (Team Drive)?

y) Yes
n) No (default)
y/n>
This should complete the Rclone setup. In the final step, please confirm everything by pressing y:
Once you press y, please press q also to quit the configuration.
Google Drive Mount
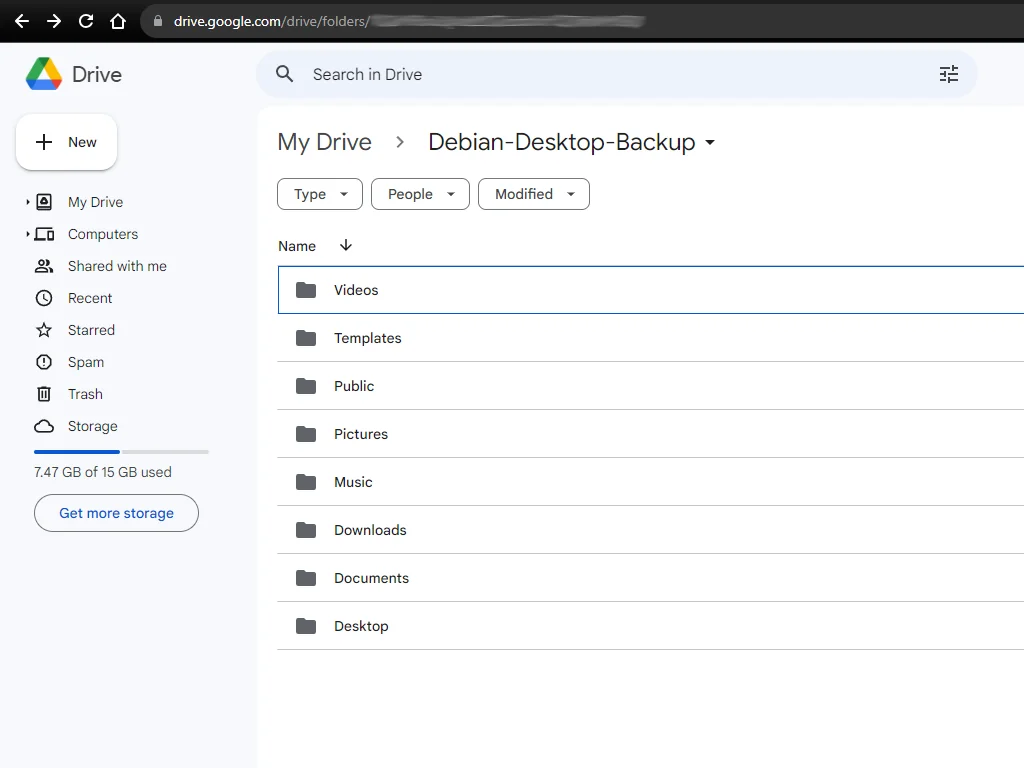
We will also use the Rclone client to mount the Google Drive configured in the previous section of this guide. Before continuing, I suggest you create a dedicated directory for your backup on Google Drive. To do so, first open your Google Drive in the browser:
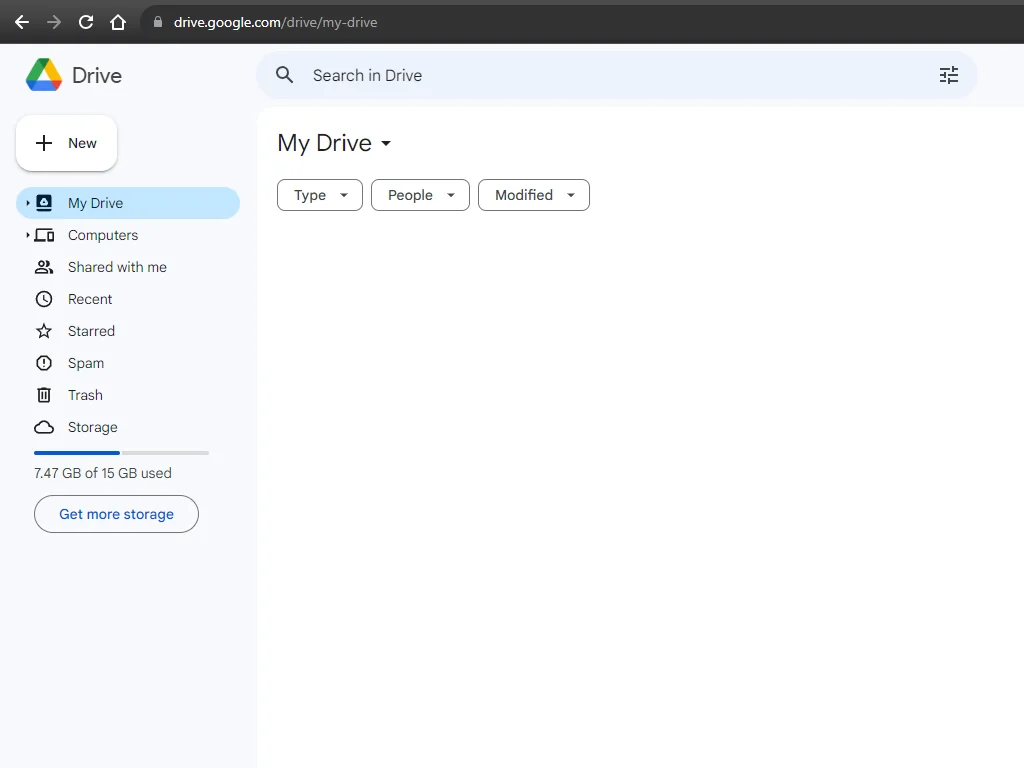
Once there, right-click anywhere on the white space below the “My Drive” title and click on New Folder from the menu:

Give a new folder a name, something related to what you intend to do (backup your files), and click the Create button. Once done, you will see your new folder:

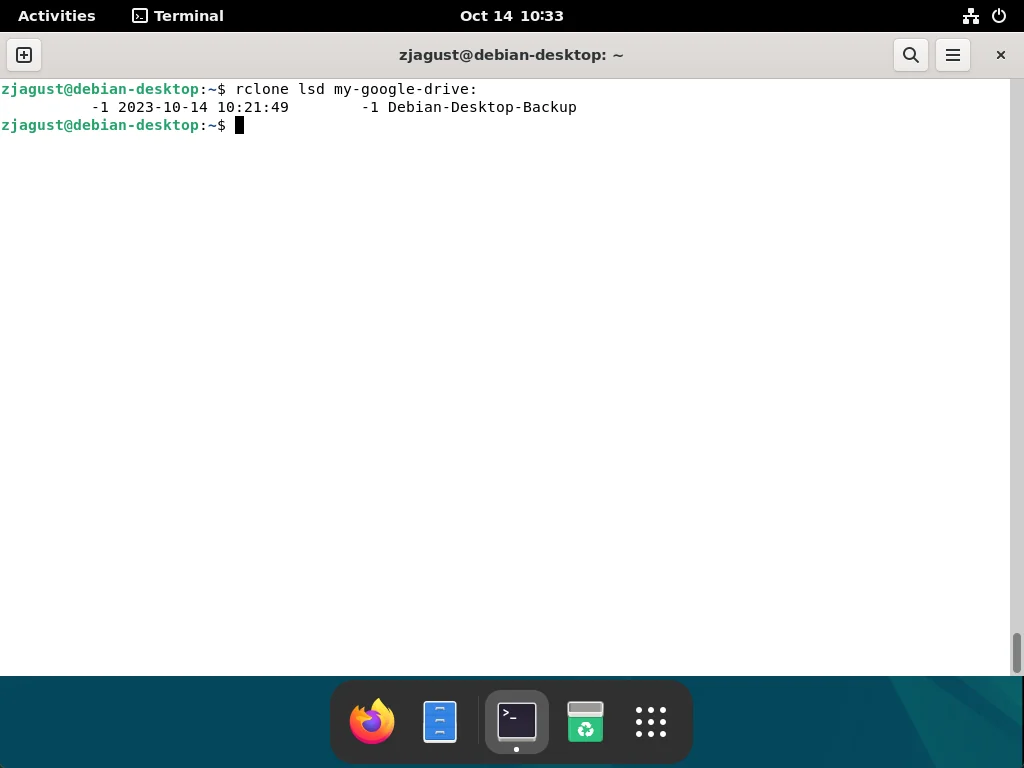
Now, you can check if you see the same folder on your computer. To do so, please execute rclone lsd my-google-drive: in the Terminal (replace my-google-drive with whatever name you used for the remote during Rclone configuration):
You can now create a local mount point if you see the folder. To do so, create a new folder in your home directory by executing the following in the Terminal:
cd
mkdir Gdrive
Now you can mount the Google Drive locally by executing the following in the Terminal:
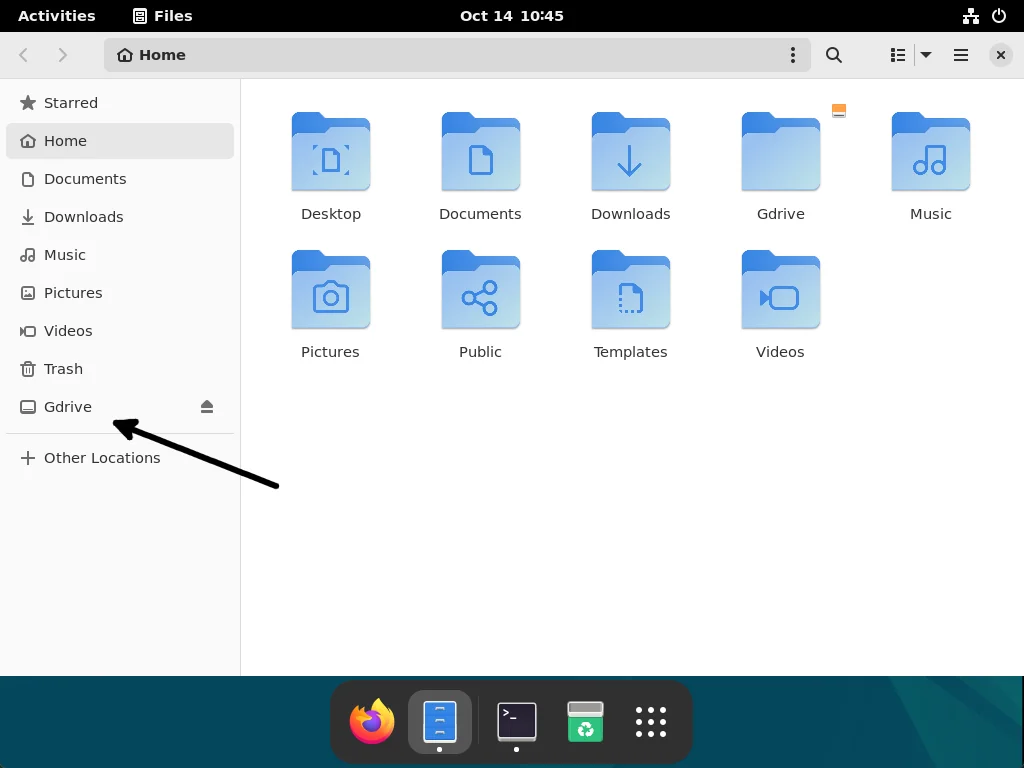
rclone mount --daemon my-google-drive:/Debian-Desktop-Backup ~/GdriveIf you open Nautilus File Manager now, you should see your Google Drive mount there also:
To make the mount persistent, you can create a cron job to mount Google Drive automatically every time you start your computer. To do so, please execute the following in the Terminal:
(crontab -l 2>/dev/null; echo "@reboot rclone mount --daemon my-google-drive:/Debian-Desktop-Backup $HOME/Gdrive") | crontab -With all this in place, you can configure the backup itself now, and I will show you how in the next section.
Lsyncd Backup Setup
I will use my home directory (/home/zjagust) as an example of the location I wish to backup to my Google Drive. If I check it out on my fresh Debian Desktop installation, default installation directories are all I have there:

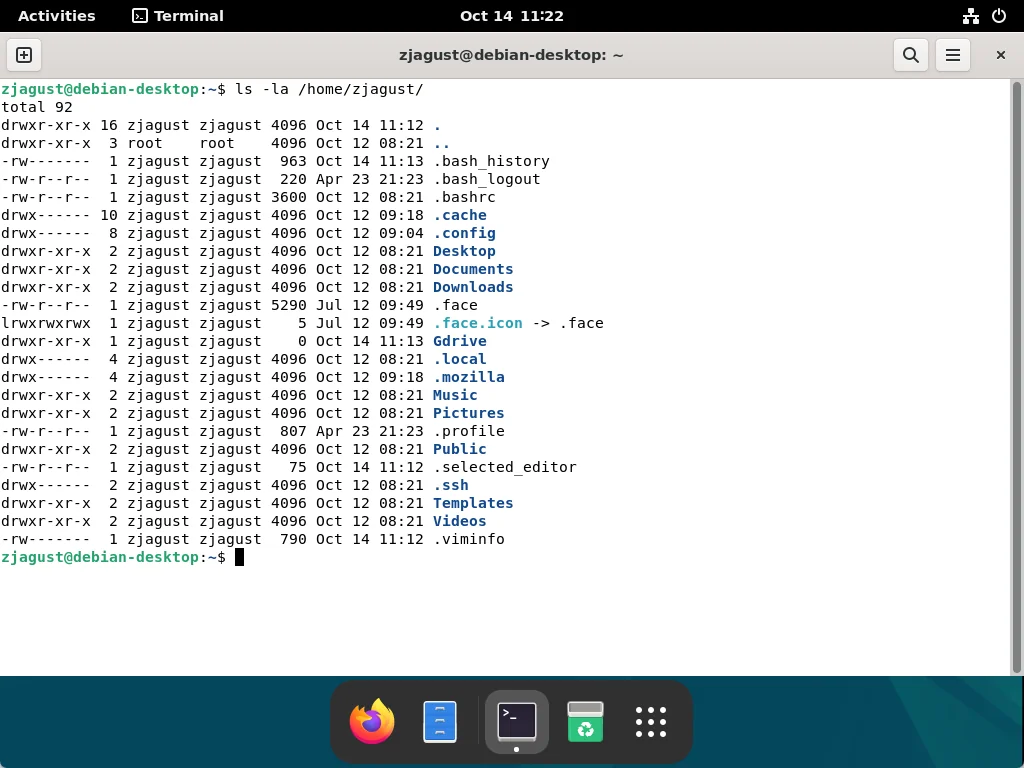
File Manager is not showing hidden (dotted) files by default, and although there is an option to enable that, I don’t want to do that (I’m not too fond of it). To see hidden files, I will list them in the Terminal by executing ls -la /home/zjagust:
I don’t want all those hidden files in my backup, and I will show you how to filter them out in the Lsyncd configuration (exclude option). To start with, I need to install Lsyncd first. It can be done by executing the following in the Terminal:
sudo aptitude install -R -y lsyncdNow, a status and log file for the Lsyncd can be created. To do so, execute the following in the terminal:
sudo touch /var/log/lsyncd.log
sudo touch /var/run/lsyncd.status
At this point, everything is ready for the Lsyncd configuration, which will be used for backup. I will create an example file that will be used to back up my home directory, and you are welcome to experiment and tailor the configuration to suit your needs. Lsyncd configuration is stored at /etc/lsyncd/lsyncd.conf.lua, so create the directory first:
sudo mkdir /etc/lsyncdNow you can open /etc/lsyncd/lsyncd.conf.lua configuration file and paste the following content in it:
-- Debian Desktop Backup
settings {
        logfile = "/var/log/lsyncd.log",
        statusFile = "/var/run/lsyncd.status",
        insist = true
}
sync {
        default.rsync,
        source = "/home/zjagust/",
        target = "[email protected]:/home/zjagust/Gdrive/",
        exclude = { '.*', '.*/', 'Gdrive/' },
        rsync = {
               update = true,
               times = true,
               archive = true,
               compress = true,
               verbose = true,
               rsh = "/usr/bin/ssh -l zjagust -i /home/zjagust/.ssh/id_rsa -o StrictHostKeyChecking=no -o User=zjagust"
        }
}
Please modify the configuration to suit your needs. Once you do that, and before you can actually start the Lsyncd service, please understand the following. We used rclone client to mount Google Drive locally to the system and used a non-privileged user (non-root) to do so. Thus, this makes our local Google Drive mount a FUSE (Filesystem in Userspace) mount.
The dilemma here is the following: Lsyncd must be started using elevated (root) privileges, and as such, it will not be able to access our locally mounted Google Drive (due to the reasons described above). To remedy this, we instructed Lsyncd (in the configuration file) to connect to our Google Drive (target) over SSH connection to the local host (127.0.0.1) and with a user who can access locally mounted Google Drive (in my case, [email protected]).
To put this all to work, you must first create an SSH key for your user. If you followed our articles listed in the prerequisites section above, you should already have a key created, and if not, you can create one by executing the following in the Terminal:
ssh-keygen -b 4096 -t rsa -f /home/$USER/.ssh/id_rsa -q -N ""You also need to “authorize” the access by executing the following in the Terminal:
echo "From=\"127.0.0.1\" $(cat /home/$USER/.ssh/id_rsa.pub)" > /home/$USER/.ssh/authorized_keysNow everything is ready, and the Lsyncd service can be started. To do so, please execute the following in the Terminal:
sudo systemctl restart lsyncd.cerviceWith the service running, your Google Drive backup on Debian is successfully configured. In the rest of the guide, I’ll show you how to check if everything works as expected and how to configure the log rotation for the Lsyncd service.
Google Drive Backup on Debian – Backup Test
You can test your Google Drive backup now. In my example, I already had basic folders in my home directory (i.e., Desktop, Documents, Downloads …), and if I check the local Google Drive mount, I can see them there:

If I check my Google Drive in the web browser, I can see those folders there also:
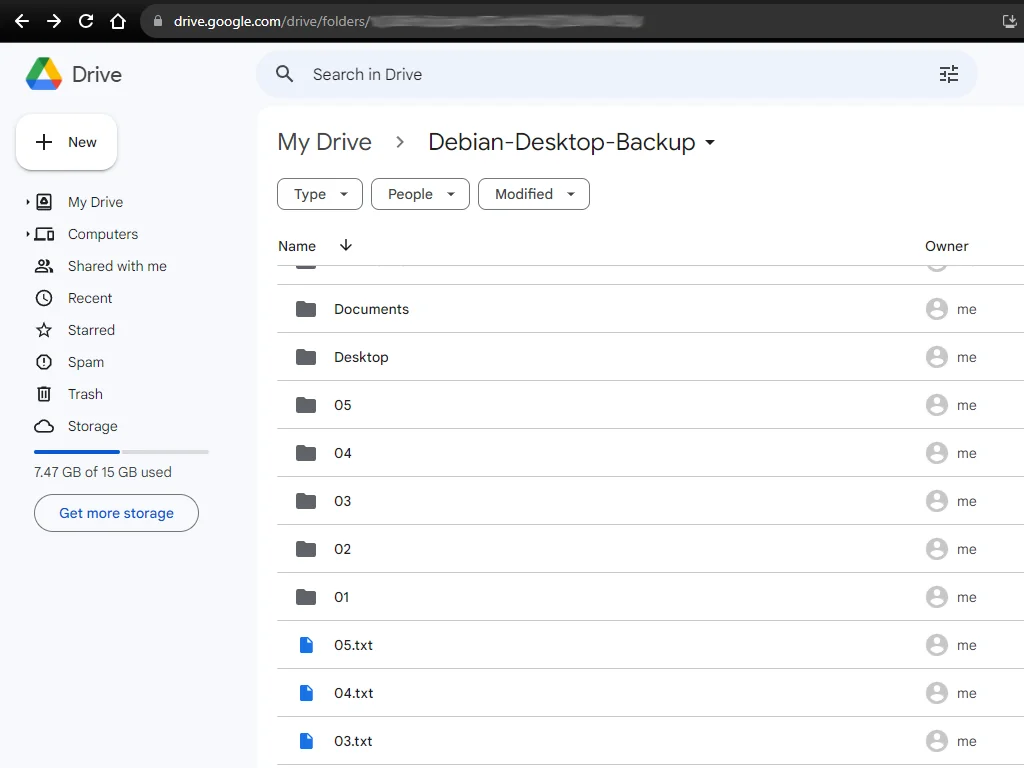
I did a simple test, creating five new files and folders in my home folder. I did it by executing the following in the Terminal:
cd
for d in {01..05}; do mkdir $d; done
for f in {01..05}; do touch $f.txt; done
And when I checked my local Google Drive mount, those new files and folders were there:

I can also see them in the browser:
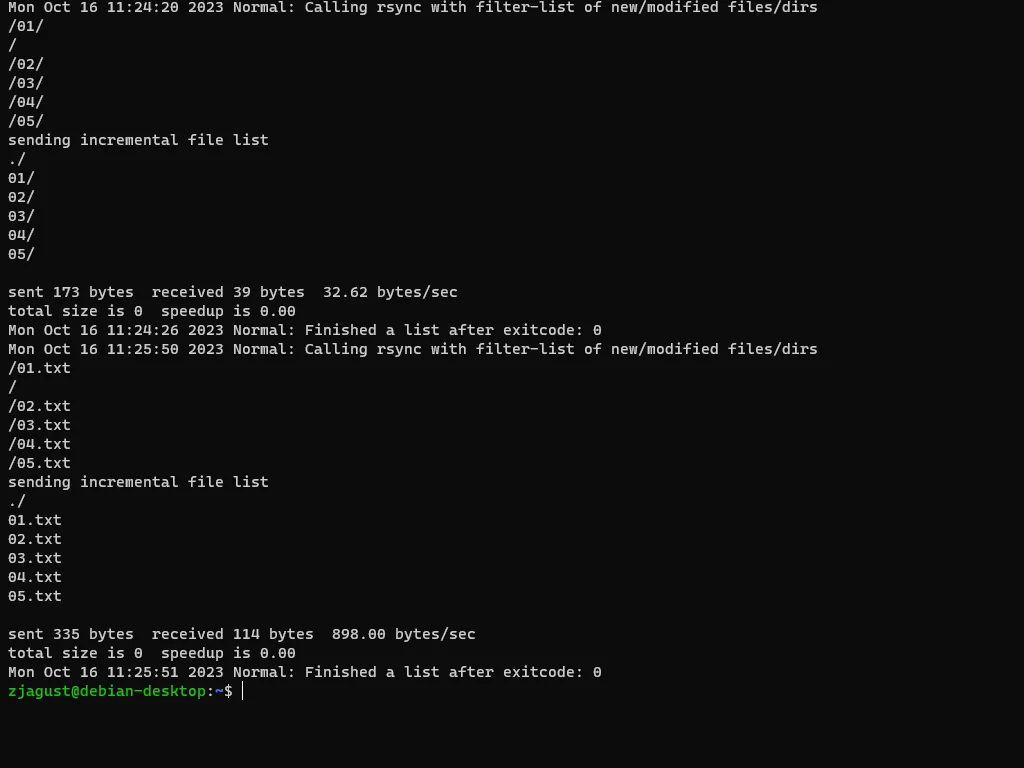
Once I checked the Lsyncd log (/var/log/lsyncd.log), I saw those files were successfully transferred:
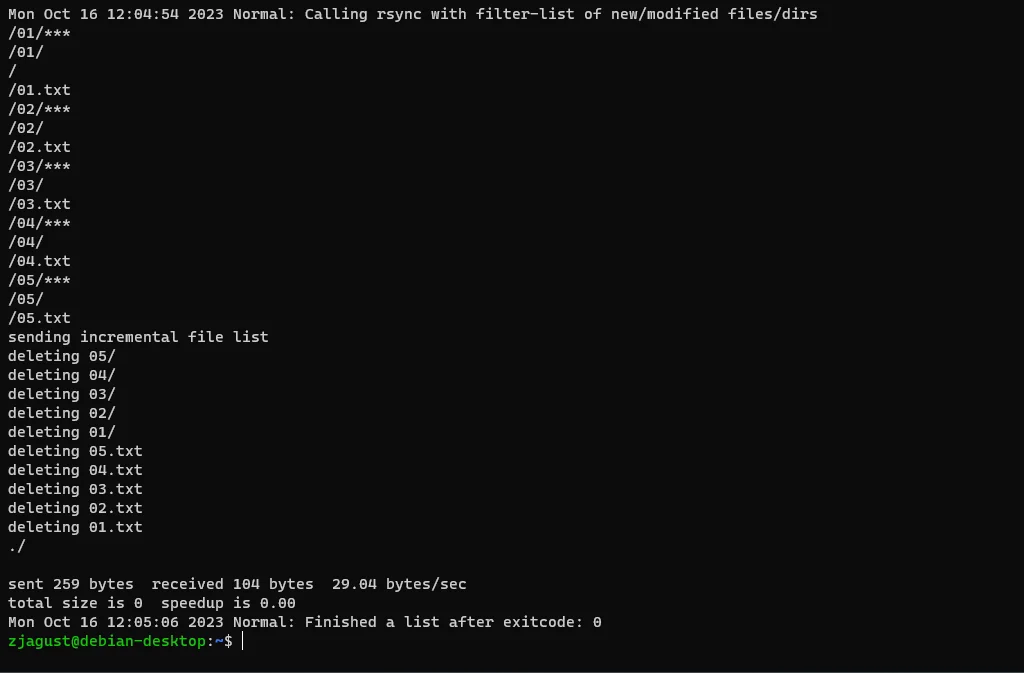
When I confirmed the new files and folders were successfully transferred, I deleted them from my local home folder. And guess what? They were also gone from my Google Drive, and the Lsyncd log confirms it:
To wrap this all up, a log rotation of the Lsyncd log should be configured to prevent it from growing indefinitely. To do so, you can create a new “log rotate” file:
/var/log/lsyncd.log {

    daily
    rotate 7
    compress
    delaycompress
    copytruncate
    missingok
    notifempty
    create 644 root root

}
This will rotate the log daily, but not if it is empty. Upon rotation, it will create a backup of the current log, compress it, and truncate it (delete all content). It will hold seven days’ worth of logs (everything older will be deleted). Of course, you are free to configure (schedule) log rotation however suits you best.
With all this in place, you have a free cloud backup in a secure and safe location that you can always access and restore. The only caveat is the space you get with your free Google account (15 GB shared with all other services you have on Google), but migrating to paid service is really not so expensive, and I highly recommend you do so. You can check pricing and plans on the Google One website.
This is it. I hope you enjoyed the article, and thank you very much for reading it!