
Author:
Željko Jagušt
Publish Date:
January 16, 2023
Estimated Reading Time:
27 minutes
QEMU is nothing other than a machine emulator and virtualizer. It can emulate a complete machine without the need for hardware virtualization. When paired with KVM, it will allow you to utilize hardware virtualization, enabling near-native CPU performance. With the addition of the libvirtd daemon, it will allow you to run everything in the background.
Introduction
This guide will demonstrate the KVM QEMU installation on the Ubuntu Linux operating system. QEMU is a piece of software that can operate independently, emulating all the hardware the virtual machine requires. Still, due to the emulation being performed entirely in software, it is extremely slow. This is where KVM comes into play.
KVM is a set of Linux kernel modules that will turn your Linux operating system into a type 1 hypervisor. To explain this better, you can think of KVM as a “bridge” between the QEMU emulator and your CPU. So, instead of emulating a CPU in software, KVM will allow QEMU to use a “slice” of your physical CPU to perform the required operations.
Prerequisites
Your computer (CPU) must support virtualization technology. For Intel processors, it is called VT-x (can also be Intel VT or Intel Virtualization Technology), and for AMD processors, it is called AMD-V. You must enable that option in BIOS, usually under the advanced settings. On the link below, you can check how to find VT-x/AMD-V BIOS settings on some major vendor computers, but I recommend you check your motherboard manual to see where precisely the option is:
You also need a Linux operating system. KVM QEMU combo will work on most Linux systems, and since this guide is suited for Debian-based distributions, we will use Ubuntu 22.04. If you don’t have one, you can check our Ubuntu 22.04 Desktop installation guide:

Ubuntu Desktop 22.04 – Installation Guide
In this guide we will demonstrate how to install the LTS (long-term support) version of Ubuntu Desktop 22.04. Come and check it out.
KVM QEMU System Checks
KVM QEMU installation is pretty trivial, but it is important to have your system prepped. There are a few things you should pay attention to before the installation:
- Server or Desktop
- While not so important, you may choose to install a GUI client (desktop approach) or use only CLI tools (more server-like “headless” method).
- High Availability
- With KVM and QEMU, you can build a highly available cloud-like system with live migration support or opt for a standalone system.
- Dedicated Hardware
- KVM QEMU system allows you to utilize LVM for better and more robust storage management, allowing you to use “chunks” of physical disks rather than disk images. Also, if your computer supports it, you can enable special processor features (Intel VT-d/AMD-Vi) that will allow you to “passthrough” other physical hardware (i.e., GPUs, NICs, etc.) to your virtual machines.
For the purpose of this guide, I will use my notebook to demonstrate KVM QEMU installation. While it fully supports hardware virtualization, I will not be able to demonstrate high-availability features. Since this is an installation and basic configuration guide, such features are out of the scope of this guide.
To start with everything, I will first do a couple of system checks essential for almost any type of virtualization, not just KVM QEMU. Let’s check them out.
Hardware Virtualization Support
As stated in the Prerequisites section above, your CPU must support virtualization technology. You can check this from your operating system by executing the following command in the Terminal:
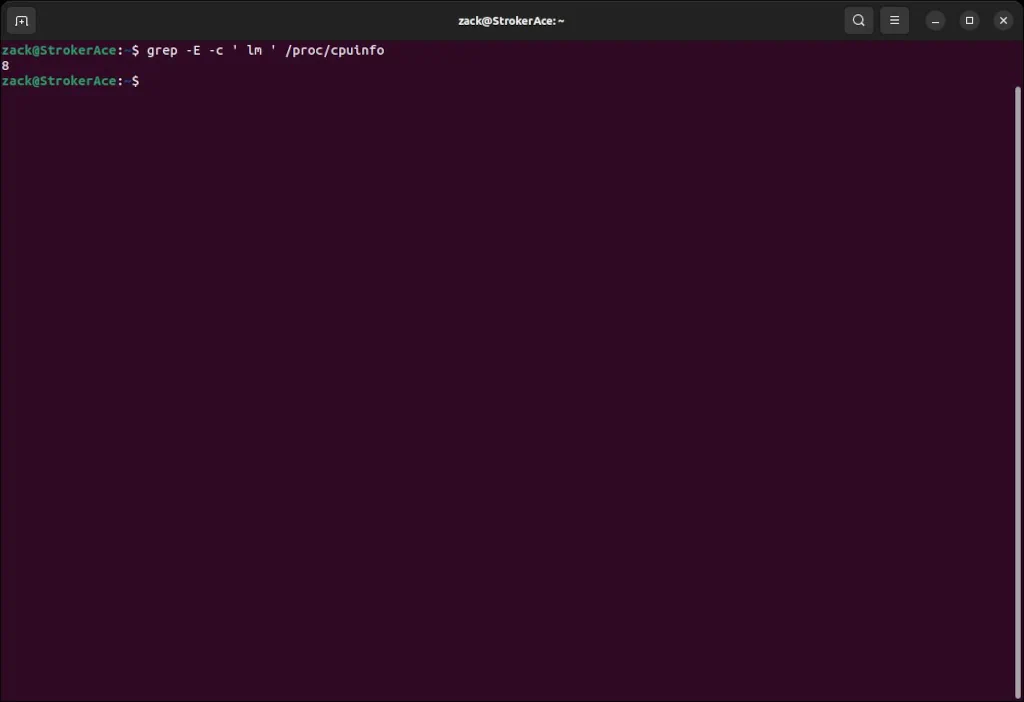
grep -E -c '(vmx|svm)' /proc/cpuinfoOnce the command is executed, the desired result should be any even number greater than 0:

While it is doubtful the result will be 0, there is still a slight possibility of it being so (i.e., if you have a really, really old CPU). In such cases, you can recheck your BIOS and see if you forgot to enable hardware virtualization. If you have an old CPU that does not support hardware virtualization, you can still install QEMU but expect extremely slow performance.
CPU Architecture
Also, it is doubtful that today you have anything other than a 64-bit CPU, but to be on the safe side, you can also check that from your operating system. Execute the following command from the command prompt (Terminal):
grep -E -c ' lm ' /proc/cpuinfoAny result greater than 0 here confirms you have a 64-bit CPU:
Kernel Build
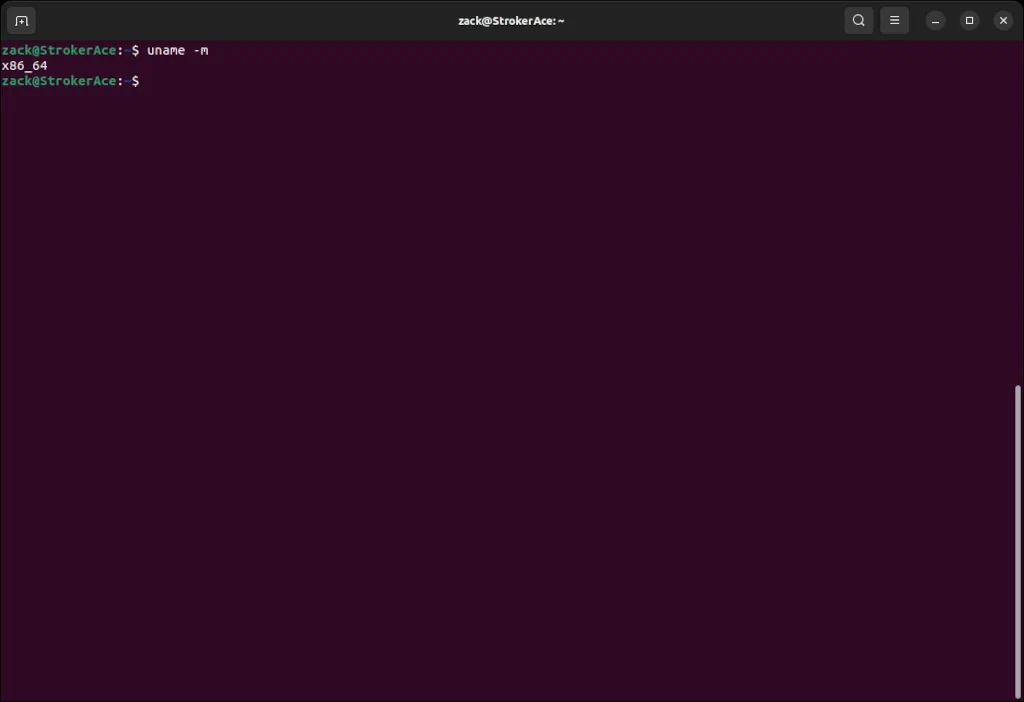
It is also doubtful you will have anything other than a 64-bit kernel, but it is still worth checking out. To do so, you can execute the following command from the command prompt:
uname -mx86_64 is the desired result here, and the one it will confirm you have a 64-bit kernel build:
Nesting Feature
Nesting will allow you a bit more complex use case scenario, where you can create a virtual machine inside a virtual machine. Nested virtualization is supported on almost all modern processor families, and it is usually enabled by default. To check if that is so, please execute the following command from the Terminal:
cat /sys/module/kvm_intel/parameters/nestedThe expected result here is capital Y:

There may be rare cases where the result will be capital N (or /sys/module/kvm_intel/parameters/nested file may be absent); thus, nesting is disabled. To enable it, you can execute the following commands in the terminal window:
sed -i 's/GRUB_CMDLINE_LINUX=""/GRUB_CMDLINE_LINUX="kvm-intel.nested=1"/g' /etc/default/grub
update-grub
Once done, please reboot the computer. Once it boots up, you can check again if nesting is enabled.
Disable Zone Reclaim
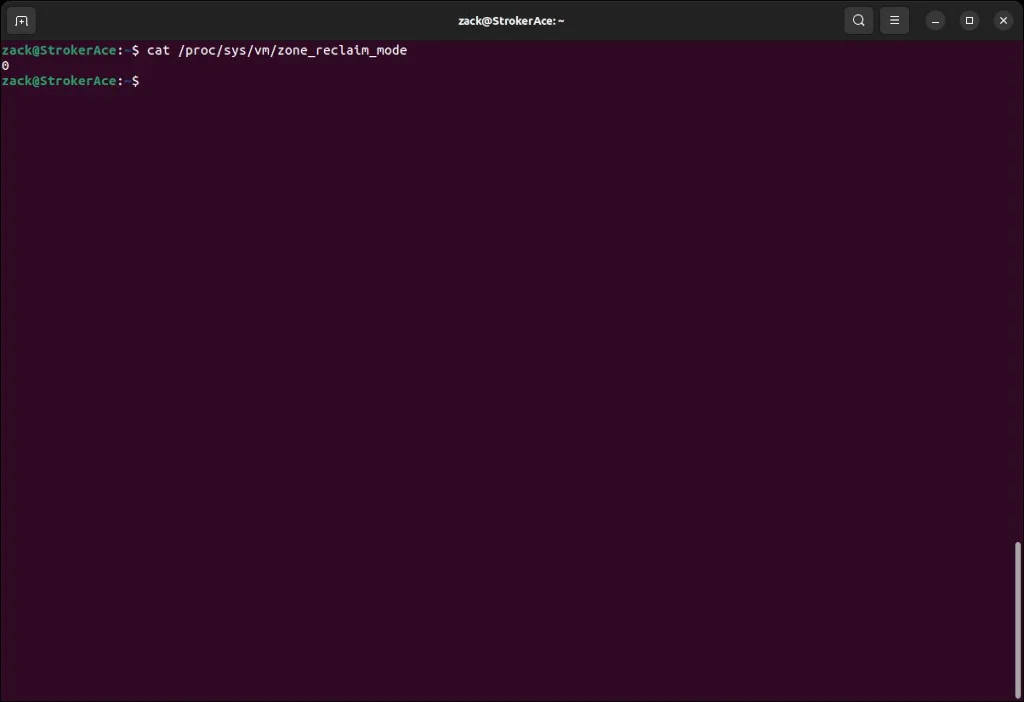
It would take a bit deeper dive to explain zone reclaim mode, so let’s say it is the essence of all evil and really bad if enabled on a computer where you intend to install KVM QEMU. Fortunately, it has been disabled in the kernel by default for quite some time, but still, you can check if that is true by executing the following command in the Terminal:
cat /proc/sys/vm/zone_reclaim_modeAnything else other than 0 here means zone reclaim is enabled:
If by any chance, the check from above returns a value not equal to 0, you can disable zone reclaim mode by executing the following commands in the Terminal:
echo 0 > /proc/sys/vm/zone_reclaim_mode
sed -i "\$a# Disable zone reclaim\nvm.zone_reclaim_mode=0" /etc/sysctl.conf
Swappiness
Swappiness controls how your system swap behaves. A high value will make the system swap more often, which we want to avoid on a system that runs KVM QEMU, as it can compromise the performance of virtual machines (guests). On the other hand, if you’re running KVM QEMU on your Desktop along with all your other apps, setting the swappiness to a low value (or completely disabling it) is also not recommended.
The following are what I would consider sane values regarding swappiness settings based on the type of the system and the amount of RAM:
- On a system running a desktop environment and less than 16GB of RAM, leave it on default
- On a system running a desktop environment and more than 16GB of RAM, set it on 35
- On a server system running other services along KVM QEMU, set it on 30
- On a dedicated KVM QEMU-only server system, set it on 1
You can check the value set for swappines on your system by executing the following command in the Terminal:
cat /proc/sys/vm/swappinessn the majority of Debian-based systems, the default swappines value is 60:

You can change it (based on the guidelines above) by executing the following commands in the Terminal:
sudo sh -c "echo 35 > /proc/sys/vm/swappiness"
sed -i "\$a# Set swappiness\nvm.swappiness=35" /etc/sysctl.conf
I/O Scheduler
For a long time, a default I/O scheduler on most Linux systems was CFQ (Completely Fair Queuing). It provided a fair allocation of the disk I/O bandwidth for all processes that request an I/O operation. In more recent versions of Linux distros (at least Debian-based), it has been replaced by the mq-deadline scheduler as a default.
The mq-deadline scheduler is most suited regarding the performance of the KVM QEMU host machine, and since it is most probably there by default, no user interaction is required. But still, if you’re running an older version of Linux, you can check the default value by executing the following command in the terminal:
cat /sys/block/sdX/queue/schedulerOn older distributions of Linux, you may notice CFQ is still a default I/O scheduler (the default one is enclosed in square brackets []):
noop deadline [cfq]You can change it to the deadline by executing the following command in the Terminal:
echo deadline > /sys/block/sdX/queue/schedulerJust to let you know, you will have to make the change on each disk that KVM QEMU will use. In my example, I used sdX, where X stands for a, b, c, etc. To make the change permanent, you need to edit the /etc/default/grub file and append elevator=deadline to the following line (an example is for Debian-based distros):
GRUB_CMDLINE_LINUX_DEFAULT="quiet splash elevator=deadline"You must also execute update grub and reboot your computer to apply this change.

IPv4 Forwarding
To handle both NAT and routed networks for KVM, you must ensure IPv4 forwarding is enabled. To check if it is, please execute the following command in the Terminal:
cat /proc/sys/net/ipv4/ip_forwardIf the result is 1, IPv4 forwarding is enabled, and you’re good to go. On the other hand, if the result is 0, IPv4 forwarding is disabled. To enable it, please execute the following command:
sudo sed -i "s\#net.ipv4.ip_forward=1\net.ipv4.ip_forward=1\g" /etc/sysctl.confYou can execute sudo sysctl -p or restart the computer to apply the changes.
KVM Kernel Module
KVM Module is a built-in kernel component. Still, there may be cases where it is absent in the kernel. For example, you may work for a company that uses an operating system with a custom-built kernel where the KVM module may be absent. You can check the existence (and if enabled) of the KVM module by executing the following command in the Terminal:
grep "CONFIG_KVM=" /boot/config-$(uname -r)If the result is y or m, you’re good to go:

If the result is n or the CONFIG_KVM line is not displayed, unfortunately, the module is absent in the kernel. The only solution here is to re-compile the kernel itself, which is something out of the scope of this guide. You can check Google on how to do it or use one of many Linux distros with the vanilla kernel, which has a built-in KVM module.
Virtio Kernel Modules
Virtio modules can be considered as a “bridge” that allows virtual machines to access simplified devices, such as block devices and network adaptors, on a host machine that runs KVM QEMU. Just like the KVM module, Virtio modules are also present and built into the kernel of most modern Linux distros. They may also be absent from the kernel for the same reasons the KVM module may be missing. To check if they are present, please execute the following command in the Terminal:
grep -E "CONFIG_VIRTIO_BLK|CONFIG_VIRTIO_NET|CONFIG_VIRTIO_BALLOON|CONFIG_VIRTIO=" /boot/config-$(uname -r)Also, if the result is y or m, you’re good to go:

While more Virtio modules exist, we checked only the essential ones: the Virtio module itself (CONFIG_VIRTIO), and let’s call them sub-modules for block devices (CONFIG_VIRTIO_BLK), network devices (CONFIG_VIRTIO_NET), and memory management (CONFIG_VIRTIO_BALLOON).
If all of the prerequisites and checks above are satisfied, we can now continue installing the required packages, which will turn our host machine into a hypervisor.
KVM QEMU Installation
KVM QEMU installation is trivial. Several packages are required, and they can be installed with APT. To do so, please execute the following in your terminal:
sudo apt install bridge-utils libvirt-clients libvirt-daemon qemu qemu-system-x86 qemu-utils virtinstIf installing this on your desktop or notebook computer, you may want to install a GUI management tool. To do so, you can install an additional package called virt-manager:
sudo apt install virt-managerWith everything installed, you must add your user (the one you log in with to your OS) to a libvirtd and kvm groups. To do so, please execute the following in the Terminal (replace #USERNAME with your user name):
sudo usermod -a -G libvirt #USERNAME
sudo usermod -a -G kvm #USERNAME
At this point, you can create your first virtual machine(s), though I recommend reading the rest of the guide first.
KVM QEMU Customization
As soon as you install KVM QEMU, it automatically sets a default storage pool and creates a default NAT network with a related virtual interface. While it is perfectly fine for you to start using KVM QEMU immediately, I suggest you stick to this guide and see how you can further extend and customize the network and storage pool, along with a few other things. Hence, you will have a bit more usage scenarios available to you.
Default NAT Network
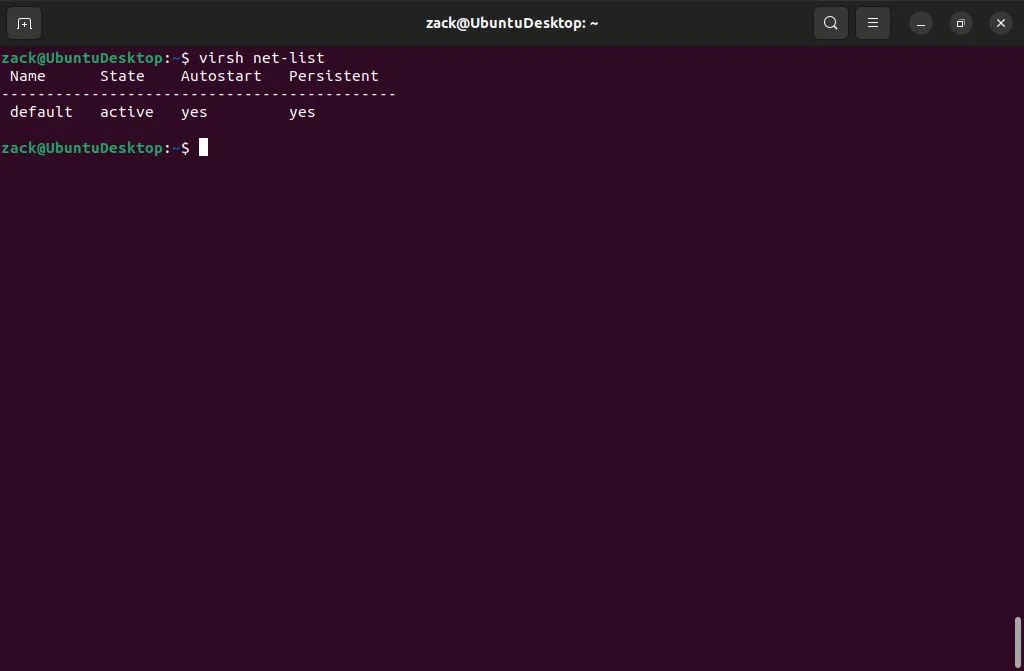
When KVM QEMU is installed, it automatically sets a default NAT network. You can inspect it by executing the following command in the terminal window:
virsh net-listA network interface named default will be displayed with active status, and an auto-start option enabled:
You can also check the full details of that default interface by executing the following command in the terminal window:
virsh net-dumpxml defaultNotice that the type of default (1) network is NAT (2), the interface name is virbr0 (3), and the IP address is 192.168.122.1 (4 – also a network gateway):
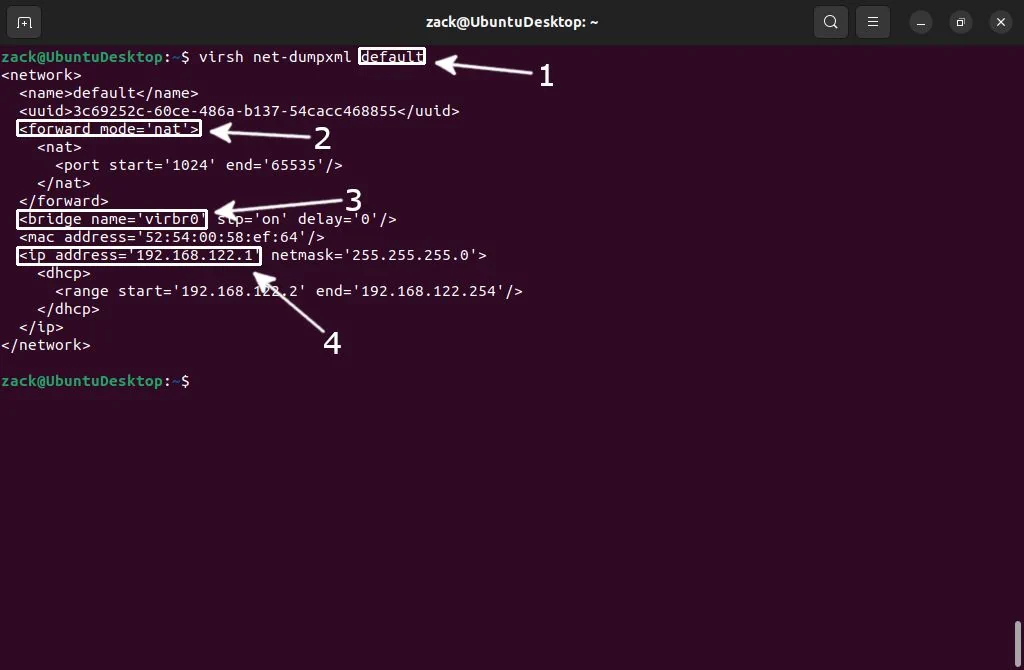
Be aware that since the type (forward-mode) of a default network is NAT, that means the following: each guest OS (virtual machine) will be able to communicate with the “outside world,” but only the Host (and those VMs in its subnet) will be able to make incoming connections. You can consider this an “isolated” network. An example of how to create a bidirectional “routed” network will be given later in this guide.
To check if the interface is up, please execute the following command:
ifconfig virbr0Once executed, the following result should be displayed, indicating the virbr0 interface is up and its IP address is 192.168.122.1:
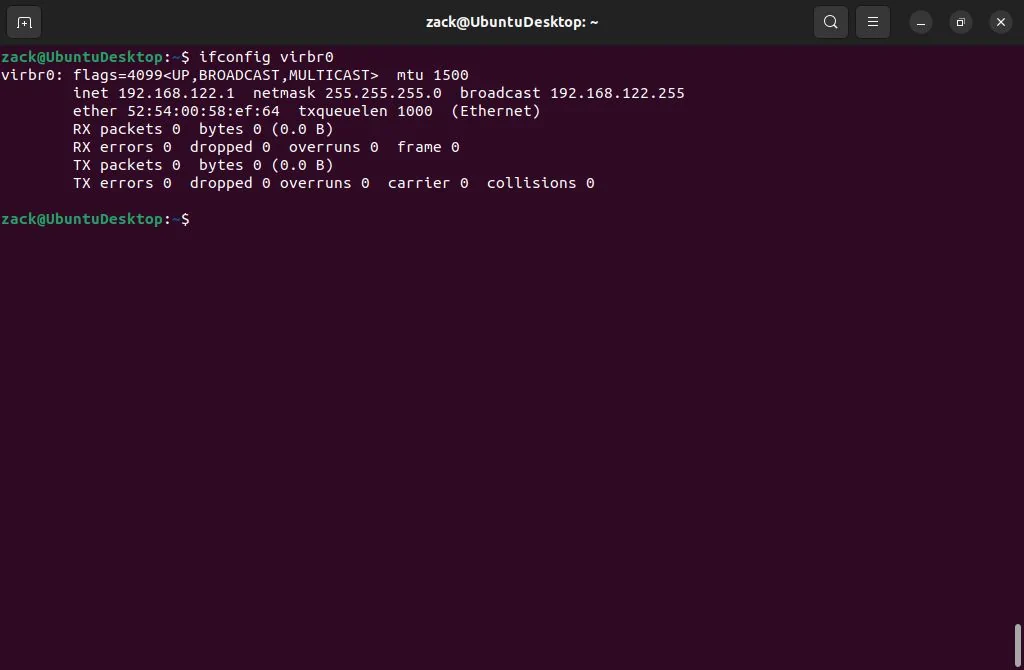
A default NAT network is OK to keep and leave as it is. With it, each time you create a virtual machine, it will receive an IP address from a default network DHCP pool (192.168.122.2 – 192.168.122.254).
Bridge Network – Network Manager
The bridge network will allow you to use the IP range of your home or office router, providing your virtual machines with IP addresses from that range. If you installed KVM QEMU on a desktop system, your network is probably managed by the Network Manager. To create a bridge network interface with the Network Manager, we will use the Network Manager’s command-line interface command, nmcli.
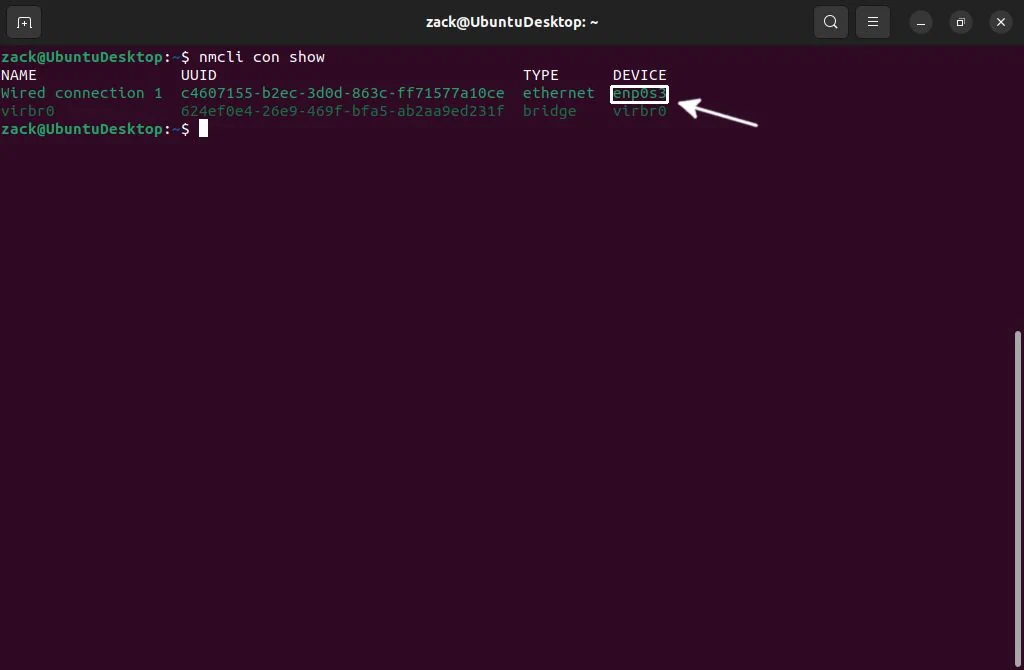
To start with, you can check the active interfaces by executing the following command from the terminal window:
nmcli con showThe result will display the default interface of your computer (mine is enp0s3) and a default interface created by KVM QEMU (virbr0 – default NAT network). It is important to notice your primary device name here, as it will be required to create the bridge (again, mine is enp0s3, but yours may be different):
Now, you can create the bridge and bridge slave interfaces. You need to execute the following two commands in your terminal window:
sudo nmcli con add ifname br0 type bridge con-name br0
sudo nmcli con add type bridge-slave ifname enp0s3 master br0
Notice how the br0 interface we created is displayed in orange (1), and the bridge slave interface doesn’t have a device identification (2). This only indicates our new interfaces are not active.

Before you activate the new interfaces, you can disable the spanning tree protocol (STP). To do so, please execute the following command:
sudo nmcli con modfify br0 bridge.stp noYou can check that STP is disabled by executing the following command:
nmcli -f bridge con show br0Once executed, the bridge.stp option should have value no:

Now you can activate both bridge and bridge slave interface by executing the following commands:
sudo nmcli con down "Wired conneciton 1"
sudo nmcli con up br0
To check everything, you can first execute nmcli con show command. It will display a “green” (active) bridge interface you created (1). By executing ifconfig command, you will see the br0 interface took over the IP address of the primary interface (enp0s3), successfully making it a slave interface (2):

Bridge Network – Ubuntu Netplan
Ubuntu (Canonical) developed Netplan as an alternative (replacement) to configuring network interfaces over flat configuration files. Before Netplan, you had to manually modify /etc/network/interfaces file to either modify/remove an existing interface or to add a new one. IMHO I don’t like it, and I consider it just another layer of abstraction and an unnecessary replacement for something that worked just fine.
You will encounter it on desktop-less Ubuntu systems where Network Manager is not installed, aka. server installations. The file you’re interested in is /etc/netplan/00-installer-config.yaml. You can see the content of that file by executing cat /etc/netplan/00-installer-config.yaml:

Start by backing up that file. Execute the following commands:
cd /etc/netplan
cp 00-installer-config.yaml 00-installer-config.yaml.bkp
Now open the file by executing vi 00-installer-config.yaml and like in the example below, add the required configuration for the network bridge:
network:
ethernets:
enp0s3:
dhcp4: false
dhcp6: false
bridges:
br0:
interfaces: [ enp0s3 ]
addresses: [10.0.2.15/24]
gateway4: 10.0.2.2
mtu: 1500
nameservers:
addresses: [8.8.8.8,8.8.4.4]
parameters:
stp: false
forward-delay: 4
dhcp4: false
dhcp6: false
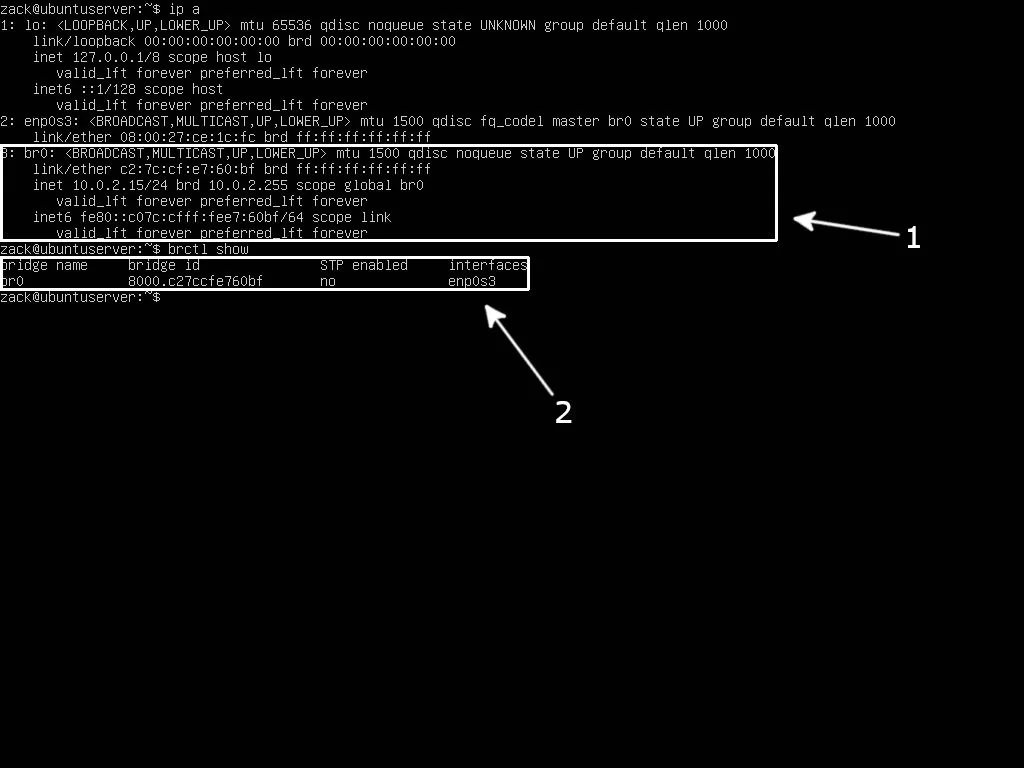
version: 2Make sure to replace values for addresses and gateway4 bridge configuration parameters so they match your network (mine are 10.0.2.15/24 and 10.0.2.2). Once you’re done, save and close the file and execute the following command to apply the new configuration:
sudo netplan applyNow you can execute ip a (1) and brctl show (2) commands to check if your bridge is really active:
Bridge Network – Manual Setup
Network Manager is the default network configuration tool on most desktop Linux distributions, while Netplan is most likely found on Ubuntu server installations. However, there are systems, like the Debian server, where neither is available. In these cases, you will have to configure the network bridge by editing the network interfaces configuration file (like it’s supposed to be done!).
I will use the Debian server as an example here. Debian’s network interface configuration file is located at /etc/network/interfaces. To start with, first, create a backup of that file:
cd /etc/network
sudo cp interfaces interfaces.bkp
Now, you can open the interfaces file by executing vi interfaces and add the bridge configuration. If you’re using DHCP, make the following changes:
# The loopback network interface
auto lo
iface lo inet loopback

# The primary network interface
iface enp0s3 inet manual

# Bridge interface
auto br0
iface br0 inet dhcp
    bridge_ports enp0s3
If your primary interface uses a static IP configuration, modify the interfaces file per the example below:
# The loopback network interface
auto lo
iface lo inet loopback

# The primary network interface
iface enp0s3 inet manual

# Bridge interface
auto br0
iface br0 inet static
    bridge_ports enp0s3
        address 10.0.2.16
        broadcast 10.0.2.255
        netmask 255.255.255.0
        gateway 10.0.2.2
With static configuration, please pay attention to address/broadcast/network/gateway values and make sure they match your network parameters. Once you’re done with modifications (either DHCP or static), please reboot the computer to apply changes.
Bridge Network Activation
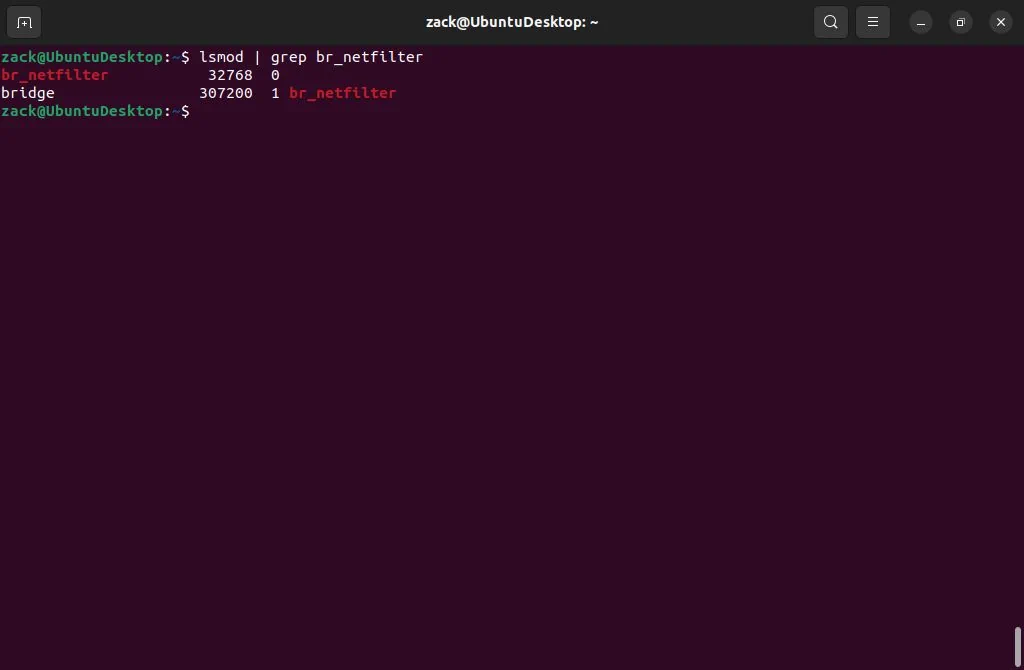
Before you activate a bridge network, it is recommended (but not required) to disable netfilter on the host bridge(s). First, you must check if the br_netfilter module is enabled in the kernel. To do so, execute the following command:
lsmod | grep br_netfilterIf the module is active/enabled, you should see the result like in the picture below:
If, however, the command returns no value, it means the br_netfilter module is not enabled. You can enable it by executing the following command:
sudo modprobe br_netfilterTo make the change permanent so br_netfilter is loaded each time after reboot, please execute the following command:
sudo sh -c 'echo "br_netfilter" > /etc/modules-load.d/br_netfilter.conf'At this point, the netfilter on the host bridge can be disabled. To do so, open a new file /etc/sysctl.d/bridge.conf in the text editor and paste in the following content:
net.bridge.bridge-nf-call-ip6tables=0
net.bridge.bridge-nf-call-iptables=0
net.bridge.bridge-nf-call-arptables=0
To make this permanent, so netfilter on host bridge is disabled after reboot, also open a new file /etc/udev/rules.d/99-bridge.rules in a text editor, and paste in the following content:
ACTION=="add", SUBSYSTEM=="module", KERNEL=="br_netfilter", RUN+="/sbin/sysctl -p /etc/sysctl.d/bridge.conf"No matter which method you used above to create a bridge interface, you can now add it as an optional network to your KVM QEMU hypervisor network pool. To do so, you’ll need to create an XML file with bridge network parameters first. Open a new file anywhere on the system:
vi host-bridge.xmlPaste the following content into a newly opened file:
<network>
  <name>host-bridge</name>
  <forward mode="bridge"/>
  <bridge name="br0"/>
</network>
Save and close the file and execute the following commands to activate a host bridge network:
virsh net-define host-bridge.xml
virsh net-start host-bridge
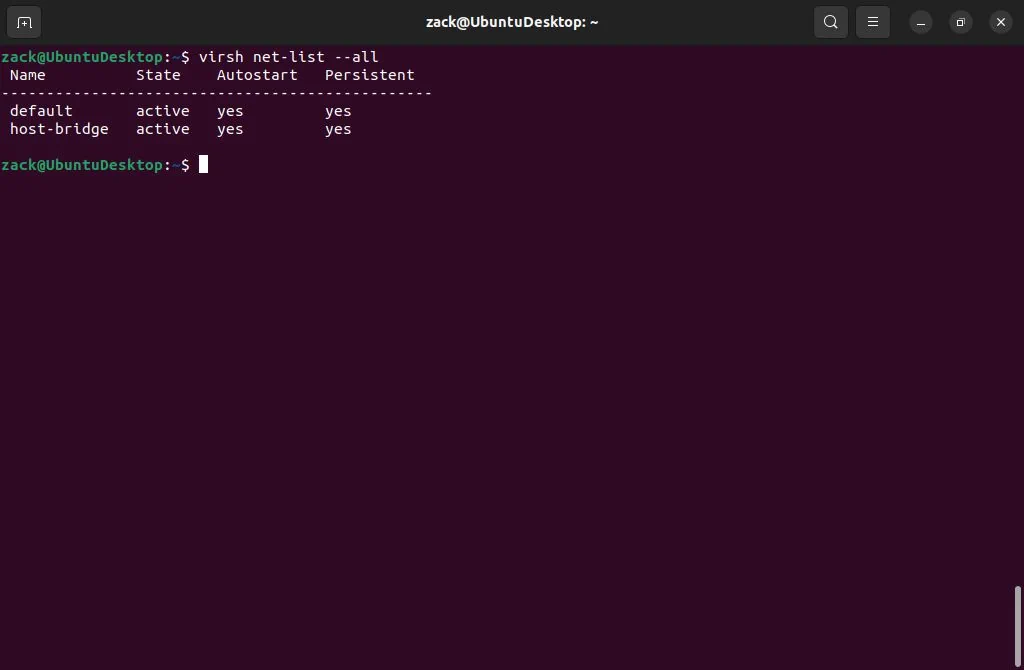
virsh net-autostart host-bridgeYou can check if the host bridge network is active by executing the following command:
virsh net-list --allYou should have both default and host bridge networks displayed with active status:
Other Network Types
Having a default NAT network and an option to create a network bridge is enough to cover most scenarios when talking about virtualization with KVM and QEMU.
There may be cases where you won’t be able to create a network bridge while incoming connections to your guests (virtual machines) are required. This might happen if your host machine (hypervisor) is connected to the network over a WiFi interface or a hosting provider has put a set of restrictions that prevent the configuration of a network bridge. In such cases, you will need to configure a routed network. Since the configuration of the routed network depends on the type of network equipment (i.e., your home WiFi router or hosting provider router/switch) and the possibility of static routes configuration on the same, we will not cover it in this guide. But still, if you’re interested in how to do it, please check the two guides on the links below this text:
Another type of network worth mentioning here is an isolated network. With the isolated network, you can communicate between your host machine and guests (virtual machines) and between guest machines connected to that network. Your guest machine’s traffic will not pass outside of the host physical machine, and they cannot receive traffic from outside the host physical machine. Use cases for such a network are limited and are not used often, so we will skip dwelling on any more details.
Default Storage
Once KVM QEMU is installed, it will set a default storage pool at /var/lib/libvirt/images. It is used to store a virtual machine’s disk image files. You may keep it as-is, but usually, I delete it and create a new “default” storage pool on a partition with the most available storage space on my computer. And usually, that is my /home partition. To check the details of the default storage pool, please execute the following commands:
virsh pool-list --all
virsh pool-dumpxml default
The first command will list all available storage pools, and the second one will list details on the default storage pool:

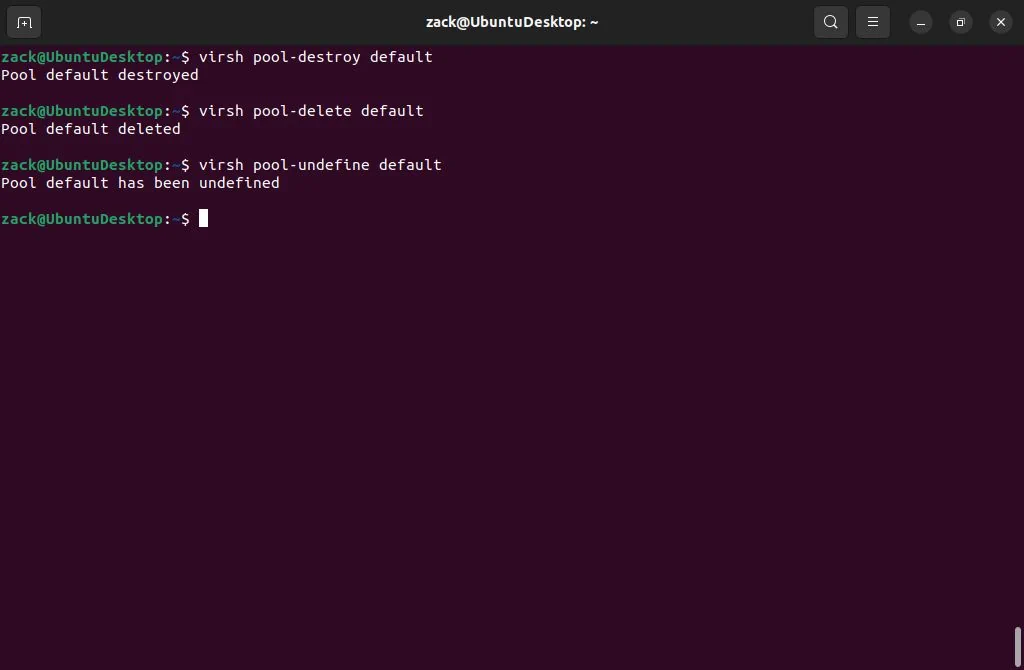
First, to delete this default pool, ensure no files are in the/var/lib/libvirt/images directory. Once done, please execute the following commands:
virsh pool-destroy default
virsh pool-delete default
virsh pool-undefine default
The first command will stop the pool, the second one will delete it, and the third one will remove it from QEMU KVM “asset inventory”:
To create a new pool, you must first create a directory on the filesystem. As already mentioned, I usually make it on my largest partition (/home):
sudo mkdir -p /home/libvirt/vm-disksNext, you must create an XML file with a new pool configuration. Open a new file (i.e., vm-disks.xml) anywhere on the system and paste in the following content:
<pool type='dir'>
  <name>vm-disks</name>
  <target>
    <path>/home/libvirt/vm-disks</path>
  </target>
</pool>
Now save and close the file, and execute the following set of commands to define and activate a new storage pool:
sudo virsh pool-define vm-disks.xml
sudo visrh pool-autostart vm-disks
sudo virsh pool-start vm-disks
Each time you create a new virtual machine, a disk image file will be stored in this new pool.
ISO Storage
Along with a storage pool for disk images, I like to create a pool for my ISO images. In the same way, I did with a disk image storage pool, I will make a directory for ISO images on my largest partition (/home/libvirt/vm-iso) and a corresponding XML configuration file with the following content (vm-iso.xml):
<pool type='dir'>
  <name>vm-iso</name>
  <target>
    <path>/home/libvirt/vm-iso</path>
  </target>
</pool>
Once done, I will execute the same set of commands as I did for the disk image pool and create my new ISO image pool:
sudo virsh pool-define vm-iso.xml
sudo visrh pool-autostart vm-iso
sudo virsh pool-start vm-iso
Now, I can download all the ISO images I require for my virtual machines to this new directory, and KVM QEMU will automatically recognize them as assets.
Both examples of storage pools in this guide are of the “directory pool” type; they are easy to set up and can be applied to all scenarios regarding virtualization. KVM QEMU supports many other storage types, some offering more performance and versatility than others. You can check other types on the link below this text:
With network and storage pools ready, you can start using your KVM QEMU hypervisor and create your first virtual machines.
KVM QEMU Installation Script
To wrap this up, I have created a script to do all KVM QEMU pre-install system checks and install the required packages to turn your host machine into a hypervisor. The script is available on GitHub under the standard MIT license:
Thanks for reading, and happy virtualizing.
Virt Manager justs recreates the default pool
Thank you for your comment, Chris. But I don’t see the point. Even if virt-manager does recreate default networks upon installation, you can still remove them, and/or create custom networks.