
Author:
Željko Jagušt
Publish Date:
November 16, 2022
Estimated Reading Time:
11 minutes
VirtualBox is a very popular, simple, yet powerful hypervisor. Its out-of-the-box simplicity allows you to create virtual machines in minutes. This guide will show you how to install and configure VirtualBox on a Microsoft Windows and Ubuntu Linux host.
Introduction
VirtualBox is a type-2 hypervisor that allows you to emulate hardware to create a virtual computer or, technically, a virtual machine. While it has many powerful options, VirtualBox installation and basic configuration are straightforward, and you can have your first virtual machine up and running in minutes.
Prerequisites
To successfully run a virtual machine(s) under VirtualBox, you must have a “virtualization technology” enabled. For Intel processors, it is called VT-x (can also be Intel VT or Intel Virtualization Technology), and for AMD processors, it is called AMD-V. You must enable that option in BIOS, usually under the advanced settings. On the link below, you can check how to find VT-x/AMD-V BIOS settings on some major vendor computers, but I recommend you check your motherboard manual to see where precisely the option is:
VirtualBox Installation
VirtualBox installation is as trivial as possible (especially on Windows). In the rest of this section, we will show you how to do it on Windows and Ubuntu Linux operating systems.
Windows Installation
VirtualBox is not in the Microsoft Store yet, so you must download it first. To do so, please click on the button below:
Once there, click on the Windows hosts hyperlink to download the latest version of VirtualBox for Windows operating systems:

You can execute the installation by double-clicking the downloaded file when the download is complete. Once you do, you will be presented with the VirtualBox installation welcome screen:

You can click the Next button to continue the installation. You will be presented with a Custom Setup screen. You can change the installation path here by clicking the Browse button, leaving everything else as it is:

A warning will appear on the next screen, telling you your network will reset during the installation. It is safe to click the Yes button to continue with the installation:

On the next screen, you will be warned about missing Python dependencies. If you don’t intend to develop, let’s say, add-ons for VirtualBox, it is perfectly safe here to click the Yes button and continue with the installation:


VirtualBox is now ready to install, and you can start the installation by clicking the Install button on the next screen. It will take a few moments, and you will be presented with a screen telling you the installation is complete. Click on the Finish button to close the installer:

Congratulations, you have successfully installed VirtualBox on your Microsoft Windows computer.
Ubuntu Linux Installation
The simplest software installation method on Ubuntu Linux is with the Ubuntu Software application. You can start it from the Ubuntu Dash menu (Ubuntu’s “start menu”). Once started, click on the Search button in the upper-left corner and type VirtualBox in the search bar:

You can click on the search result here, and on the next screen, you will have a green Install button that will install VirtualBox. The only “issue” here is that the VirtualBox version supplied over the Ubuntu Software application is not the latest. If you’re OK with that, please feel free to install it. In the rest of this section, we will demonstrate how to install the latest version of VirtualBox on your Ubuntu.
You must execute a couple of commands in Terminal, so please start it up (search “Terminal” in Ubuntu Dash). First, you will have to import the VirtualBox GPG signing key:
wget -O- https://www.virtualbox.org/download/oracle_vbox_2016.asc | sudo gpg --dearmor --yes --output /usr/share/keyrings/oracle-virtualbox-2016.gpgYou can configure the VirtualBox repository now. Execute the following command to do so:
echo "deb [arch=amd64 signed-by=/usr/share/keyrings/oracle-virtualbox-2016.gpg] http://download.virtualbox.org/virtualbox/debian $(lsb_release -cs) contrib" | sudo tee /etc/apt/sources.list.d/virtualbox.listWith the signing key and repository in place, you must update the APT repositories index. Please execute the following command:
sudo apt updateAt the moment of writing this article, the latest version of the VirtualBox was 7.0.2, and based on that, you can search for the related package to install by executing the following command:
sudo apt-cache search ^virtualbox$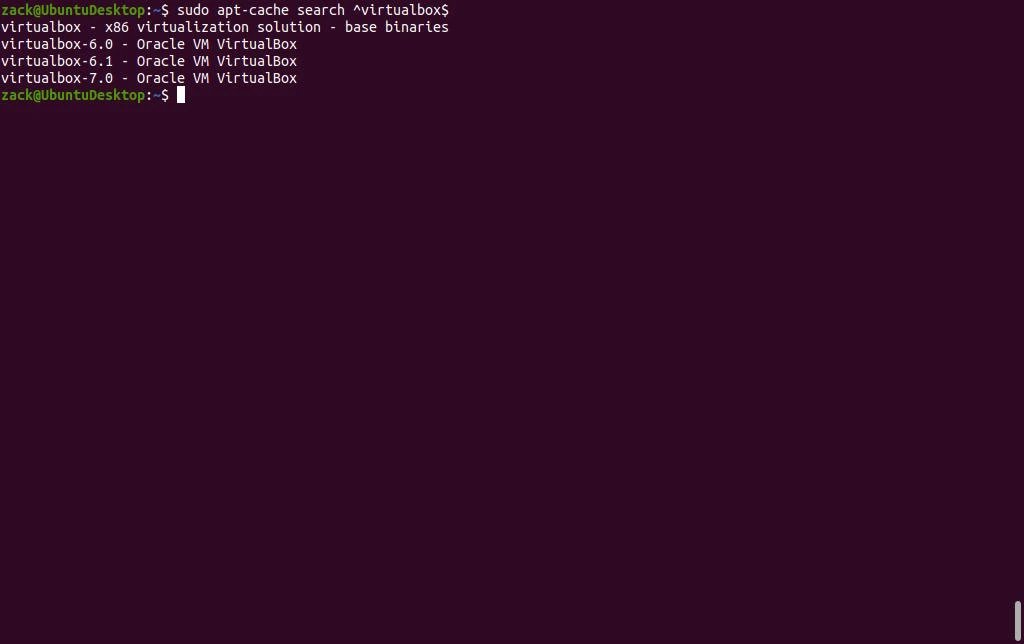
Based on the search result from the previous step, you can confirm the latest version of the virtualbox-7.0 package is, in fact, the latest version available (7.0.2) by executing the following command:
sudo apt-cache policy virtualbox-7.0
As you can see, the apt-cache policy is a handy command. We found out the package virtualbox-7.0 is not installed on the system and that the candidate version of the package to install is, in fact, the latest version (7.0.2). To install the package, please execute the following command:
sudo apt install -y virtualbox-7.0Before using VirtualBox, you must add your user to the vboxusers group. To do so, please execute the following command (in the example, my username is zack; please change it to your username):
sudo usermod -a -G vboxusers zackWith the user added to the group, you can now find and start the VirtualBox from the Ubuntu Dash (start menu).
VirtualBox Configuration
While you can use VirtualBox as-is right after installation, we would like to point out a few configuration options you may consider. To start with, we urge you to install the VirtualBox Extension Pack right after you install the VirtualBox. Extension pack has many benefits:
- VirtualBox Remote Desktop Protocol (VRDP) support
- Intel PXE boot
- Integration with Oracle Cloud Infrastructure
- Disk image encryption
The following subsections show you how to install the VirtualBox Extension Pack on Windows and Ubuntu Linux operating systems.
VirtualBox Extension Pack – Windows Installation
The extension pack must match the VirtualBox version currently installed on your computer. To check which VirtualBox is currently installed, please open Windows Terminal and execute the following command:
cd "C:\Program Files\Oracle\VirtualBox\"
.\VBoxManage.exe --version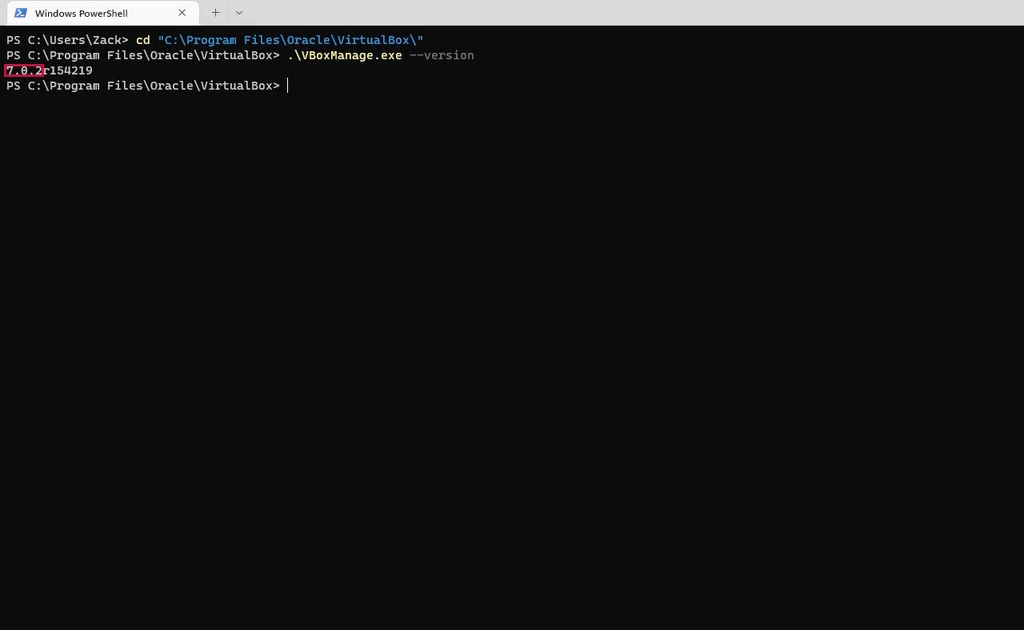
With the version confirmed, you can now download the matching version of the extension pack. While still in Windows Terminal, please execute the following commands:
$client = new-object System.Net.WebClient
$client.DownloadFile("https://download.virtualbox.org/virtualbox/7.0.2/Oracle_VM_VirtualBox_Extension_Pack-7.0.2.vbox-extpack","C:\Users\Zack\Downloads\Oracle_VM_VirtualBox_Extension_Pack-7.0.2.vbox-extpack")
As you can see from the example, I have downloaded the extension pack in my user download folder, “C:\Users\Zack\Downloads\.” If you’re doing the same, please swap “Zack” (my username) with your username. Once you have downloaded the extension pack, you can install it by executing the following command also while still in Windows Terminal:
cd "C:\Program Files\Oracle\VirtualBox\"
.\VBoxManage.exe extpack install C:\Users\Zack\Downloads\Oracle_VM_VirtualBox_Extension_Pack-7.0.2.vbox-extpack
VirtualBox Extension Pack – Ubuntu Installation
As with Windows, you also have to match the VirtualBox version with the version of the extension pack. To do so, start the Terminal and execute the following command:
vboxmanage -v | cut -dr -f1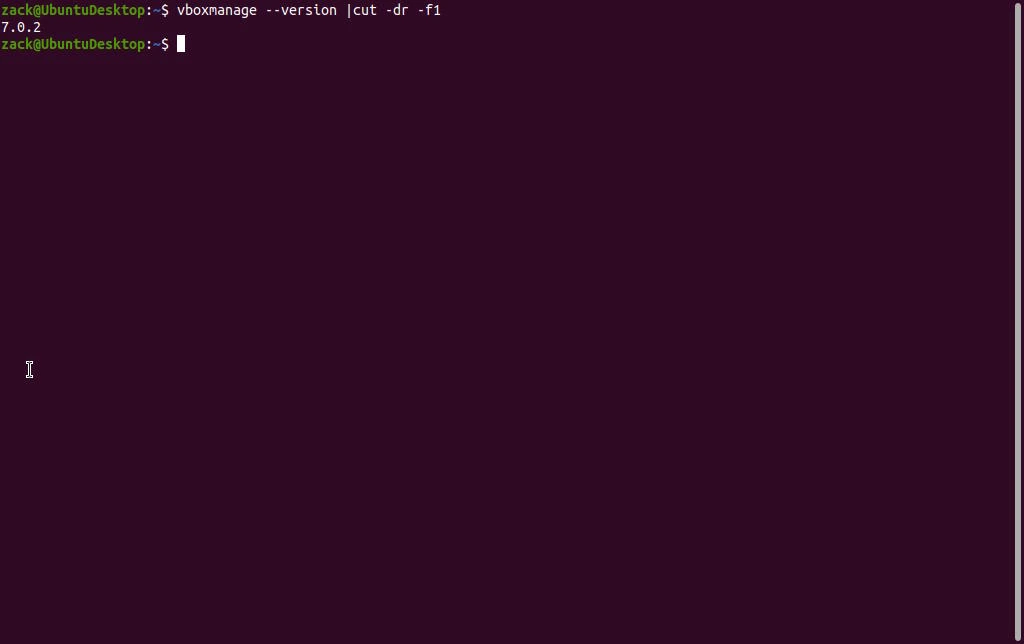
Once you get the correct version, you can download and install the extension pack. You can also do it while still in the Terminal by executing the following command:
for version in $(vboxmanage -v | cut -dr -f1); do wget https://download.virtualbox.org/virtualbox/$version/Oracle_VM_VirtualBox_Extension_Pack-$version.vbox-extpack; sudo vboxmanage extpack install Oracle_VM_VirtualBox_Extension_Pack-$version.vbox-extpack; rm Oracle_VM_VirtualBox_Extension_Pack-$version.vbox-extpack; doneThe installation will ask you to enter your user password and accept the VirtualBox Extension Pack usage license, so please do so when instructed. Once done, you will have the extension pack installed.
Other Settings – Optional
After installing the extension pack, you can start using VirtualBox; the settings discussed in this section are optional, but we suggest you consider them.
To successfully “build” a virtual machine, you will need an operating system installation media (ISO Image) and a virtual disk. Once created, a configuration for your virtual machine will be stored in a configuration file. All three must be stored somewhere on the disk of your actual physical computer. I suggest you create a “VirtualBox” folder inside your home folder, and in it, three additional folders: VM_ISO, VM_DISK, and VM_CONF. For instance, on Windows, you can create them by executing the following command in Windows Terminal:
cd ~
md VirtualBox\VM_ISO, VirtualBox\VM_DISK, VirtualBox\VM_CONF
On Linux systems, you can do the same by executing the following commands in the Terminal application:
cd
mkdir -p VirtualBox/{VM_ISO,VM_DISK,VM_CONF}
With folders created, you can now download a few installation ISO images of various operating systems and save them in the VM_ISO folder you created in the previous step. Below, you will find a few links to popular operating systems leading to their ISO download pages:
- Ubuntu Desktop download page
- Ubuntu Server download page
- Windows 11 download page
- Debian Linux download page
At this point, you can adjust a few VirtualBox settings. Once you start it, you will be greeted with a welcome screen. There, you will see a Preferences button. Click on it, and right on the General tab, you can change the Default Machine Folder option and point it to a VM_CONF folder you created before:

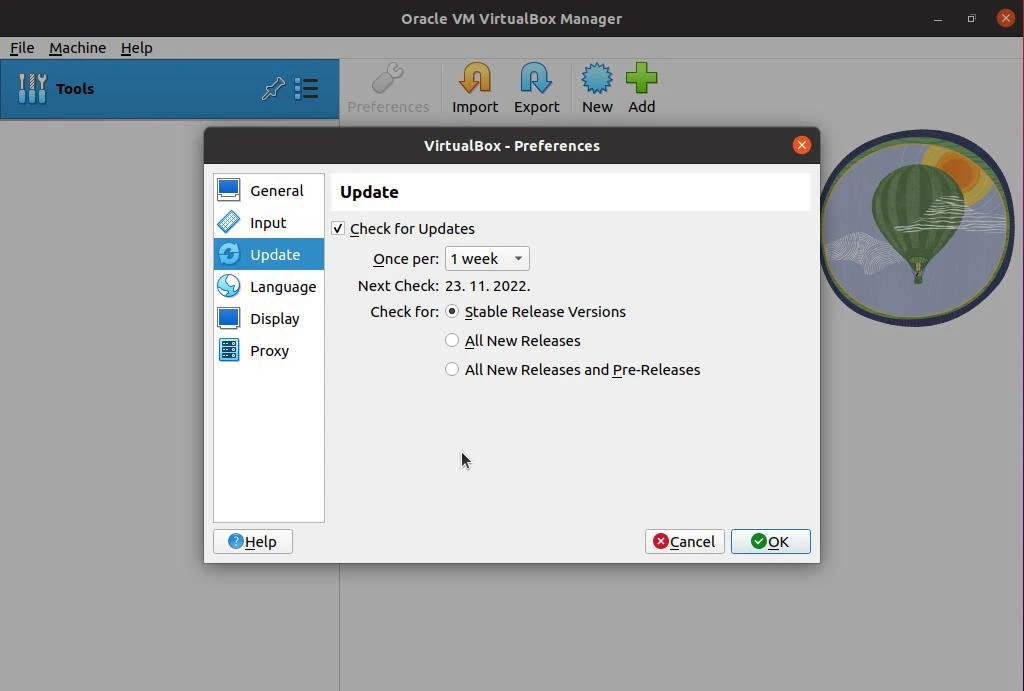
While still in the preferences tab, click on Update and turn them off if you’re running VirtualBox on Ubuntu; the operating system updater will update VirtualBox. If you’re on Windows, turn them on and set the update check to one week:
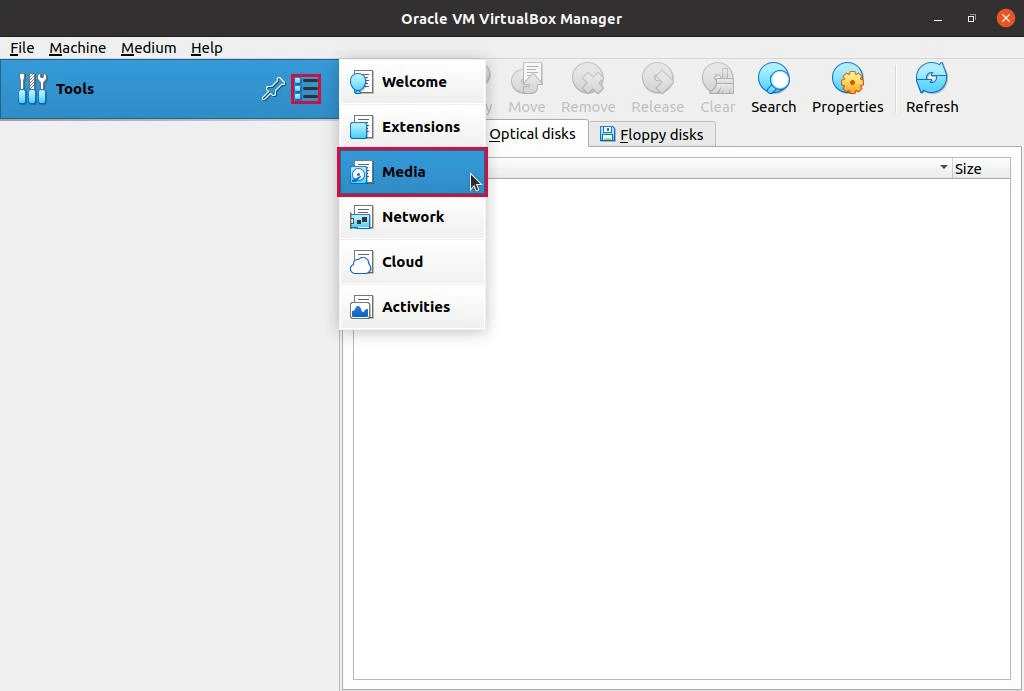
You can turn off the Preferences tab now and switch to the Media option by clicking the Tools menu button and then on the Media tab:
From there, click on the Optical Disks tab and then on the Add button to add all the ISO images you downloaded to the VM_ISO folder before:
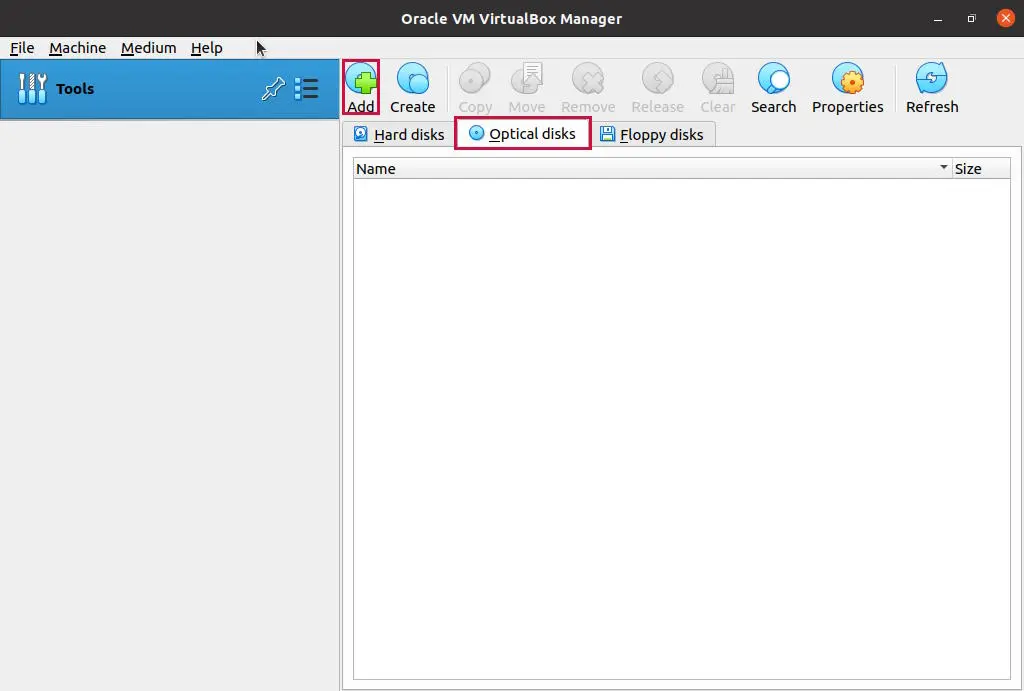
With ISOs added, you have everything ready to create your first virtual machine. Thank you for reading, and happy virtualizing.