
Author:
Željko Jagušt
Publish Date:
August 8, 2023
Estimated Reading Time:
29 minutes
When it comes to building a robust and reliable server environment, Debian, one of the most popular and stable Linux distributions, stands out as an excellent choice. With its rock-solid performance and extensive package repositories, Debian offers a solid foundation for various server applications. However, to truly optimize the potential of your Debian server, it’s essential to embark on a journey of initial customization.
Introduction
Tailoring your server environment from the outset not only enhances security but also optimizes performance and streamlines administrative tasks. In this comprehensive Debian server initial customization guide, we’ll delve into the key steps and best practices for customizing your Debian server, empowering you to create a tailored, secure, and efficient foundation for your infrastructure that meets your specific needs.
Prerequisites
Before you begin with this guide, you should have a minimal installation of the Debian server. If you don’t have one, we’ve got you covered. You can check our guide on the Debian server minimal installation:

Debian 11 Server – Minimal Installation Guide
Follow this guide for a Debian 11 Server minimal installation, providing a solid foundation for any server setup or project you want to build.
Also, since this is a server installation, the assumption is that you are using a wired network connection. While wireless can be configured on a Debian server, this guide will not cover wireless network setup.
Boot Loader & Interface Names
After logging in to your new shiny instance of the minimal Debian server, the first task is reconfiguring the GRUB boot loader and network interface names. We need to instruct GRUB to display our system’s verbose boot, and we want our network interfaces to use a simple naming scheme.
GRUB – Boot Verbosity
In a hypothetical situation where our server got stuck on the boot, we want to see where (and why) it got stuck. To be able to do so, we need to instruct our boot loader to enable boot verbosity. You can do it by executing the following sed one-liner:
sed -i 's/GRUB_CMDLINE_LINUX_DEFAULT="quiet"/GRUB_CMDLINE_LINUX_DEFAULT=""/g' /etc/default/grubWith this in place, we will see all status messages during the Debian boot process. While we’re at GRUB configuration, we can instruct it to use kernel parameters for legacy network interface names. One sed one-liner is required for that also:
sed -i 's/GRUB_CMDLINE_LINUX=""/GRUB_CMDLINE_LINUX="net.ifnames=0 biosdevname=0"/g' /etc/default/grubTo apply the changes above, we need to reload GRUB. Execute the following command to do so:
update-grubNetwork Interface Names
Debian uses the predictable names scheme when setting network interface names by default. I like to change this (it’s a matter of habit) back to the old simple scheme. Since we passed kernel parameters for legacy network interface names in GRUB, this is mandatory for this guide.
Under the presumption there is only one wired active network interface on our server, this can be done by first setting the variable that will “extract” the current name of our interface:
INTERFACE_CURRENT=$(ip a | grep "2: " | awk '{print $2;}' | cut -d: -f1)Once the variable is set, we can execute another sed one-liner to change the name of our interface in the interfaces configuration file:
sed -i "s/$INTERFACE_CURRENT/eth0/" /etc/network/interfacesIf your server has more than one active network interface, it is best to edit the /etc/network/interfaces file manually and change the interface names (to eth0, eth1, eth2, etc.).
Software Sources
We must set up Debian software repositories here to install the required software (packages). On Debian 11, execute the following echo:
echo -e "# Main Repos
deb http://deb.debian.org/debian bullseye main contrib non-free
deb http://deb.debian.org/debian-security/ bullseye-security main contrib non-free
deb http://deb.debian.org/debian bullseye-updates main contrib non-free
# Sources - enable only when needed
#deb-src http://deb.debian.org/debian bullseye main
#deb-src http://deb.debian.org/debian-security/ bullseye-security main
#deb-src http://deb.debian.org/debian bullseye-updates main
# Backports - For software like Git, Redis, etc.
deb http://deb.debian.org/debian bullseye-backports main contrib non-free" > /etc/apt/sources.list
On Debian 12, execute the following echo:
echo -e "# Main Repos
deb http://deb.debian.org/debian bookwork main contrib non-free non-free-firmware
deb http://deb.debian.org/debian-security/ bookworm-security main contrib non-free non-free-firmware
deb http://deb.debian.org/debian bookworm-updates main contrib non-free non-free-firmware
# Sources - enable only when needed
#deb-src http://deb.debian.org/debian bookworm main
#deb-src http://deb.debian.org/debian-security/ bookworm-security main
#deb-src http://deb.debian.org/debian bookworm-updates main
# Backports - For software like Git, Redis, etc.
deb http://deb.debian.org/debian bookworm-backports main contrib non-free non-free-firmware" > /etc/apt/sources.list
With repositories configured, we can update the software catalog by executing the following command:
apt updateSysdig Repository – Optional
Sysdig is awesome! Period. And thus, it is mandatory on my servers. That is all I’m going to say. Still, if you want to learn more about what it does, please check out the official Sysdig GitHub repository.
This step is optional, but I highly recommend you try Sysdig. To set up its repository, we need to install curl and gnupg2 software packages first:
apt install -y --no-install-recommends curl gnupg2 ca-certificatesNext, we need to download and set the repository signing key:
curl -sS https://download.sysdig.com/DRAIOS-GPG-KEY.public | gpg --dearmor | tee /usr/share/keyrings/draios.gpgWith the signing key in place, we can set up the Sysdig repository:
curl -o /etc/apt/sources.list.d/draios.list https://download.sysdig.com/stable/deb/draios.listAn additional step is required here. We need to supply a signing key to the repo, and to do it, please execute the following:
sed -i "0,/deb/ s/deb/& [signed-by=\/usr\/share\/keyrings\/draios.gpg]/" /etc/apt/sources.list.d/draios.listWith the repository in place, please update APT:
apt updateAptitude – Optional
Aptitude is a simple Ncurses and command-line-based frontend for APT. If you like user interfaces (UI) better than plain old apt (or apt-get), please feel free to install it. Otherwise, this step is also optional. If you opt to install it, you can do it by executing the following:
apt install --no-install-recommends -y aptitude apt-transport-httpsTo complete setting up the software sources, one more step is required. We must instruct debconf to present all installation options when installing software packages. To do so, please execute the following:
echo -e "debconf debconf/frontend select Dialog\ndebconf debconf/priority select low" | debconf-set-selectionsSoftware Installation
With software sources configured, we can start with the software installation required for this Debian server’s initial customization. We will do an initial system update and install some standard and additional software and the tools needed for development.
Initial System Update
As a first step here, we will update our Debian Server. Since it is a minimal installation, there will be little to update (if anything at all). First, we need to update the software catalog by executing the following:
aptitude update -q2Now, we can update the system. Please execute the following:
aptitude forget-new
aptitude full-upgrade --purge-unused -y
Standard Software Packages
Packages considered “standard” are various tools and help utilities required for any Linux-based server system, not just Debian. To install them, please execute the following:
aptitude install -R -y busybox_ bash-completion bind9-host busybox-static dnsutils dosfstools \
friendly-recovery ftp fuse geoip-database groff-base hdparm info install-info iputils-tracepath \
lshw lsof ltrace man-db manpages mlocate mtr-tiny parted powermgmt-base psmisc rsync sgml-base strace \
tcpdump telnet time uuid-runtime xml-core iptables resolvconf lsb-release openssh-server
At this point, you will be asked a few questions about the configuration of the software you’re installing. Please read and understand each option carefully before deciding what to do. A quick summary follows:
- PACKAGE: man-db
- Should man and mandb be installed ‘setuid man’? -> No
- PACKAGE: resolvconf
- Prepare /etc/resolv.conf for dynamic updates? -> Yes
- Append original file to dynamic file? -> No
Once all the standard software is installed, we must configure resolvconf service. First, the service needs to be started and enabled. To do so, please execute the following:
systemctl start resolvconf.service
systemctl enable resolvconf.service
To do the same on Debian 12, please execute the following:
systemctl start resolvconf-pull-resolved.service
systemctl enable resolvconf-pull-resolved.service
Now, we need to define nameservers that will be used for resolve. Usually, I use Google name servers here, and you can do the same. To set the nameservers, please execute the following:
cat <<-EOF > /etc/resolvconf/resolv.conf.d/head
nameserver 8.8.8.8
nameserver 8.8.4.4
EOF
To apply newly set nameservers, resolvconf related services need to be restarted:
systemctl restart resolvconf.service
systemctl restart systemd-resolved.service
To do the same on Debian 12, please execute the following:
systemctl restart resolvconf-pull-resolved.service
resolvconf -u
Development Tools
Simply said, here we will install the packages required for compiling and building various other software from the source code. To install them, please execute the following:
aptitude install -R -y linux-headers-amd64 build-essentialAdditional Software
In this last batch of the software, we will install various helper tools required for easier maintenance and administration of our server system. To install them, please execute the following:
aptitude install -R -y safecat sharutils lynx zip unzip lrzip pbzip2 p7zip p7zip-full rar pigz unrar acpid \
zstd inotify-tools sysfsutils dstat htop lsscsi iotop nmap ifstat iftop tcptrack whois atop sysstat gpm \
localepurge mc screen vim ethtool apt-file sysdig net-tools sudo wget bsd-mailx dma pwgen
As with standard software, you will be asked a few questions about the configuration of the software you’re installing at this point. Please read and understand each option carefully before deciding what to do. A quick summary follows:
- PACKAGE: gpm
- Do you want to (re)start GPM while X is running? -> No
- Mouse device for GPM: /dev/input/mice
- Mouse type: exps2
- Mouse responsiveness: leave empty
- Protocol to use for repeating mouse events: none
- Mouse sample rate: leave empty
- Additional arguments for the GPM daemon: leave empty
- PACKAGE: dma
- System mail name: leave default
- Smarthost: leave empty
- PACKAGE: localepurge
- Locale files to keep on this system: Select only en and en_US.UTF-8
- Use dpkg –path-exclude? -> Yes
- Also delete localized man pages? -> Yes
- PACKAGE: sysstat
- Activate sysstat’s cron job? -> No
There is one Debian version-related exception here: netcat. To install it on Debian 11, please execute the following:
aptitude install -R -y netcatOn Debian 12, please execute the following to install netcat:
aptitude install -R -y netcat-openbsdAs a final step, we will update apt-file first:
apt-file updateAnd we will turn off startup messages for the screen:
sed -i 's/^#startup_message/startup_message/g' /etc/screenrcServer Access
In this step, we are going to configure the SSH Server and configure user(s) for remote access. We will do it so that password login is disabled and access is enabled only with private RSA-based keys.
Local Root Access
Here, we need to create an SSH key for our root user. We will create an RSA key (-t) with a 4096-bit length (-b). The key will be saved to a default location /root/.ssh/id_rsa (-f), and we will not set a keyphrase for it (-N). Execute the following to create the key:
ssh-keygen -b 4096 -t rsa -f /root/.ssh/id_rsa -q -N ""The command above will create a private (/root/.ssh/id_rsa) and public (/root/.ssh/id_rsa.pub) portion of the key. You can use your public key for access authorization, but you should never share your private key with anyone.
To control which user(s) can access the server (and potentially from where), we need to set a control file where we will allow access. To do so, please execute the following:
touch /root/.ssh/authorized_keys
chmod 0600 /root/.ssh/authorized_keys
With the authorization file in place, we can now add the root’s public key to it, thus allowing our root user local SSH access to the server:
echo -e "from=\"127.0.0.1\" $(cat /root/.ssh/id_rsa.pub)\n" >> /root/.ssh/authorized_keysRemote Access
You will grant server access to your remote user(s) here. To do it, temporarily allow password access to the server:
sed -i 's/^#PermitRootLogin prohibit-password/PermitRootLogin yes/g' /etc/ssh/sshd_config
sed -i 's/^#PasswordAuthentication yes/PasswordAuthentication yes/g' /etc/ssh/sshd_config
To apply changes, please restart the SSH service:
systemctl restart sshNow, you can add the public key of each user who needs root access to the server. You will add those keys in the /root/.ssh/authorized_keys control file.
To do it, you need to know the public IP address of your server. While it is easy to determine that on servers with only one active interface, it may be a bit more tricky if your server has multiple active interfaces. In such a case, maybe the best approach would be to determine a default gateway and the IP address used to communicate with that gateway. To do so, please execute the following:
ip route get "$(ip route show 0.0.0.0/0 | grep -oP 'via \K\S+')" | grep -oP 'src \K\S+'The command from the example above will give you the correct server IP address. Once you have it, you can add your user’s public key to the server. Please keep in mind that you will need your root password to complete this step.
If your client machine is running Windows, you will first have to enable SSH Client. You can do it by going to Settings -> Apps -> Optional features. There, you will find OpenSSH Client. Click on it and install it. Now you can execute the following command in the PowerShell (please replace $MACHINE_IP with the IP address from the ip route get result from above):
type C:\Users\$Env:USERNAME\.ssh\id_rsa.pub | ssh root@$MACHINE_IP -T "cat >> /root/.ssh/authorized_keys"If you’re on Linux system, you can do the same by executing the following in the Terminal (please replace $MACHINE_IP with the IP address from the ip route get result from above):
cat /home/$(whoami)/.ssh/id_rsa.pub | ssh root@$MACHINE_IP -T "cat >> /root/.ssh/authorized_keys"With your users authorized for server access, we can now disable password SSH login and allow only authorized key access. To do so, please execute the following:
sed -i 's/^PermitRootLogin yes/PermitRootLogin without-password/g' /etc/ssh/sshd_config
sed -i 's/^PasswordAuthentication yes/PasswordAuthentication no/g' /etc/ssh/sshd_config
To apply changes, please restart the SSH service:
systemctl restart sshServer Time Sources
Many services and software you may install on your server depend on the correct time. That said, we need to tell our server which sources it can rely on to get the right time. Also, later in this guide, when we configure the basic firewall, we will allow our server to communicate explicitly with the time servers we configure in this step.
We are going to use a local /etc/hosts file to map network time server hostnames with their respective IP addresses. First, we need to define a couple of variables that will fetch those IP addresses:
POOL_NTP_0=$(dig +short 0.pool.ntp.org | head -n1)
POOL_NTP_1=$(dig +short 1.pool.ntp.org | head -n1)
POOL_NTP_2=$(dig +short 2.pool.ntp.org | head -n1)
POOL_NTP_3=$(dig +short 3.pool.ntp.org | head -n1)
Now we can add IP address/hostname pairs to our local hosts file:
echo -e "$POOL_NTP_0 0.debian.pool.ntp.org" >> /etc/hosts
echo -e "$POOL_NTP_1 1.debian.pool.ntp.org" >> /etc/hosts
echo -e "$POOL_NTP_2 2.debian.pool.ntp.org" >> /etc/hosts
echo -e "$POOL_NTP_3 3.debian.pool.ntp.org" >> /etc/hosts
Basic Firewall
By default, the Debian server allows all incoming and outgoing traffic once you install it. Here, we are going to set up a basic firewall that will allow all outgoing traffic off the server and only SSH, DNS, and NTP incoming connections.
Default Firewall Chains
Many system administrators have a nasty habit of stuffing all firewall rules in the INPUT firewall chain. This is a terrible practice that can lead to a completely unmanageable firewall. To avoid this, we will set two default firewall chains; one where we will add our basic rules and one that will reject all other traffic.
To do so, we will first flush all firewall chains:
iptables -F INPUT
iptables -F FORWARD
iptables -F OUTPUT
Now we can add our default firewall chains:
iptables -N GENERAL-ALLOW
iptables -N REJECT-ALL
To continue with this, let me first explain a bit about how iptables firewall works. When an incoming connection hits the server, it is passed to the INPUT chain of the firewall. There it is matched to rules set in that chain (in the order they are set) until it matches the rule that will allow connection to the server. If there is no rule it can be matched against, the connection is dropped (unable to connect to the server).
In our case, the same will happen, but a bit differently. Incoming connections will be passed to the INPUT chain, but we will create a rule that will immediately forward (-j) that connection to the GENERAL-ALLOW chain we created in the previous step. Execute the following to create such a rule:
iptables -I INPUT -m comment --comment "No rules of any kind below this rule" -j GENERAL-ALLOWOnce the connection “jumps” to the GENERAL-ALLOW chain, it will be matched against the rules set there. If it cannot be matched, it will be dropped. This is where the second rule we will set in the INPUT chain comes into play:
iptables -A INPUT -j REJECT-ALLBasic Firewall Rules
We can populate our firewall with the basic, most essential rules now. First, we are going to allow established connections:
iptables -I GENERAL-ALLOW -p tcp -m tcp ! --tcp-flags FIN,SYN,RST,ACK SYN -m comment --comment "Established Connections" -j ACCEPTWe’re going to continue with allowing SSH connections on port 22:
iptables -A GENERAL-ALLOW -p tcp -m tcp --dport 22 --tcp-flags FIN,SYN,RST,ACK SYN -m comment --comment "SSH Access" -j ACCEPTContinue with allowing DNS traffic to our server:
iptables -A GENERAL-ALLOW -s 8.8.4.4/32 -p udp -m udp --sport 53 -m comment --comment "Google DNS UDP" -j ACCEPT
iptables -A GENERAL-ALLOW -s 8.8.4.4/32 -p tcp -m tcp --sport 53 -m comment --comment "Google DNS TCP" -j ACCEPT
iptables -A GENERAL-ALLOW -s 8.8.8.8/32 -p udp -m udp --sport 53 -m comment --comment "Google DNS UDP" -j ACCEPT
iptables -A GENERAL-ALLOW -s 8.8.8.8/32 -p tcp -m tcp --sport 53 -m comment --comment "Google DNS TCP" -j ACCEPT
Let’s do the same for NTP traffic (we’re going to reuse $POOL_NTP_# variables):
iptables -A GENERAL-ALLOW -s $POOL_NTP_0/32 -p udp -m udp --sport 123 -m comment --comment "NTP Pool Servers" -j ACCEPT
iptables -A GENERAL-ALLOW -s $POOL_NTP_1/32 -p udp -m udp --sport 123 -m comment --comment "NTP Pool Servers" -j ACCEPT
iptables -A GENERAL-ALLOW -s $POOL_NTP_2/32 -p udp -m udp --sport 123 -m comment --comment "NTP Pool Servers" -j ACCEPT
iptables -A GENERAL-ALLOW -s $POOL_NTP_3/32 -p udp -m udp --sport 123 -m comment --comment "NTP Pool Servers" -j ACCEPT
Allow ping and traffic over the loopback interface:
iptables -A GENERAL-ALLOW -p icmp -j ACCEPT
iptables -A GENERAL-ALLOW -i lo -j ACCEPT
All the rules above will satisfy everything needed regarding the basic firewall on the Debian server, so all other traffic can be rejected:
iptables -A REJECT-ALL -p tcp -j REJECT --reject-with tcp-reset
iptables -A REJECT-ALL -p udp -j REJECT --reject-with icmp-port-unreachable
iptables -A REJECT-ALL -p icmp -j DROP
As a last step here, please install the iptables-persistent package, which will save and automatically load firewall rules on the reboot:
aptitude install -R -y iptables-persistentYou will be asked whether you want to save current IPv4 and IPv6 rules, so please select Yes. Following the same logic, later on, you can, for example, create the SERVICES iptables chain and save all services-related firewall rules in that chain (i.e., MySQL, Apache, Nginx, and so on). Just remember to save your newly added rules with iptables-persistent. You can do it by executing the following:
iptables-save > /etc/iptables/rules.v4
ip6tables-save > /etc/iptables/rules.v6
Finishing Touches
Once you have completed all the steps above, your server is ready to accept the software and services you require. The steps described in this section are optional; whether you want them is up to you. Nevertheless, I recommend you at least read about them.
Vim Editor
There are a lot of editors you can use on your Debian server, and I like Vim. Vim allows users to set a configuration file (per user), where various options like tab spaces, indentation, highlighting, and others can be set. I like to set a location for backup files and a few tab space related options.
I like the option of having a backup of the original file while I’m editing that same file. For that, I need to create a directory for such backup files:
mkdir -p /root/.vim/savesNow I can add a Vim configuration environment file for my root user:
cat <<-EOF > /root/.vimrc
set tabstop=4
set softtabstop=4
set expandtab
set shiftwidth=4
set backupdir=~/.vim/saves/
set mousemodel=popup
syntax on
EOF
Vim has many configuration options you can set, and you can check them all out in the official documentation.
Custom .bashrc
By default, Debian runs Bash shell, and Bash will run the .bashrc script every time it is started interactively. You can think of the .bashrc file as a configuration file for your interactive shell. You can set in it how your prompt will look, history settings, colorization settings, aliases, and many more.
Since the default .bashrc file supplied with Debian has very few options, and potential options vary from user to user (or, better say, system to system), a whole new guide would be required to cover the topic. That said, you can explore the topic on Google, or you can check my example in the GitHub repository for the script, which automatizes everything we did in this guide (more on that later).
Changes Log
Since this is a server environment, there is a possibility that more than one user will be able to log in to your server. To make them all “behave” and not mess up your nice server, some ground rules must be communicated to them all.
Now, Debian (and other Debian-based distros) has a nice “service” called motd (message of the day). It is using pam_motd to print system and user-generated messages on every login:

In the example above, you can see the default system motd specific to each Debian installation, showing you some general information. You can add your message here (user-generated motd), which will be displayed to all other users accessing your server. To do so, generate a file in the /etc/update-motd.d directory. For example, you can open a new file /etc/update-motd.d/20-changes-log, and paste in the following content:
printf "\n"
echo "$(tput -T xterm setaf 2)--- $(hostname)$(tput -T xterm sgr0) $(tput -T xterm setaf 1)**GENERAL**$(tput -T xterm sgr0) $(tput -T xterm setaf 2)changes log --- $(tput -T xterm sgr0)"
printf "\n"
echo "$(tput -T xterm setaf 2) * Please append this file ($(tput -T xterm sgr0) $(tput -T xterm setaf 1)/etc/update-motd.d/20-asset-log$(tput -T xterm sgr0) $(tput -T xterm setaf 2)) for any system changes made. $(tput -T xterm sgr0)"
echo "$(tput -T xterm setaf 2) * Please run$(tput -T xterm sgr0) $(tput -T xterm setaf 1)iptables-persistent$(tput -T xterm sgr0) $(tput -T xterm setaf 2)if doing any changes to firewall. $(tput -T xterm sgr0)"
echo "$(tput -T xterm setaf 2) * Please add any new custom service/system script in /usr/local/sbin. This is mandatory! $(tput -T xterm sgr0)"
echo "$(tput -T xterm setaf 2) * Please set up log rotation (if required) for any new custom service/system script. This is also mandatory! $(tput -T xterm sgr0)"
printf "\n"
echo "$(tput -T xterm setaf 2)--- $(hostname)$(tput -T xterm sgr0) $(tput -T xterm setaf 1)**GENERAL**$(tput -T xterm sgr0) $(tput -T xterm setaf 2)changes log end --- $(tput -T xterm sgr0)"
printf "\n"
Save and exit the file and make it executable:
chmod 755 /etc/update-motd.d/20-changes-logFrom now on, the following motd will be displayed on every login and to every user:
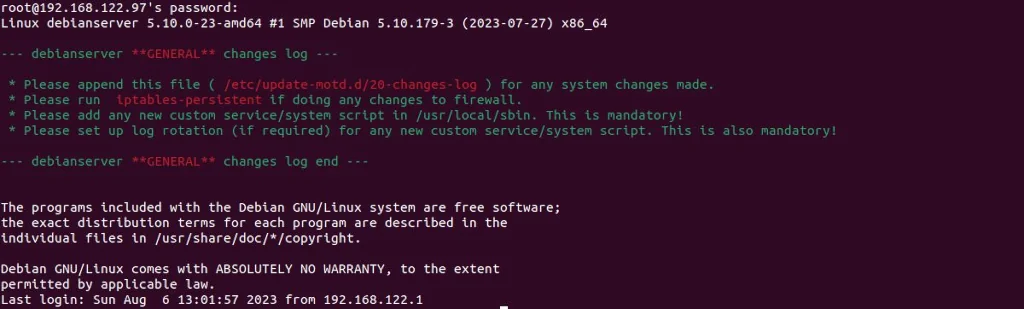
Post-install Cleanup
As a final step, you can do a little cleanup (if there is anything to clean) and reboot your server to apply all the changes:
apt autoremove -y
aptitude clean
aptitude autoclean
shutdown -r now
Debian Server Initial Customization – Fully Automated
As a bonus, I will provide you with a Bash script that will automatically do all the steps from above. You can find the script, its resources, and instructions on how to use it in my GitLab repository:
And this is it. Your Debian server is now ready for any service you require it to run. Thank you for reading, and please feel free to leave a comment.